Sunday, November 8, 2015

Gokano: collect points easily and receive free rewards with UNLIMITED TRICK to EARN UNLIMITED FREE REWARDS !!

Hi everyone! We are back with another unlimited loot post! By following the below steps you can earn Unlimited Rewards from Gokano.


Gokano is a website which gives free reward for opening account daily and referring to people. It is an easy way to earn reward as it is not some creepy app which should be downloaded but is a web based rewarding system.You simply have to collect Gokano points to get free rewards.

How to get started with Gokano :-
  1. Simply Visit Here - Click Here
  2. Register a new account > Enter Name / Password / Email / Mobile / Shirt Size.
  3. Verify you are a Human and Agree their Terms to Register.

  4. Once Registered > Verify your Email address.
  5. Click on “Collect Daily Point” to Get 1 Point for daily Visits.
  6. Now Click on “Mission” and Complete Simple Mission to Get 1 More Point.
  7. Now Click on “Invite Friend” and Copy Your Referral Link.
  8. Share that Referral link with your friends to get more conversions.
  9. You’ll Get 1 Point For Every Friend Registers Through Your Link.
  10. Standard members earn 1 point for each of the actions above, while Gold members earn double the points! To receive the Gold rank (and get a free t-shirt along with it) you just need to invite 30 people! See proof at the bottom of this thread.
Prizes:
Gifts are divided in 3 categories: Gadgets, Electronics and Accessories.

Here's a screenshot of some of the Electronics prizes:


Prizes aren't always available, you need to wait for the restocks to order them!

Shipping:
Gokano is based in Poland (Europe) but they ship prizes to any country worldwide completely for free!
Prizes are shipped within 28 working days from order's date.

UNLIMITED TRICK:

  • Copy your Referral Link or note it down somewhere.
  • Paste your referral link and click on surf.
  • Now you will get redirected to the registration page.
  • Register a new account with a new email address and phone number and click register.
  • Now verify your email and you will reach to the dashboard.
  • Now log out of your account and open your old account.
  • And hurray! You will get your reward point in account.
  • Repeat the above step again with new email and phone number to get Unlimited Points.

Rewards :-


Gokano has three types of Reward Categories - Gadgets / Electronics / Accesories
  • Fountain Pen - 15 GN Points.
  • 16 GB Pendrive - 30 GN Points.
  • Sony Headphones - 60 GN Points.
  • Selfie Stick - 60 GN Points.
  • iPod Shuffle - 150 GN Points.
  • Casio Retro Watch - 150 GN Points.
  • Moto 360 Smart Watch - 550 GN Points.
  • Play Station 4 - 900 GN Points.
  • Apple iPhone 6 - 1500 GN Points.
  • MacBook Air - 2000 GN Points.
I already got my prize!

What are you waiting for? Sign up now!

Posted on 10:23 PM | Categories:

Monday, June 22, 2015

OPPO Mobile PC Suite USB Drivers for Windows Download


OPPO Mobile PC Suite USB Drivers for Windows Download


OPPO Mobile PC Suite for Windows : OPPO is a Chinese Electronics Manufacturing company founded in 2004 with its headquarters located at Dongguan, Guangdong province, China. OPPO Electronics major product line up includes MP3 Players, Portable Media Players, Car Accessories and Smartphones. OPPO entered the mobile market in 2008 but has recently started to gain reputation worldwide with the launch of sophisticated feature packed high end smartphone’s at affordable prices. OPPO Smartphone’s can now be easily bought online and are also available on leading mobile showrooms.


Also the launch of OPPO smartphone’s in India has received a satisfactory response from the Indian audience and is expected to grow its market further more in the upcoming years. Therefore considering the Increasing popularity and availability of OPPO smartphone’s among the users across the world here I am going to share OPPO Mobile PC Suite along with OPPO Mobile USB Drivers for your Windows based PC, Computer or Laptop. Download OPPO Mobile PC Suite for Windows.


Download OPPO Mobile PC Suite


Download OPPO Mobile PC Suite USB Drivers for Windows : Steps to Follow


As of now OPPO doesn’t have any official PC suite of its own but yeah you can use alternative android phone manager suites for managing or syncing your phone with your system. One such popular Android Phone Manager available for free is Mobogenie PC Suite. Mobogenie has all the basic functionalities that a usual mobile PC Suite offers like phone contacts management, SMS contacts, Data Backup, Internet connectivity etc. You can simplify the way you use your phone via Mobogenie mobile phone manager. Mobogenie is fully compatible with Microsoft Windows 10, Windows 8.1, Windows 8, Windows 7 and Windows XP. So Download OPPO Mobile PC Suite for Windows from below.


Supported OPPO Mobile Phones :


OPPO Joy PC Suite, OPPO Neo PC Suite, OPPO Neo 3 PC Suite, OPPO Find 5 PC Suite, OPPO Neo 5 PC Suite, OPPO Yoyo PC Suite, OPPO Mirror 3 PC Suite, OPPO R1K PC Suite, OPPO R1L PC Suite, OPPO R1 PC Suite, OPPO R3 PC Suite, OPPO Find 5 PC Suite, OPPO Find 5 mini PC Suite,  OPPO N1 PC Suite, OPPO N1 mini PC Suite, OPPO Find 7 PC Suite, OPPO Find 7a PC Suite, OPPO Joy 3 PC Suite, OPPO Joy plus PC Suite, OPPO R7 PC Suite, OPPO Neo 5 PC Suite, OPPO Neo 5s PC Suite, OPPO R1x PC Suite, OPPO R5 PC Suite, OPPO R7 Plus PC Suite


The post OPPO Mobile PC Suite USB Drivers for Windows Download appeared first on RushInformation.


Posted on 11:15 AM | Categories:

Saturday, June 20, 2015

How to Speed Up Logging Into Windows


How to Speed Up Logging Into Windows


Even with fast hardware and the newest operating system, logging into Windows can become painfully slow if there are a lot of programs that startup when Windows starts up. Note that I am not talking about how long it takes to boot Windows because that is a completely different beast.


I’ve already written previously on speeding up Windows boot times, speeding up Windows 7 and speeding up Windows 8. Just reading those articles will help you speed up Windows guaranteed. One common theme you’ll see in those articles is managing startup items.


As mentioned before, your Windows 8 or Windows 10 machine might be able to boot up in 10 seconds, but once you type in your password to login, it could take more than a minute to get to a fully functional desktop because of startup programs. I’ve already written a detailed article on how to disable startup programs in Windows 7 and higher, which you should read first.


However, there are situations where you simply can’t disable everything. Maybe you working in a corporate environment and are required to have certain programs startup when you login. If you’re a business owner or professional, you might have certain business applications that you want to start up when you login.


In this type of case, you need something different. One interesting solution to this problem is to delay the loading of the startup programs by the few minutes after you login. In this article, I’m going to talk about a program called Startup Delayer, which does exactly that.


Startup Delayer


Once you download and install the program, it will show you a dialog the first time you run the program. Here you have to choose how you want Startup Delayer to behave.


startup delayer behavior


Note that you can change whatever settings you picked here later on in the program settings. The dialog has a slider where the far left means you want your programs to load as fast as possible and you don’t mind your computer running slow or sluggish. There really isn’t any point to using this application if you choose the far left because all the programs loading immediately is what’s happening by default when you log into Windows.


As you move the slider to the right, you’ll see it’s pretty much the same except for the CPU and Disk Idle values. By default, its set to 30%, which means the program will wait till your computer is at least 30% idle before launching the delayed applications you have chosen.


Moving to the far right means your delayed applications will start later, but smoother. You might have to wait a minute or so before the application will launch. Startup Delayer manages all of this and will automatically launch the applications when the desired idle value is reached.


Once you click Save, you’ll get to the main program interface. Here you will see 3 tabs across the top: Startup Applications, Running Tasks and System Services. As the name of the first tab implies, any startup applications that start with Windows will be listed here.


startup delayer gui


The startup items are broken down into three different categories: Delayed, Normal Startup and Disabled. You can simply drag and drop the items to the section you like. To delay an application, just drag it from Normal Startup to Delayed like shown below.


delayed startup items


The first item you drag and drop will be given the first priority when loading. As you add more items, they will be added to the queue. When Startup Delayer loads the programs, it will launch then in the order listed. You can change the order of the items by dragging and dropping the items.


When you select an item, you will see that Automatic Delay is selected and the default values for CPU and DISK idle are listed. You can change the idle values for each application individually if you like also by simply selecting the item and typing in new values.


If you double-click on any of the delayed applications, you can configure the advanced settings. The General tab lets you edit the target in case you want to add any command line parameters to the program.


launch details


On the Delay tab, you can again edit the idle values or choose to do a Manual Delay if you like, but the program developers don’t recommend using manual delays.


delayed program wait


On the Wait tab, you can check a box to ensure that the application has completed loaded before Startup Delayer continues loading other applications. You can also set it so that Startup Delayer will wait until the current program is terminated or a user gives confirmation before launching the next application.


delayed program advanced


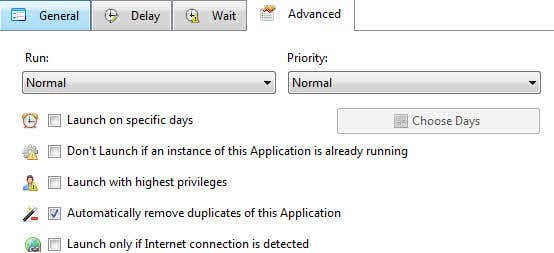
On the Advanced tab, you can configure options so that the program launches on certain days only, doesn’t launch if another instance is already running, or launches if an Internet connection is detected. This option can be useful in certain situations. For example, do you really need Skype to launch if there is no Internet connection?


Finally, going back to the main screen, you can click on the green Add New button to add a program that is not already listed. This can be really useful for things like launching a web browser or a MS Office application or any other program that may not automatically startup when logging into Windows.


The Running Tasks lists out all of the current processes running on the system. Again, if something is not listed in the main tab, you can go to Running Tasks, select a process and then click the small round plus button. I would be very careful about adding anything from here to the delayed section because many of the processes listed are Windows processes.


Luckily, they have a filter that lets you hide all the Microsoft processes so that you see only processes created by third-party programs. Just click on the Filter button and then click Hide all created by Microsoft.


hide microsoft processes


The last tab is System Services, which lets you stop, start and disable Windows services, but for the purposes of this article, you should just leave it alone unless you know what you are doing.


Before we get into whether this program actually works well or not, there are a couple of other small items to mention. Firstly, you can click on the Options button at the top right of the main interface to change how the program behaves. I personally haven’t had to mess around with any settings here, but if you want more information during the login process, you can click on the Launch Process tab and select Show always during Startup and check the Show Launch Process Window on Startup.


launch options


By default, the program keeps itself very well hidden and only pops up during the login process if something goes wrong. Otherwise, you won’t even know anything is going on. What’s nice about the program is that it has a plethora of options so you can see more info if you like.


Secondly, you can click on the Tools button to do even more stuff like create startup profiles, view the last launch log, view the last performance graph, create a backup of all your settings, etc.


startup delayer tools


Performance Results


So does this program really work? Well, when I tried it out back in 2008, it didn’t work all that well. Back then, it simply did a manual delay, which didn’t work very well. However, in the ensuing years, the program has gotten a lot more advanced and in my tests on Windows 7, it made a significant difference in the user experience.


Instead of sitting around waiting for the desktop to become clickable or waiting for the Start menu to appear after clicking on it 10 times, Startup Delayer can make everything seem snappy. You obviously have to wait a bit longer for some programs to load up, but I have never once felt I needed one of those startup programs to load immediately after logging in.


It’s also worth noting that the program becomes more useful if you have a larger number of startup items. If you only have a couple of things loading up on startup, it’s probably not going to make a major difference. Let us know if the program helped on your system or not. Enjoy!


The post How to Speed Up Logging Into Windows appeared first on Online Tech Tips.


Posted on 2:30 PM | Categories:

Friday, June 19, 2015

How to Combine Multiple PowerPoint Presentations


How to Combine Multiple PowerPoint Presentations


Do you have multiple PowerPoint presentations that you need to combine or merge into one presentation? I’ve had to do this myself a couple of times and one of the most important aspects when merging presentations is whether you want to maintain the format and theme of the inserted presentation or have it match the theme of the main presentation. The second most important factor is whether you need to maintain any animations and transitions that might be included in the inserted presentation.


Depending on how you want the inserted slides to appear in the main presentation, you will need to choose between two different methods for joining the presentations. In this article, I’ll mention both methods along with the advantages and disadvantages for each method.


The first method uses the Reuse Slides option in PowerPoint and the second method uses the Insert Object option.


Reuse Slides Method


If you want the inserted slides to match the theme of your main presentation, then you have to use the Reuse Slides option. The inserted slides will simply take the slides exactly as they are in the external presentation and add them to the main presentation.


However, there is one big caveat: none of the animations or transitions will be carried over. Whatever you see on the slide in the normal viewing mode is what will get imported into the main presentation.


If you need to maintain all the animations or transitions, then skip down to the Insert Object method.


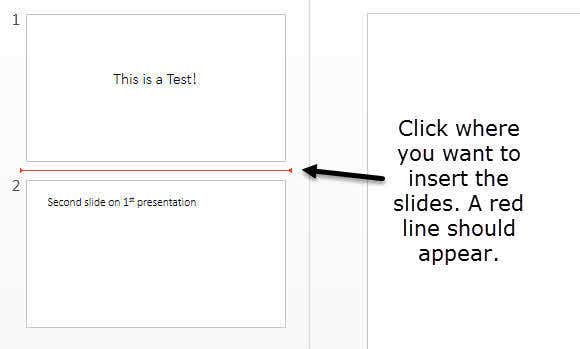
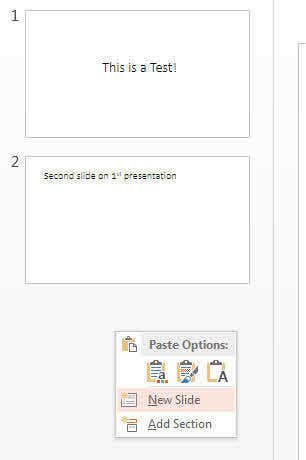
To get started with this method, open the main presentation and then click between the two slides you want to import the slides into. It’s worth nothing that this method also lets you pick and choose which slides you want to insert from an external presentation, whereas the Insert Object method will insert the entire presentation.


insert slide


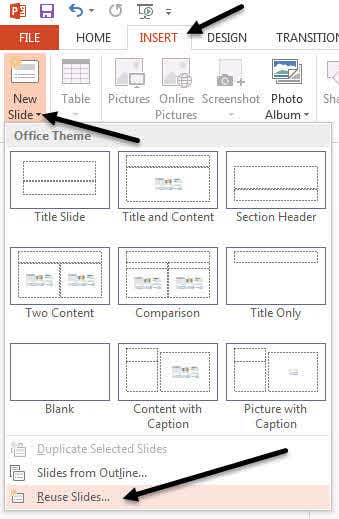
Now click on the Insert menu and then click on the words New Slide and you’ll see a menu appear. At the very bottom of that menu is an option called Reuse Slides.


reuse slides


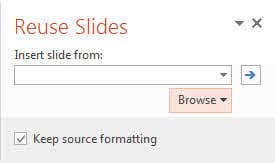
When you click on that, a tab will appear on the right hand side. Click on the Browse button and then select Browse File. Check the Keep source formatting box if you want keep the theme and text formatting of the external presentation.


If you uncheck that box, then when you go to insert the slides into the main presentation, the original formatting will not be kept. Instead the slides will use the theme and formatting of the main presentation.


insert slide from


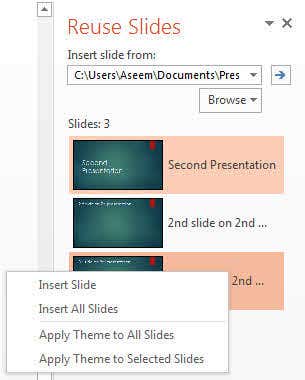
Select the PowerPoint Presentation you want to insert and then click OK. Immediately, you should see a small thumbnail and the title of each slide displayed.


insert slides from ppt


As you can see above, the second presentation has a different theme than my first presentation. There are a number of things you can do at this point. Firstly, if you just want to insert one slide or a couple of slides from your external presentation, simply click on the slide and it will be inserted!


The formatting will depend on whether you checked the Keep source formatting box like I explained above. As shown below, I inserted just one slide from the external presentation and kept the source formatting.


powerpoint inserted slides


It will be inserted wherever you had clicked earlier with the red line. If you want to insert all the slides, just select the Insert All Slides option that comes up when you right-click on any of the slides.


Lastly, you can apply the theme used in the external presentation to your main presentation by right-clicking and choosing Apply Theme to All Slides. This will apply the external presentation theme to the main presentation.


As mentioned earlier, you lose all animations, effects, transitions, etc when using this method. Now let’s talk about the other way to merge two presentations.


Insert Object Method


The second method will insert the entire external presentation into one slide as an object. You then have to configure some settings so that when you run your slideshow, it also runs through all the slides in the external presentation.


There are a couple of things that need to be mentioned before we get into how to use this method:


1. When you insert the presentation as an object, it is not a link to the presentation, but an actual full copy into the main presentation. This means that if you open the external presentation later after inserting it into the main presentation and make changes to it, those changes will not be reflected in the imported version inside the main presentation.


2. If you do want to make changes to an already inserted presentation, you can edit it inside the main presentation. Again, those changes are only made to the version inside the main presentation.


In my opinion, this method is better than the Reuse Slides method because it lets you keep all your animations and transitions and it allows you to change or keep the theme of the inserted presentation.


To get started, open the main presentation and then insert a new slide. Make sure to delete any default text boxes or anything else on the new slide so that it is completely blank.


add new slide


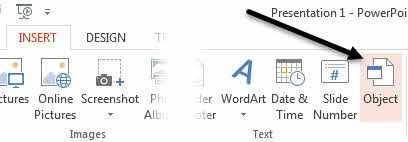
Now click on the Insert tab and then click on Object.


insert object into slide


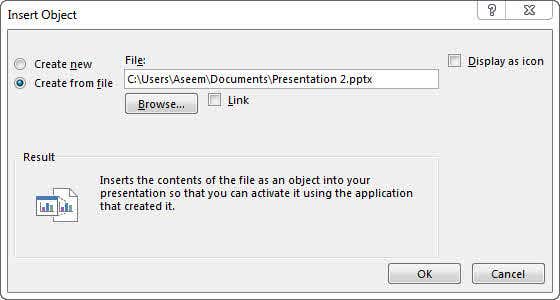
Select the Create from file radio button and click the Browse button. Select the external presentation you want to insert into your main presentation.


insert 2nd powerpoint


You’ll now see the first slide of the presentation inserted as a selectable object. All of the other slides are there, but you just can’t see them.


stretch window to slide


The next step is to move your cursor to the upper left corner of the inserted object until it turns into a double sided arrow. Click and then drag the corner to the upper left corner of the main slide. Now do the same thing with the bottom right corner of the object and drag it to the bottom right corner on the main slide.


Now the inserted object should be the exact same size as the slide that it was inserted onto. You want to do this so that there won’t be any change in the size of the slides when you are playing the presentation.


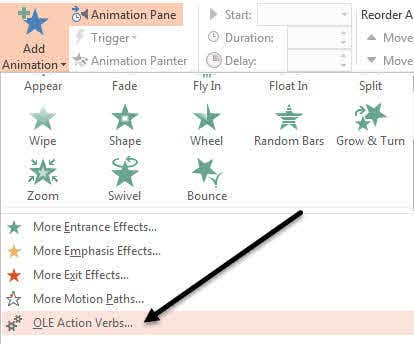
Once that is setup, we have to configure the second presentation to play when we hit that slide that we inserted the presentation into. To do this, select the object, click on the Animations ribbon, click on Add Animation and then scroll all the way to the bottom where it says OLE Action Verbs.


ole action verbs


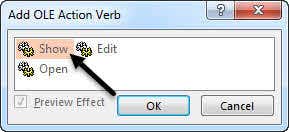
Another dialog will pop up and you want to choose Show. If you were to play the presentation at this point, you would notice that when you reach the slide with the inserted presentation, it will show all the slides in the inserted presentation, but it will also include a still slide of the first slide at the front and back of the inserted presentation.


add show action verb


This was kind of annoying to me and luckily you can almost get rid of it. First, click on Animations again and then click on Animation Pane, which will show up at the right.


animation pane


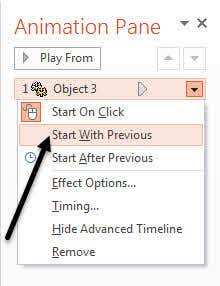
In the Animation Pane, you will see the inserted object listed as Object 1 or Object 2, etc. and when you select it, there will be a small black arrow you can click on. This will bring up a few options and then first one you want to select is Start With Previous.


start with previous


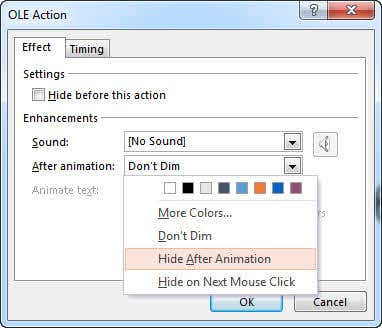
Now when you play the presentation, it won’t show you that still image of the first slide but will actually play the first slide from the external presentation. To get rid of the still image at the end of the presentation, you have to select Effect Options from the menu above and then select Hide After Animation from the After animation dropdown box.


hide after animation


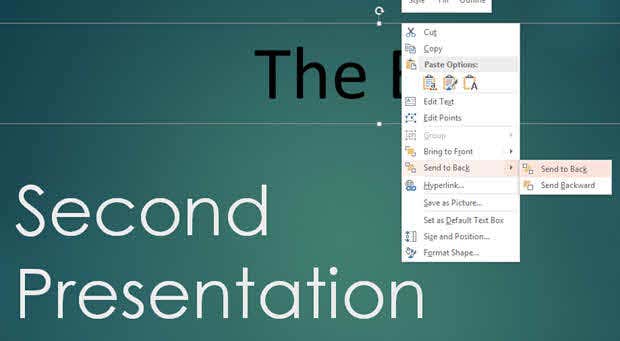
It’s not perfect because it still shows you the empty slide that the inserted presentation was put once before the presentation ends. Luckily, I found a simple hack for this too that works really well. Simply add something to the slide that has the external presentation object like a text box or whatever you like and then right-click on the object and choose Send to Back.


send to back


This will effectively hide the object behind the presentation object. Now when you play your presentation, it will hide the presentation object after the last slide because that is what we chose in the After animation option. When the presentation object is hidden, you’ll see any content that was hidden under it. It’s a great way to avoid having that blank slide show up during the presentation.


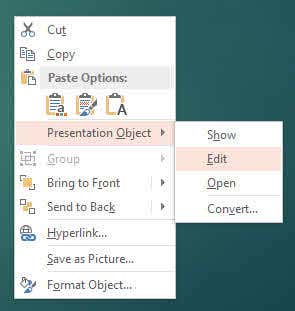
One last thing I wanted to mention was about editing the inserted presentation. You can right-click anywhere on the object and choose Presentation Object – Edit to edit any slide in the inserted presentation directly within the main presentation.


edit presentation


Hopefully, this was a detailed enough tutorial for anyone wanting to merge, combine or insert one PowerPoint presentation into another. If you have any questions, feel free to comment. Enjoy!


The post How to Combine Multiple PowerPoint Presentations appeared first on Online Tech Tips.


Posted on 5:30 PM | Categories:

Wednesday, June 17, 2015

The Best Free Defrag Tool for Windows is Itself


The Best Free Defrag Tool for Windows is Itself


Back in the days, defragging your PC was something everyone did on a regular basis, even if you had no clue what you were doing. What everyone did know was that it somehow made the computer run faster.


I’ve written many articles in the past about defragmenting your hard drive, the boot sector, the paging file and even the registry. During the days of Windows XP, defragging was necessary and it made a significant difference in performance.


Over time, many companies started selling third party defragging tools that supposedly did the job faster, better and more accurately. Some were actually fairly good, but most pretty much did the same thing as the built-in Windows defragment tool or even worse. It wasn’t surprising to run a third-party defrag tool and have your computer actually run slower than before.


Third Party Defrag Scenarios


The only time I have actually seen a reason to recommend a third-party defrag tool to anyone was if the person had a complex setup on their PC with different types of data stored in different locations. For example, if you have four different hard drives installed on your PC, each containing different types of data like music, videos, operating system files, etc, then a third-party tool can let you defrag each drive in a different way.


If one drive has a lot of small files that are accessed often, you could use a third-party tool to defragment that drive so that the files are sorted by the last accessed time or creation time. For a drive that has a bunch of large music or video files that don’t get accessed very often, you could sort them on the disk by folder size or file size.


You could even defragment only certain files or folders instead of the entire drive if you wanted. Obviously, as you can see, this is really only useful for certain specific scenarios and the time and effort spent doing all of this may not even yield any dramatic results.


The only other scenario where a third-party defrag tool worked well was with a client who had a hard drive that was almost full. I was able to use a third-party tool to move all the data to the beginning of the disk. This freed up some extra space and helped speed up the PC a bit.


Windows Built-In Defrag Is The Best


For 99% of the people reading this article, the built-in disk defragmenter tool in Windows is perfect for keeping your hard drive running smoothly.


A bunch of people have actually gone through the trouble of testing out a lot of different defragment tools like Defraggler, MyDefrag, etc and have found that in Windows 7 and above, they don’t speed up read or write access to data on the hard drive by any noticeable amount.


This is because hard drives nowadays are much larger and therefore have a lot more free space. With the extra space, Windows doesn’t have to fragment your files as much.


In addition to larger hard drives, modern machines and hard drives can access data much faster than earlier. So even if you have a partially fragmented hard drive, it most likely won’t even make any difference in how fast the data can be accessed. Only if you have a very fragmented hard drive will you start seeing some slowdowns, but this is virtually impossible because of the built-in Windows defragmenter.


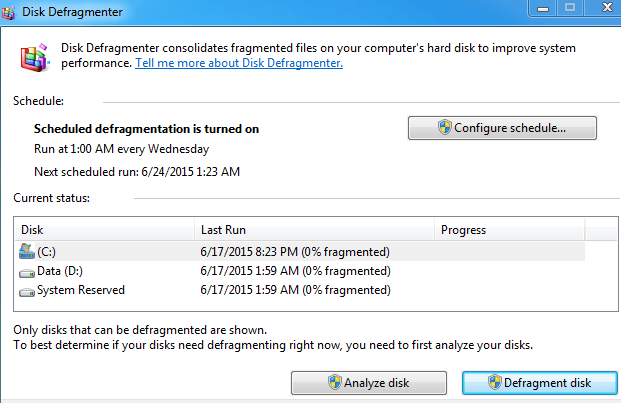
In Windows 7, it’s called Disk Defragmenter and in Windows 8 and higher, it’s now called Optimize Drives. By default, it’s scheduled to run once a week, which pretty much keeps all your drives near 0% fragmentation. Here’s my Windows 7 PC after 2 years of use without ever manually running a defrag.


disk defragmenter


I’ve already written a detailed post about Optimize Drives and Disk Defragmenter in Windows 8 and Windows 7, so feel free to check that out if you want more info.


SSDs Don’t Need Defragmenting


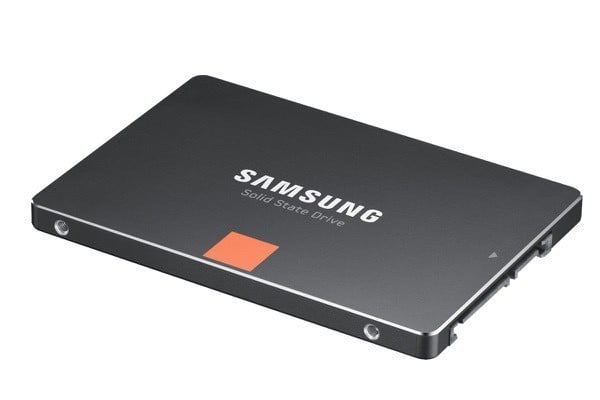
Lastly, even the days of automatic defragmentation are dying because of SSDs (solid state disks). An SSD doesn’t read and write data like a traditional hard drive and doesn’t need to be defragged. Actually, Windows will automatically disable disk defragmentation on a solid state hard drive because defragging can reduce the life of an SSD.


samsung ssd


If you are looking for truly significant performance gains when reading and writing data, then you should upgrade to an SSD. Even the cheapest and slowest SSDs are many times faster than traditional spinning hard drives.


On my Windows 7 machine, the boot time went from over 40 seconds to under 5 seconds when I switched from a 7200 RPM hard drive to a 256 GB Samsung SSD. SSDs are usually much smaller in size due to their higher cost, but just loading the operating system onto an SSD can make a huge difference, even if you store all your other data on a separate slower spinning hard drive.


Conclusion


Hopefully, everything I said above made sense, but if not, here’s the takeaway. If you are running Windows XP on an older machine, you really should upgrade. If you can’t, then manually run the built-in disk defragmenter. If you are running Windows Vista or higher, there is nothing you have to do becauseWindows will automatically defragment any traditional hard drives and will exclude SSDs.


If you’re a tech geek and want to squeeze every last ounce of juice from your PC, then install a reputable third-party defrag tool and configure it to your liking. Otherwise, relax and enjoy your already optimized hard drive. Another good way to speed up a PC that is better than defragmenting is uninstalling unused or junk software. Enjoy!


The post The Best Free Defrag Tool for Windows is Itself appeared first on Online Tech Tips.


Posted on 7:30 PM | Categories:

Fix Windows Phone Downloading Application Error 8000ffff


Fix Windows Phone Downloading Application Error 8000ffff


If you are a Windows Phone user then you might have come across downloading application error code 8000ffff while you trying to download apps from the Windows Phone store or when you try to restore your Windows Phone using a backup you face issue for some of the installed apps. What worse is that your apps list will show several invalid entries. Now, in case you are facing the same error, here is how to fix Windows phone downloading application error 8000ffff in Windows Phone.


Fix Windows Phone downloading application error 8000ffff


How to Fix Windows Phone downloading application error 8000ffff : Best Fixes


Well before we proceed on discussing various measures or solutions that need to be applied in order to fix Windows Phone downloading application error 8000ffff it is important to understand what are the possible suspected reasons for facing such irritating errors.


What causes Windows Phone downloading application error 8000ffff?


This is a question one needs to figure out by themselves as the error code hardly gives any hint about the error.  However, there are several reasons why the downloading application error code 8000ffff would appear on your Windows Phone.


  • The downloading application error code 8000ffff can occur if Apps are not compatible with your Windows Phone version: That’s right! If you have recently upgraded your Windows Phone version then some apps may no support that version and you will eventually end up with error code 8000ffff. Even if you change your device to some other OEM then also this error can occur, because few exclusive apps will not be supported by other OEMs. For example if you are using Nokia Lumia device and trying to switch to HTC Windows Phone device then this error could occur because Nokia Exclusive apps will not be supported by HTC Device.


  • The downloading application error code 8000ffff can occur because of different region: One thing you need to make sure that while you try to restore the back up, your region is set to what it was while taking the backup. Because some apps are region restricted, hence will show error if region in your device has been set to something else.


  • The downloading application error code 8000ffff can occur if the developer changes App identification number or remove the app from the store: Now suppose that you had an app installed on your old device, but later the developer remove the apps or publishes the app again with different identification number. Now while restoring the back up you will get the error because the app in the store and the app in your device does not match resulting in migration failure.


How to Fix Downloading Application error 8000ffff : Best Fixes


Now that you know what could cause downloading application error code 8000ffff in Windows Phone device, here is how you can fix this error.


Method 1: Set Region Before your Try to Restore


The best thing you could do to avoid this error because of region related issue is that you set your region on your Windows Phone to what it was before you proceed with the restoring process. This would make sure that the restoration process is smooth without any error.


Method 2: Remove Every Invalid Entry Manually from the App List


As I said earlier because of this error your app list will be filled with invalid entries. Now what you can do to fix this error is that remove each invalid entry manually. To do this go to Start screen, swipe left to view the app list. Now press and hold every invalid entry one after another and select Uninstall from the option.


Method 3: Cancel Failed Downloads from Store


If you don’t see an option to Uninstall the invalid entry, then you can try to cancel the failed download from the store. To do this, go to Store app, you should see all the failed download listed there. Now tap on failing download and then on Cancel Download.  Do this for each and every failed download app.


The post Fix Windows Phone Downloading Application Error 8000ffff appeared first on RushInformation.


Posted on 1:45 PM | Categories:

Tuesday, June 16, 2015

Best Download Manager for Mac OS X 2015 : Latest


Best Download Manager for Mac OS X 2015 : Latest


Best Download Manager for Mac OS X 2015 : If you have been on Windows before switching to Mac OS X, you might have known the king of download manager known as Internet Download Manager for Windows. Undoubtedly, Internet Download Manager is still the best download manager you can get for Windows PC. However, now that you have switched to Mac, you might be looking for a best download manager for Mac OS X.


Best Download Manager for Mac OS X 2015


Mac OS X users now have number of software among which you can find the best download manager for your OS X running Mac. Although, there are number of choices, still you will be missing Internet Download Manager from PC on your Mac, as it is only restricted to Windows running machines. However, there are many good download manager apps for OS X Mac with some great features. Check out our list of best download manager for Mac OS X in 2015.


Best Download Manager for Mac OS X 2015 : Top Download Managers


1 – Folx Pro and Folx + – Best Download Manager for Mac


Folx Pro and Folx + are the 2 version of Folx, a download manager for Mac OS X.  The Folx + is a free version of the download manager  with limited features whereas Folx Pro is the premium version of the same with more features.  The Folx + comes with features like high-speed downloading, split the downloads in two threads, auto resuming and automatic catching of downloads. Where as the Folx Pro comes with all the basic features + splitting of downloads in up to ten threads, scheduling the downloads, integration with iTunes, Speed control, search for torrents directly from the application and YouTube video download support.


Folx + and Folx Pro Download Manager for Mac


2. Leech – Download Manager for Mac


Leech is a light wights download manager for Mac and comes with premium and trial version in case you wanna try before buying it. The Reveal feature allows you to double-click an active download to reveal it in the finder. The Retry All feature is contextual menu entry for fast retires, easy update allows you update your software directly in future, Pause and Resume feature allows you to resume or pause your download anytime. It also comes with Keychain Support feature which allows to download by saving password in Leech and skip password authentication.


Leech download manager for mac


3 – iGetter – Download Manager for Mac


iGetter is one of the most popular Download manager for Mac OS X. It offers high-speed download by using segment download for boosting up the download speed. Auto Resume feature allows you to resume your download in case of connection failure and more.


igetter Download manager for Mac


4 – JDownloader


If you are looking for a completely free download manager for your Mac then JDwonloader is a must have utility for you. It has very easy to use and simple user interface. Other features in the app includes, Resume and Pause feature allowing the users to Resume their download without worrying about connection failure. You can also set bandwidth limit for internet connection. It also comes with automatic archiving and extracting of files.


So these are our choice for best download manager for Mac OS X 2015. Do try them out and let us know in the comments below.


The post Best Download Manager for Mac OS X 2015 : Latest appeared first on RushInformation.


Posted on 10:45 AM | Categories: