Friday, April 24, 2015

Asus Zenfone 2 Review, Price, Specifications, Features


Asus Zenfone 2 Review, Price, Specifications, Features


Asus has announced a strong comeback in Indian mobile market with the launch of Asus Zenfone 2 series smartphones which are now officially available for pre-order exclusively from Flipkart online retail store and are expected to be released soon starting from the first week of May 2015. Asus first unveiled about Asus Zenfone 2 earlier in January at CES 2015 which was held in Las Vegas as a result of which Asus has finally launched three variants of Asus Zenfone 2 in an event on Thursday. These three variants are priced from Rs 12,999 to Rs 22,999.


The three variants of Asus Zenfone 2 comes under Asus Zenfone 2 ZE551ML tag differing from each other in terms of specifications, technical features and pricing. All these three variants of Asus Zenfone 2 runs on latest Google Android 5.0 lollipop with Asus ZenUI on the top and features Intel Atom SoCs along with a 5.5 inches display screen. Asus Zenfone 2 ZE551ML with 4GB of RAM and 64GB of Internal storage memory features a powerful 64-bit 2.3GHz quad-core Intel Atom Z3580 processor. This 4GB variant sports an amazing 5.5 inches Full HD Display screen and will be available at price tag of Rs 22,999 with a tentative release date of May 13. Another variant with half the Internal storage i.e 32GB ROM and rest of the specifications same as that of the top variant that is mentioned above will be available for Rs 19,999.


Asus Zenfone 2 Review


Another variant of Asus Zenfone 2 ZE551ML comes with 2GB of RAM and 16GB of Internal storage sporting a 5.5 inches Full HD Display screen priced at Rs 14,999 whereas Asus Zenfone 2 ZE550ML with same specifications as that of Asus Zenfone 2 ZE551ML 2GB RAM variant except for a 5.5 inches HD display comes for a price tag of Rs 12,999 only. Both of these two smartphone’s are powered by 1.8GHz quad-core Intel Z3560 processor. As per the sources these two devices are now available for pre-order and will be released around 4th May 2015.


Apart from these differing technical specifications and features all of them are Dual-SIM devices featuring 4G Connectivity. On the camera front all of them sports a 13 MP rear camera along with a 5 MP front facing camera with dual-tone flash feature.


Overall Asus Zenfone 2 smartphone’s looks really great considering their specifications and a very competitive price and will surely be a more than challenger for the popular One Plus One smartphone taking an edge with 4GB of RAM at the same price.


The post Asus Zenfone 2 Review, Price, Specifications, Features appeared first on RushInformation.


Posted on 11:15 AM | Categories:

Thursday, April 23, 2015

Dead Target for PC Download Windows | Dead Target APK


Dead Target for PC Download Windows | Dead Target APK


Dead Target is basically an FPS (First Person Shooter) game where you along with agent M will play the role of sole survivors in their route to reinforcement location in the city that has been infected with zombies and dead walkers. The story of dead target revolves around 2040 where World War III has happened where the whole country frontier changed transformed into a new era after  where Minister of Defense signed a contract with CS Corporation to perform Dead Target project to transform the prisoners into super evil combat killer but unfortunately CS Corporation betrayed them and infected the whole city with the virus converting everyone in the city to zombies. On the story perspective Dead target is just awesome and a must play game. Get Dead Target for PC from here.


Dead Target for PC Download


Gameplay wise Dead Target offers stunning 3D visual graphics with detailed textures. You need to play as a role of survivor killing everyone coming in your route where you will be equipped with modern warfare weapons. You will need to regularly upgrade your gears in order to face the incoming zombie waves. Game developers have also given special importance in providing realistic sound effects during the game play. So if you are willing to dead target without having a high powered android device you don’t need to worry anymore because you can still play it on your Windows PC or Apple Mac OSX. Get Dead Target for PC Windows download from here.


How to Play Dead Target on PC Windows 8.1/8/7/XP : Dead Target For PC Download


Well if you want to play Dead target on your Windows system you need to emulate the Google android version of Dead target on your PC with Bluestacks App Player. Bluestacks App Player basically allows you to emulate android apps or games on Windows PC and Apple Mac OSX devices. You just need to follow the below given simple steps and after following all the steps properly you will be able to play Dead Target on your PC. Download game dead target for PC from here.


  • First of all you need to download and install Bluestacks App Player on your system. You can download it from below :


Get Bluestacks Android App Player from here


  • After installing Bluestacks just Open Bluestacks and here search for Dead Target via Bluestacks App Search feature


Alternatively – If you are having trouble searching Dead Target through Bluestacks App Search feature then don’t worry you can simply download Dead Target APK File on your system and install it via APK File directly.


*To get the Dead Target APK File Just drop your query with your email


  • That’s it You can now start playing  Dead Target from the Installed Apps list within your Bluestacks App Player.


The post Dead Target for PC Download Windows | Dead Target APK appeared first on RushInformation.


Posted on 11:31 AM | Categories:

Tuesday, April 21, 2015

Motorola Moto E 4G (2nd Gen) Now Available for Sale @7,999 Only


Motorola Moto E 4G (2nd Gen) Now Available for Sale @7,999 Only


As of now we are witnessing immense boom in ecommerce websites especially from past few years that brought the concept of online sale of mobile devices and accessories which is now contributing over one third of ecommerce sales as per the reports and statistical data. In India this trend saw an impressive response from the customers when Motorola after a very long wait released high powered Moto G Google android smartphone with Android Kitkat OS at a very reasonable and competitive price.


Motorola Moto E 4G Smartphone


This was the first time when a mobile manufacturing company decided to put its smartphone exclusively for online sale thus saving the retail store costs etc. which proved very succesful in terms of sale and customers positive response and this was the phase that brought a new revolution in mobile sales after which majority of the mobile companies decided to directly put smartphones on sale via online shopping portals.


Motorola Moto E 4G Brief Review, Technical Specifications, Conclusion :


Motorola Moto E 4G (2nd Gen) is the latest 4G and slightly upgraded variant of the recently launched Moto E 3G (2nd Gen) smartphone which is now available for purchase online via Flipkart @7,999 Rs only. It was first unveiled in the month of February which is now officially available for sale.


Well Moto E 4G and Moto E 3G variants doesn’t differ much in terms of design and specifications except that Moto E 4G packs a 64-bit quad-core 1.2GHz Qualcomm Snapdragon 410 SoC (with Adreno 306) whereas Moto E 3G is powered quad-core 1.2GHz Qualcomm Snapdragon 200 SoC (with Adreno 302). Both of these devices runs of Android 5.0.2 lollipop version out of the box. Moto E 4G features the same 4.5 inches qHD display along with 1GB of RAM and 8GB Internal storage that is expandable via SD Memory card. Motorola Moto E 4G Sports a 5MP rear facing camera and a VGA front camera.


Overall Motorlo Moto E 4G looks great considering its price and overall specifications but we have to see whether this enough to woo Indian customers where they have plenty of options to choose from with the likes of Lenovo A6000 Plus, Micromax Yureka, Redmi Note 4G etc.


Grab your Motorola Moto E 4G (2nd Gen) Smartphone from Flipkart @7,999 Rs


The post Motorola Moto E 4G (2nd Gen) Now Available for Sale @7,999 Only appeared first on RushInformation.


Posted on 1:30 AM | Categories:

Sunday, April 19, 2015

Lenovo A6000 Plus Review : Launched @7,499 Only


Lenovo A6000 Plus Review : Launched @7,499 Only


Lenovo A6000 Plus is the latest budget android smartphone released by Lenovo on last Friday 17th April 2015. Lenovo A6000 Plus is essentially a modified and improved variant of the popular Lenovo A6000 smartphone which was released earlier in 2014. On an average lenovo A6000 plus resembles pretty similar to the exisiting A6000 smartphone the only difference being in its specifications. Lenovo A6000 plus will go on sale exclusively via Flipkart from 28th April onwards and is all set to compete with the likes of Xiaomi Redmi Note, Asus zenfone and motorola moto e 2nd Gen.


Lenovo A6000 Plus sports a 5 inches display screen boasting a resolution of 1280 x 720 pixels. It is powered by a 64-bit 1.2GHz quad-core Qualcomm Snapdragon 410 (MSM8916) SoC with Adreno 306 400MHz GPU. Lenovo A6000 plus runs on Android Kitkat v4.4.2 version with Lenovo’s Vibe UI 2.0 skin on top.


Lenovo A6000 Plus Review


It differs from lenovo A6000 in terms of RAM and in built storage where Lenovo A6000 plus houses 2GB of RAM along with 16GB of internal memory. Moving to camera features it sports 8MP autofocus primary camera with LED Flash and 2MP front facing camera for video calling. In terms of battery backup lenovo A6000 plus battery delivers enough juice to last a day with moderate to heavy usage. It has also got Dolby Digital Plus dual speakers ensuring high quality sound.


So if you are planning to buy the old Lenovo A6000 smartphone it is the time you should review your decision and get yourself geared to buy Lenovo A6000 Plus instead of buying the old A6000. As I said above like the previous lenovo A6000 smartphone this would be also available exclusively via Flipkart online retail store in flash sale mode from 28th April Onwards at 2PM IST.


The post Lenovo A6000 Plus Review : Launched @7,499 Only appeared first on RushInformation.


Posted on 4:45 AM | Categories:

Saturday, April 18, 2015

Friday, April 17, 2015

How to Hide Sheets, Cells, Columns, and Formulas in Excel


How to Hide Sheets, Cells, Columns, and Formulas in Excel


If you use Excel on a daily basis, then you’ve probably run into situations where you needed to hide something in your Excel worksheet. Maybe you have some extra data worksheets that are referenced, but don’t need to be viewed. Or maybe you have a few rows of data at the bottom of the worksheet that need to be hidden.


There are a lot of different parts to an Excel spreadsheet and each part can be hidden in different ways. In this article, I’ll walk you through the different content that can be hidden in Excel and how to get view the hidden data at a later time.


How to Hide Tabs/WorkSheets


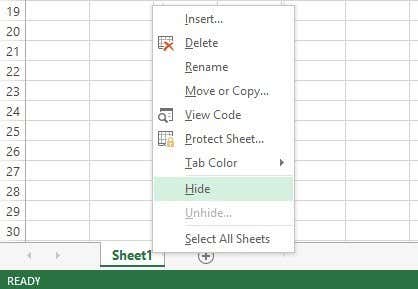
In order to hide a worksheet or tab in Excel, right-click on the tab and choose Hide. That was pretty straightforward.


excel hide sheet


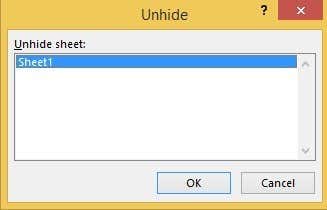
Once hidden, you can right-click on a visible sheet and select Unhide. All hidden sheets will be shown in a list and you can select the one you want to unhide.


unhide sheet


How to Hide Cells


Excel does not have the ability to hide a cell in the traditional sense that they simply disappear until you unhide them, like in the example above with sheets. It can only blank out a cell so that it appears that nothing is in the cell, but it can’t truly “hide” a cell because if a cell is hidden, what would you replace that cell with?


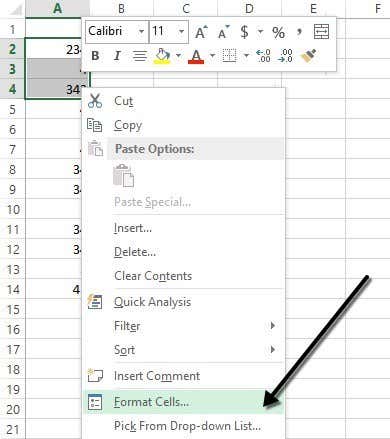
You can hide entire rows and columns in Excel, which I explain below, but you can only blank out individual cells. Right-click on a cell or multiple selected cells and then click on Format Cells.


format cells excel


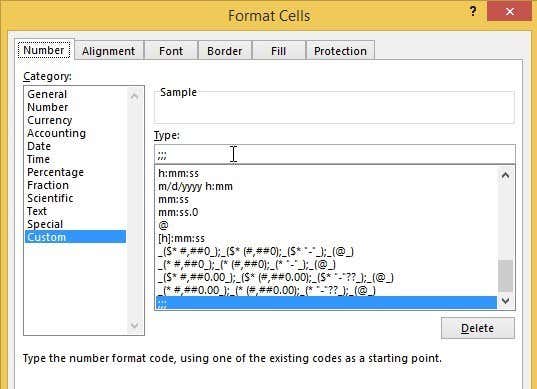
On the Number tab, choose Custom at the bottom and enter three semicolons (;;;) without the parentheses into the Type box.


format cells custom


Click OK and now the data in those cells is hidden. You can click on the cell and you should see the cell remains blank, but the data in the cell shows up in the formula bar.


hidden cell


To unhide the cells, follow the same procedure above, but this time choose the original format of the cells rather than Custom. Note that if you type anything into those cells, it will automatically be hidden after you press Enter. Also, whatever original value was in the hidden cell will be replaced when typing into the hidden cell.


Hide Gridlines


A common task in Excel is hiding gridlines to make the presentation of the data cleaner. When hiding gridlines, you can either hide all gridlines on the entire worksheet or you can hide gridlines for a certain portion of the worksheet. I will explain both options below.


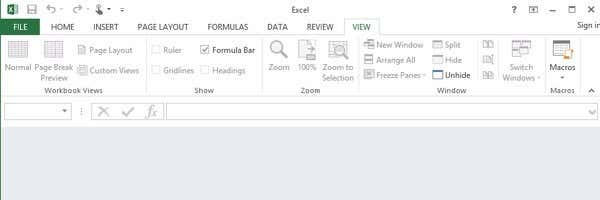
To hide all gridlines, you can click on the View tab and then uncheck the Gridlines box.


remove gridlines


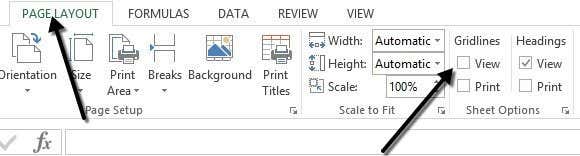
You can also click on the Page Layout tab and uncheck the View box under Gridlines.


page layout gridlines


How to Hide Rows and Columns


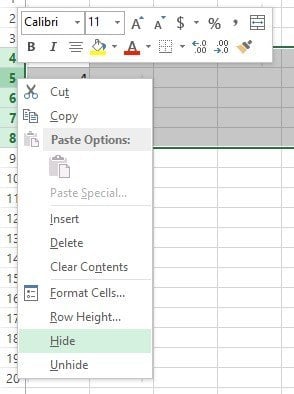
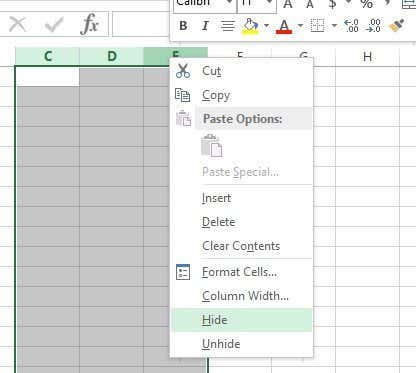
If you want to hide an entire row or column, right-click on the row or column header and then choose Hide. To hide a row or multiple rows, you need to right-click on the row number at the far left. To hide a column or multiple columns, you need to right-click on the column letter at the very top.


hide row


hide column


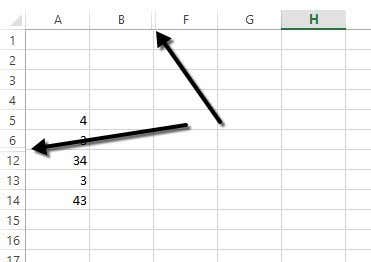
You can easily tell there are hidden rows and columns in Excel because the numbers or letters skip and there are two visible lines shown to indicate hidden columns or rows.


hidden rows columns


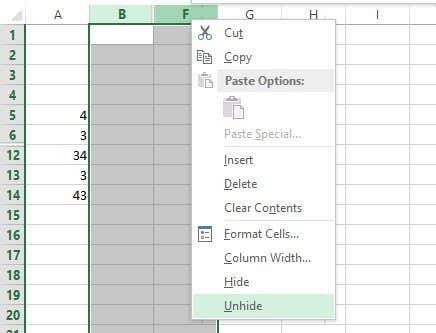
To unhide a row or column, you need to select the row/column before and the row/column after the hidden row/column. For example, if Column B is hidden, you would need to select column A and column C and then right-click and choose Unhide to unhide it.


unhide columns excel


How to Hide Formulas


Hiding formulas is slightly more complicated than hiding rows, columns, and tabs. If you want to hide a formula, you have to do TWO things: set the cells to Hidden and then protect the sheet.


So, for example, I have a sheet with some proprietary formulas that I don’t want anyone to see!


excel formulas


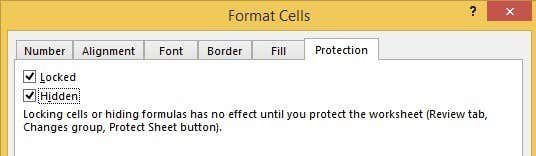
First, I will select the cells in column F, right-click and choose Format Cells. Now click on the Protection tab and check the box that says Hidden.


protection tab hidden


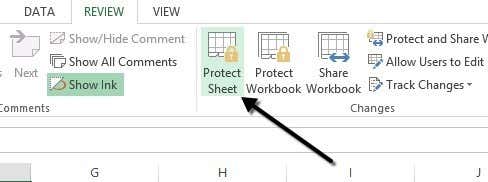
As you can see from the message, hiding formulas won’t go into effect until you actually protect the worksheet. You can do this by clicking on the Review tab and then clicking on Protect Sheet.


protect sheet excel


You can enter in a password if you want to prevent people from un-hiding the formulas. Now you’ll notice that if you try to view the formulas, by pressing CTRL + ~ or by clicking on Show Formulas on the Formulas tab, they will not be visible, however, the results of that formula will remain visible.


Hide Comments


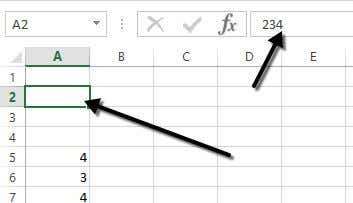
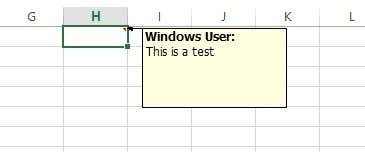
By default, when you add a comment to an Excel cell, it will show you a small red arrow in the upper right corner to indicate there is a comment there. When you hover over the cell or select it, the comment will appear in a pop up window automatically.


excel comment


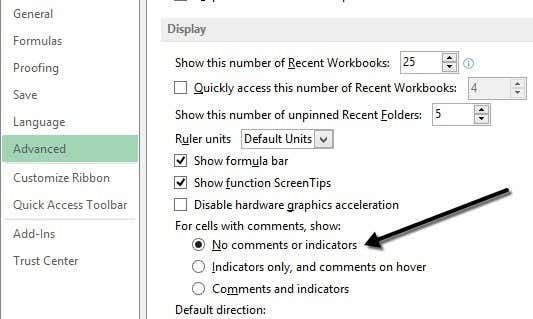
You can change this behavior so that the arrow and the comment are not shown when hovering or selecting the cell. The comment will still remain and can be viewed by simply going to the Review tab and clicking on Show All Comments. To hide the comments, click on File and then Options.


excel advanced options


Click on Advanced and then scroll down to the Display section. There you will see an option called No comment or indicators under the For cells with comments, show: heading.


Hide Overflow Text


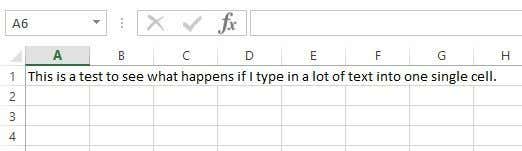
In Excel, if you type a lot of text into a cell, it will simply overflow over the adjacent cells. In the example below, the text only exists in cell A1, but it overflows to other cells so that you can see it all.


overflow text excel


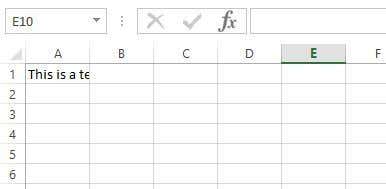
If I were to type something into cell B1, it would then cut off the overflow and show the contents of B1. If you want this behavior without having to type anything into the adjacent cell, you can right-click on the cell, choose Format Cells and then select Fill from the Horizontal Text alignment drop down box.


text alignment horizontal


This will hide the overflow text for that cell even if nothing is in the adjacent cell. Note that this is kind of a hack, but it works most of the time.


hidden overflow text excel


You could also choose Format Cells and then check the Wrap Text box under Text control on the Alignment tab, but that will increase the height of the row. To get around that, you could simply right-click on the row number and then click on Row Height to adjust the height back to its original value. Either of these two methods will work for hiding overflow text.


Hide Workbook


I’m not sure why you would want or need to do this, but you can also click on the View tab and click on the Hide button under Split. This will hide the entire workbook in Excel! There is absolutely nothing you can do other than clicking on the Unhide button to bring back the workbook.


hide workbook


So now you’ve learnt how to hide workbooks, sheets, rows, columns, gridlines, comments, cells, and formulas in Excel! If you have any questions, post a comment. Enjoy!


The post How to Hide Sheets, Cells, Columns, and Formulas in Excel appeared first on Online Tech Tips.


Posted on 12:15 AM | Categories:

Thursday, April 16, 2015

Best Free Windows Registry Cleaner


Best Free Windows Registry Cleaner


If you’re reading this article, you came here looking for a way to “clean out” your Windows registry. Maybe someone told you that cleaning out the registry will fix computer performance issues or application crashes or something else that sounds really good. Unfortunately, many of these claims are false and could actually cause your computer more harm.


The Windows registry is basically a really big database with a bunch of keys and values that stores data about everything that makes Windows and the applications installed on it run. The registry starts off very large and can definitely grow in size over time as you install apps, uninstall apps, add/remove hardware, etc.


A lot of registry cleaners claim that they will remove “junk” or “corrupt” entries from the registry and thereby reduce crashes, blue screens, and general computer slowness. While they can remove a lot of entries from the registry, there is rarely any perceptible performance benefit to doing this.


fix registry


Actually, you’ll quickly realize while looking at various registry cleaners that there is no actual evidence or performance tests conducted by a legitimate organization that show any performance gains to clearing out thousands of entries from the registry. The only people that claim this are the sites selling the software and they also don’t have any factual evidence or performance tests on their sites to prove it.


registry cleaner


The reality is that registry cleaners were popular back in the days of Windows 95, Windows 98, Windows Me and maybe even Windows XP, but the newer operating systems like Windows 7, Windows 8 and Windows 10 are far more stable, well-coded and advanced than their previous counterparts. With Windows 8 and Windows 10, you can fix a lot of problems by resetting or refreshing your PC. You’re also going to see much bigger performance benefits by disabling useless startup programs in Windows or by uninstalling junkware or crapware from your system.


There are some rare cases where removing entries from the registry may help. One example that comes to mind is right-click context menu in Explorer. Sometimes the list of items becomes very large and some items in the registry no longer exist on the system. That means when you right-click on a file or folder, it could take a very long time to load the context menu.


In this type of case, removing the registry entries would help. However, it’s still a better idea not to use a registry cleaner. Instead, you would Google and hopefully find an article like mine that shows you how to troubleshoot a slow right-click context menu. This way you’re fixing the problem without clearing out a bunch of stuff you’re not sure what is being used for.


In addition, a lot of registry cleaners are simply malware or spyware programs that trick users into thinking they have serious problems with their computers when in reality they don’t. The programs will then pop up ads all over the place, steal important data and worse, so there is a bit of risk in using this type of software unless you stick with a reputable brand with a reputable website.


If you’re still certain that you need a registry cleaner, then I do have one recommendation. Before we get to that, however, you should always make a backup of the registry before you run any type of cleaner software. Making a backup is as simple as creating a new system restore point. I always do this before running any cleaner on my registry even though the one I will mention is extremely safe and has never caused me any issues.


CCleaner


CCleaner is actually a system cleanup utility that happens to also include an option for cleaning the registry. I’ve already debated the worthiness of system cleaning software before and concluded that basically, yes, some tools do actually work in these cases.


CCleaner-Prompt_thumb.png


Most of the entries that CCleaner will remove are simply leftover keys that were not removed when a program was uninstalled. Again, these values do not actively make Windows any slower or prone to crashes. They simply exist in a database and aren’t accessed anymore. As mentioned earlier, these databases in the newer versions of Windows are advanced and therefore even tens of thousands of extra entries will not slow down access to the database.


What I like about this program is that it’s the best for cleaning your system in addition to having the registry cleaning option. It also allows you to create a backup of the registry before you fix any issues. It also lets you choose what types of items to scan the registry for, thereby allowing you to control the level of risk. The only downside is that it doesn’t really provide very meaningful descriptions of the actual entries, but that is true for every other registry cleaner too. There are simply too many entries in the registry to write descriptions of each.


At the end of the day, it’s the only program I can suggest that I am certain will not cause damage to your computer, install malware or do something else bad to your system. If you’re still having issues with your PC, check out some of the links I mentioned above that have a better chance of increasing performance and reducing crashes. If you have any questions, post a comment. Enjoy!


The post Best Free Windows Registry Cleaner appeared first on Online Tech Tips.


Posted on 11:15 AM | Categories:

Wednesday, April 15, 2015

How to Set Away Message in Outlook


How to Set Away Message in Outlook


Going out of the office soon and need to setup an Out of Office, Away or Vacation message in Outlook? You would think it would be super easy, but unfortunately it’s not! There are actually two ways of creating an automatic reply and it depends on whether Outlook is stand-alone or using Microsoft Exchange.


If your are in a corporate environment and Outlook is connected to MS Exchange, then setting an out of office reply is actually very easy. Let’s go through that method first and then we’ll discuss how to do it if you are not using Exchange.


Out of Office Message w Exchange


In Office 2007 and earlier, go to Tools and click on Out of Office Assistant. Note that this should be there automatically in Outlook 2003 and Outlook 2007 when using Exchange. If you don’t see the option, you’re not using Exchange.


out of office assistant


In Office 2010 and Office 2013, you have to click on the File tab, then Info and you’ll see a button called Automatic Replies (Out of Office).


out of office


In Office 2007 and earlier, click on the I am currently Out of the Office radio button and type in the message into the AutoReply box.


out of office outlook


Go ahead and put the date you will be out till and also put in any contact info in case there is an emergency, etc. If you click OK, everyone will get this message until you come back to this dialog and change it to I am currently in the office.


You can also add rules to incoming messages while you are out of the office by clicking on Add Rule. This is useful if you want to perform certain actions on emails coming from different people. For example, if you get an email from a client, you may want to forward it to your phone or reply with a different email template than the one used for internal employees. If you don’t know how to use rules, read my previous post on how to create Outlook rules.


email auto reply


In Outlook 2010 and 2013, it’s a bit different. When you click on Automatic Replies, you’ll get a pop up dialog like the one shown below.


automatic replies outlook


Select the Send automatic replies button and then check the Only send during this time range box if you know the exact dates you’ll be gone. If you leave it unchecked, it will simply leave the automatic reply on until you manually come and select Do not send automatic replies.


What’s also cool about this version is that you can have a separate auto reply setup for people inside and people outside your organization. Again, as with the earlier versions of Office, you click on Rules if you want to add exceptions to the auto reply.


Out of Office Message w/o Exchange


So this is great if you have Outlook with Exchange, but what if you don’t have access to Out of Office Assistant or Automatic Replies? Well there is a way you can EMULATE the out of office assistant by creating an automatic reply rule along with a out of office template. Here are the steps below.


Step 1: First create a new message in Outlook as if you are going to write someone an email. Do not put anything in the TO or CC boxes. Type in your away email message and put in a subject also.


new office email


Click on the Microsoft Office button or the File tab in newer versions of Office and choose Save As. In the Save as type combo box, select Outlook Template. Type a name such as Out Of Office Reply in the File Name box and click Save.


out of office template


Step 2: Now all we need to do is create a rule and tell Outlook to use the new email template we just created. For Office 2007, click on the Tools menu and go to Rules and Alerts.


rules and alerts


In Office 2010 and 2013, click on the Home tab, then click on Rules and then click on Manage Rules & Alerts.


manage rules


Click on New Rule under Email Rules to create a new Outlook rule.


new rule outlook


Under the section Start from a blank rule, go ahead and click on Check messages when they arrive in older versions of Office or Apply rule on messages I receive in newer versions of Office, then click Next.


apply rule outlook


Next you’ll have to choose which conditions, if any, you want to check. For out of office auto replies, I normally don’t check anything since I want it to apply to any email that I receive.


outlook rule condition


Click Next and then under Actions, check the box that says “Reply using a specific template” and then in the second text box at the bottom, click on the link that says a specific template.


reply using specific template


Now select the template that you had created earlier from the list of templates. If you do not see your template, click on the Look In combo box and choose Use Templates in File System.


reply template outlook


Click Open and then click Finish. Now whenever you get a new email, an automatic response will be sent using your auto reply template. Outlook remembers whom it sends the messages too and will only send it once to each email address.


To turn it off, you have to go back into Rules and Alerts and uncheck the box next to the rule. Also, you have to make sure that Outlook is open on your computer before you leave in order for it to send the auto replies! If you have any questions, feel free to leave a comment. Enjoy!


The post How to Set Away Message in Outlook appeared first on Online Tech Tips.


Posted on 4:15 AM | Categories: