Friday, October 31, 2014

How to Hack Your Cell Phone


How to Hack Your Cell Phone


When people search for cell phone hacks or hacking, they normally have one of two things in mind: how can I hack my cell phone to do something or install something that’s currently restricted or how I can hack a cell phone and steal its data like images, text messages, location data, etc.


In this article, I’ll try to cover both topics in some detail. Obviously, hacking is a non-trivial task, so you’ll need to spend quite a bit of time browsing through forums, etc. before you attain your goal.


Hack Phone OS & Feature Set


In order to hack a cell phone so that you can install a different operating system on Android or install apps outside the App Store on iOS, you need to either unlock or jailbreak the phone, respectively. It used to be illegal to unlock your cell phone, but this recently changed in late 2014, so now you don’t have to worry about doing something criminal. It should be noted, though, that performing a jailbreak or unlock will prematurely void your warranty.


One of my favorite sites on the web is Cell Phone Hacks, a large discussion and community driven forum where you can find and share cell phone hacks and cell phone hack codes. Not only can you find ways to hack into your cell phone to either give it more functionality or to add some kind of feature it was not meant to have, but you can also find all kinds of useful tips on how to do complicated things with your cell phone, like use it as a modem, etc.


cell phone hacks


The site is broken down into a couple of different forums: cell phone hacks, ringtones, logos and software, service provider hacks, and cell phone hardware and accessories. Here you can learn how to do things like make your own logos and wallpapers for your cell phone or how to setup your Verizon phone as a modem to connect to the Internet.


You can find hacking information on just about any phone manufacturer and service provider including Nokia, Ericsson, Motorola, Sprint, Blackberry, LG, Audiovox, Sidekick, Apple iPhone, and more.


Another very popular forum that probably has the most comprehensive knowledgebase on hacking cell phones, including unlocking phones or revealing hidden menus, is HowardForums. You’ll find that there are a LOT more threads and discussions going on at this site than even cell phone hacks! So if you don’t find what you’re looking for at cell phone hacks, definitely make sure to check this site out. They also have more topics including US Prepaid, Canadian wireless providers, European providers, etc.


Lastly, there is one other site that I visit that’s not exactly for hacking, but does offer a lot of info on unlocking phones. It’s mostly for Android phones, so if you’re trying to jailbreak an iPhone, you’ll need to read on below. XDA Developers is meant for developers and you’ll find a lot of programming stuff on the site. However, there are always posts on how to unlock the bootloader, root the phone, etc.


For iPhone users, if you want to be able to install apps from outside the App Store, you’ll need to jailbreak your iPhone and then use Cydia to install the apps of your choice. Jailbreaking an iPhone is a complicated process and sometimes a certain combination of hardware and software can’t be jailbroken. For example, an iPhone 5S running iOS 8 currently does not offer a proper jailbreak option. Some Chinese hackers called Pangu have released a tool to jailbreak iOS 8 on all compatible devices, but it’s only in Chinese right now.


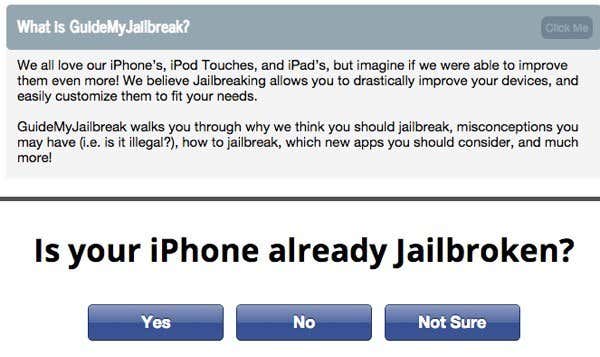
Luckily, there is a website that does all the work for you in terms of jailbreaking iPhones. GuideMyJailbreak makes the process of figuring out how to jailbreak your iPhone into a simple wizard that anyone can follow. If your device can be jailbroken, it’ll tell you where to download the software and the instructions for performing the jailbreak.


jailbreak guide


If you are more interested in watching videos, another great place to learn about hacking phones is from YouTube. Just search how to hack a cell phone and you can literally watch hundreds of videos on the topic.


Hopefully that will get your started on your cell phone hacking journey! Always remember though that unlocking/jailbreaking could screw up your phone and void your warranty, so be careful and don’t do anything you’re not sure of, especially with phones like the iPhone, etc.


Hack Cell Phone Data


Now on to the more interesting topic of hacking someone else’s cell phone for data like photos, text messages, call logs, location tracking etc. Before we get into any details, spying on someone without their consent is completely illegal and therefore could get you sued if you’re unlucky. If you choose to continue, that’s your choice, just be warned.


The main thing to note about spying on someone else’s cell phone is that you will need access to it for at least a short time frame. There really is no way to hack into a phone from a computer or remotely unless you are a genius hacker. For 99.999% of people, you’ll need to rely on getting your hands on the device so that you can install the spying software. For iPhones, you’ll also need to jailbreak the phone first before you install the spying software.


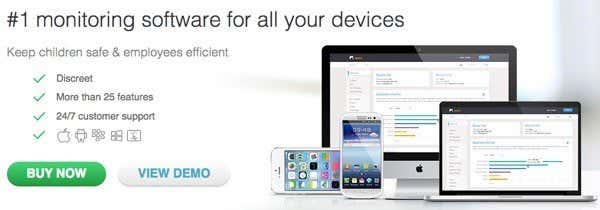
There are lots of choices when it comes to cell phone spying software, but there are just a handful that are very popular because of their stealth, wealth of information and reliability. Note that any cell phone spying software that is half decent will cost you money, so don’t even try to find a free program because it’ll probably be a fake anyway.


mSpy


mSpy is by far the most popular software solution when it comes to spying on cell phones whether it be a BlackBerry, Android, Windows Phone or iPhone. It’s so popular because it can monitor pretty much everything under the sun. Want to see what your kids are posting on Snapchat? Done. Who they are texting via SMS or WhatsApp? Done. Who they are emailing and where they are going? Done. See what photos or videos they are taking with the phone camera? Done.


mspy


It’s literally ridiculous how much information you can capture using mSpy. It’s pretty much like watching the person use their device while standing over their shoulder. Plus, if you run into any issues, just call their 24/7 customer service and they’ll help you figure it all out. mSpy isn’t cheaper, though. The basic version will cost you $40 for one month of monitoring. The premium version with more monitoring options will cost you $70 for one month all the way up to $200 for 12 months.


PhoneSheriff


PhoneSheriff is another popular choice and pretty much has all the same features as mSpy, but without the really nice interface and reports that mSpy has. That’s probably why the software is a lot cheaper too: $50 for 6 months or $90 for a year. It does have all the reports you want, I just found mSpy’s interface to be cleaner and more modern looking.


phonesheriff


As I mentioned before, there are quite a few other software solutions for spying, but those are the main two. If you’re interested in doing more comparison shopping before choosing, check out these two sites with top 10 lists for cell phone spying software:


http://cell-phone-monitoring-software-review.toptenreviews.com/


http://www.top10spysoftware.com/


If you have any questions about hacking a cell phone, feel free to post them in the comments. Otherwise, let loose and have fun. Just be careful and don’t get caught if you’re spying on someone else. Enjoy!


The post How to Hack Your Cell Phone appeared first on Online Tech Tips.


Posted on 12:31 AM | Categories:

Wednesday, October 29, 2014

5 Free Disk Imaging/Cloning Utilities for Windows


5 Free Disk Imaging/Cloning Utilities for Windows


Creating a good backup of your computer system involves not only backing up all of your data, but also backing up all Windows and system files when they are in a working and stable state. When a hard drive crashes or the Windows operating system becomes corrupt, it would be preferable to not only be able to load back your data quickly, but also to load back the entire OS with all of your user settings, bookmarks, installed drivers, installed applications, and more.


A good way to have both things taken care of at once is to create an image of your hard drive. By creating an image, your entire system state, including the OS and data files, is captured like a snapshot and can be reloaded at any time. It’s the best way to protect your data and is the fastest solution also. However, it’s not necessarily the easiest solution since most imaging programs require a bit of trial and error when performing a restore.


In this article, I’ll mention a couple of my favorite freeware programs for cloning a hard drive. You’ll find a lot of paid solutions also like Acronis, which make the process easier, but can cost a good chunk of change. If you hate computers and want the simplest process possible, then go for commercial software. Otherwise, read on for some great freeware apps for cloning your hard drive.


Paragon Backup & Recovery


Paragon Backup & Recovery is one of my favorite tools for backing up and restoring hard drives at home. It has a slew of features and is very reliable. It’s been around for a very long time and therefore the software is polished and works perfectly on all versions of Windows from Windows 2000 to Windows 8.1 32-bit or 64-bit. Here’s a list of features that make Paragon one of the best freeware utilities in this category.


paragon backup


- Complete disk backup including GPT disks


- Differential backups so that you can create one full image and then save space on future backups. I believe Paragon is the only freeware one I mention here that supports differential backups.


- Unique backup capsule feature that lets you store the backup on a local hard disk in a hidden partition for easy recovery if they active partition fails


- Linux and WinPE bootable recovery media options


- Restore an entire image or only certain files and folders from an image


The only annoying thing about the program is that it includes all the features from the commercial version too and when you try to use one of them, it will try to upsell you the paid version of the program. It’s not a major nuisance, but it’s slightly annoying. I would rather they just strip it down to the bare minimum and if I like the program, I might be interested in purchasing the more feature-full version.


The free version can still do a lot of other stuff too like create, delete, and formats partitions, hide/unhide partitions, and mark partitions as active.


DriveImage XML


DriveImage XML is a completely free data recovery program that you can use to create images and backups of logical drives and Windows partitions. Here are a couple of the major features of this program:


- Quickly backup logical drives and Windows partitions to image files without having to restart Windows (you can remain logged in)


- Easily browse, view or extract files from the images


- Restore the images to the same drive or to a different drive


- Copy data directly from drive to drive


- Schedule automatic backups and image creations with Task Scheduler


- Run the program from the Live CD or from the WinPE boot CD-ROM


driveimage xml


The nice thing about DriveImage XML is that it uses Microsoft’s Volume Shadow Service (VSS), which means you can create hot images of hard drives that are in use. It supports Windows XP, Windows Server 2003, Windows Vista, Windows 7 and Windows 8.


The one thing to remember though when restoring an image is that the partition you are restoring to needs to be of the same size or larger. You cannot restore to a smaller partition size than the original. Also, DriveImage XML does not perform incremental backups after the first backup image, so you’ll either have to have a lot of space or you will have to delete older backups.


Macrium Reflect Free


Macrium Reflect Free is another popular free utility for disk imaging or disk cloning. In terms of design, the GUI for Macrium is much better than Drive Image XML. It’s clean and looks more modern. The layout is also easier to navigate and understand.


macrium reflect free


You can clone a disk or image a disk. Cloning is better if you want to move everything on one disk to another hard disk, i.e. a larger disk. Imaging a disk can be scheduled whereas cloning has to be done manually. You can then restore the images to the same hard drive, a replacement hard drive or even to a new computer, though the last option will require a paid version of Macrium to restore to the new hardware.


Macrium also has a Linux rescue CD and Windows PE rescue CD that can be used to restore an image to a new hard drive. The restore process is fairly straightforward and if you get confused anywhere, they have tutorials for creating images, restoring images, troubleshooting problems, etc. in the knowledgebase. It’s a good program for a novice user.


EaseUS Todo Backup Free


EaseUS creates a lot of different products and one of the best is Todo Backup. Again, like Paragon, they want to upsell you to their paid versions, but the free version worked just fine for me when performing a backup and restore.


It’s got a simple clean interface and is a little better than Paragon when it comes to upselling. It just have a little bar at the bottom of the window that say “Upgrade Now to get a more powerful edition”.


easeus todo backup


Using the free version, you can only recover to the same disk or a new disk on the same machine. If you want to recover to new hardware, then you’ll have to purchase their paid software just like Paragon and Macrium do. Feature-wise, it’s closest to Paragon in terms of what it supports. You can restore using their WinPE bootable media and it works as expected.


I also found EaseUS Todo backup to be very easy to use, especially when following their online guides. Overall, it’s a great choice for a novice user.


CloneZilla


If you’re more of an advanced user, then CloneZilla may be the right choice for you. Clonezilla is basically a live CD that you boot from and then work with from there. Unlike other programs, it doesn’t have an executable file that you can run inside Windows. That right there will be reason enough for most people to choose something else.


clonezilla


However, if you’re familiar with the DOS environment and really want the most customization options for creating your backup or disk image, then CloneZilla has you covered. Here’s an abbreviated list of features:


- Supports a large range of file systems including ext2, ext3, ext4, xfs, jfs, FAT12, FAT16, FAT32, NTFS, HFS+, UFS, VMFS3, VMFS5 and minix


- Both MBR and GPT formatted hard drives supported


- Image file can be stored locally or on an NFS server, Samba server, or SSH server.


Performing a clone and restore in CloneZilla was a bit more work than I had expected and it certainly had many pitfalls for novice users. Thankfully, they have some documentation with step by step instructions for performing common operations. Again, this is a great tool for advanced users only.


Those are my favorite 5 tools for cloning or imaging a disk in Windows. If you have another suggestion not mentioned here, feel free to post it in the comments. Enjoy!


The post 5 Free Disk Imaging/Cloning Utilities for Windows appeared first on Online Tech Tips.


Posted on 2:43 AM | Categories:

Tuesday, October 28, 2014

7 Great Firefox about:config Tweaks


7 Great Firefox about:config Tweaks


After using Internet Explorer for many years, I have to say that I really wish I would have switched to Firefox a lot earlier than I did! Firefox is by far the most customizable browser out there with thousands of extensions and addons that you can download to extend the capabilities of the browser. Not only are there many third-party extensions to enhance Firefox, there are also many configuration settings that can be tweaked in Firefox itself.


Over the last few months, I’ve tweaked a good number of settings in Firefox and I thought I would share some of those with my Firefox readers. I’m going to go through a couple of Firefox about:config settings that you can change that will make your browsing experience more enjoyable.


Backup about:config Settings


Before you begin editing the about:config file in Firefox, you should backup the file in case you make a change that messes everything up. You can back it up by making a copy of the prefs.js file, which is in the Firefox profile folder. Whether you are on OS X, Windows or Linux, there is a really way to find the profile folder for Firefox.


First click on the settings button at the top right with the three horizontal lines.


firefox settings


Now in the menu that opens, go ahead and click on the question mark icon at the very bottom of the menu.


firefox help menu


Another menu will pop up and here you have to click on Troubleshooting Information.


firefox troubleshooting info


Finally, a new tab in Firefox will open and you’ll see a section called Application Basics. In that section, you should see a button called Show Folder next to Profile Folder.


show profile folder


When you click the button, it will open Explorer to the current Firefox profile. Now just browse down till you see prefs.js and copy that file to another location on your hard drive.


prefs js


Modify the about:config Configuration in Firefox


First off, it’s probably a good idea to mention how to actually modify these advanced configuration settings in Firefox for those non-techie users. The configuration settings are simply a table of key names and values. You can access all of them by typing in about:config into your browser address bar. It’ll show you a warning that doing this might void your warranty and you’ll have to click the I’ll be careful, I promise button.


void warranty firefox


To change a value for a key, simply enter its name into the Search textbox at the top. Double click on the entry and you can change the value in the popup box. Restart the browser and the changes will take effect.


change config value


Ok, so let’s get to the actual tweaks. It’s always a good idea to only tweak one setting at a time to make sure it’s suitable for your system and that it doesn’t cause any unforeseen problems.


Open Search Results in New Tab


This tweak is pretty cool and one of the best out there. Basically, when you perform a search from the search box at the top right in Firefox, it normally loads in the current tab. However, if you set the value of this setting to TRUE instead of FALSE, then every time you perform a search, a new tab will come up with the results, thereby leaving your current tab alone!


open search new tab


According to my Google web history, I perform almost 50 searches a day! So that’s 50 times when I would have to manually open a new tab to perform a search or would accidentally overwrite the webpage I was currently viewing.


browser.search.openintab


False - Default value, set to True to load results in a new tab


Just a quick note before we move on. You’ll notice that once you change a value from the default, it will turn bold and the status will be changed to user set. You can sort on that column and quickly find all the settings you have changed. You can also just right-click on any of those settings and click Reset to set it back to the default value.


Open New Tabs at End


Normally, when you click on a link that opens in a new tab, the new tab will appear immediately after the current tab. I personally like it when the new tab opens at the end of all the tabs. If you prefer this also, then change the value below to False.


browser.tabs.insertRelatedAfterCurrent


True – Default value, set to False to load new tab at the end of all tabs


Disable Delay When Installing Add-ons


I still don’t understand why Firefox makes me wait several seconds before I can install an add-on. Maybe it’s for security, but it’s really annoying for someone who knows what they are doing. If you just want to install an add-on without being hassled by Firefox’s useless delay, you can disable it by setting the value to 0.


security.dialog_enable_delay


1000 – Default value, set to 0 to disable delay


Preview Tabs When Switching


If you like how you can see previews when you switch between programs in Windows when using ALT + TAB, then you will definitely want to enable previews in Firefox. In Firefox, you’ll get a little popup window in the center with a thumbnail for each open tab.


browser.ctrlTab.previews


False – Default value, set to true to view previews


firefox previews


Disable Prefetch of Webpages


Firefox has an interesting feature whereby it tries to determine which links on a page you might click on and then downloads them so that it can load the pages faster. For example, it will try to download the top result from a Google search automatically. However, this eats up bandwidth, which can be a problem for people who have slow and limited Internet connections. To turn it off, set the value to false.


network.prefetch-next


True – Default value, set it to False


Increase Network Performance


From the networking point of view, you can increase a couple of different settings to increase network performance.


network.http.max-connections controls how many simultaneous network connections Firefox will make at any one time to any number of Web servers. In the latest version of Firefox, the default value is 256. If you have that value, leave it as is. If you are running an older version of Firefox and the value is 8 or 30 or something like that, you can increase it all the way up to 256.


network.http.max-persistent-connections-per-server controls the number of persistent connections allowed per server. The default is 6 and this is generally the value people list when they are say you can increase the number of simultaneous downloads in Firefox. Don’t go more than 1 or 2 above the default as you could be temporarily blacklisted.


Turn Off ToolTips


Finally, you can get rid of all of those annoying tool tips that pop up every time you hover your mouse over a button by changing the config file. Personally, I already know what every single button on my toolbar does and it annoys me when they pop up and cover something else!


browser.chrome.toolbar_tips


True – Default value, set it to False to turn off tooltips


The only thing that could be bothersome to some is that it will also not pop up a tooltip when you hover over the title of a tab. If you sometimes hover over a tab to see the full title of the webpage, then setting this to false will prevent you from seeing that info.


So those are just seven of many Firefox tweaks that I use on a daily basis. Of course, feel free to throw in your own favorite about:config tweaks in the comments. Enjoy!


The post 7 Great Firefox about:config Tweaks appeared first on Online Tech Tips.


Posted on 1:15 PM | Categories:

Make Money Online With Fiverr - Register for Fiverr


Hello guys, am back online and better. This time I will like to use this write up to give the exact understanding of what FIVERR really is to anyone who is yet to clear about what FIVERR means. Many people from different countries often call me on phone, text and write emails to question me about what fiverr really stand for.

Fiverr is a website or let me say it is a platform where people can buy things as low as $5 (#800) and it is reachable on www.fiverr.com. Fiverr as a website got it’s name from the words “five” and “dollars”.  The concept is clear even from the name “fiverr”.

To give a better explanation
for a newbie, Fiverr is the name of website platform and the website is a marketplace where services can be rendered for as low as $5.

There are both buyers or services and sellers of services on fiverr. To make money on fiverr, we must be a seller. As a seller, we make money when people (buyers) buys the services that we render on fiverr.

Afolabi Andrew Kenny popularly known as Sir Fiverr is one of the first Nigerian to organize a seminar to teach fellow Nigerians about his breakthrough on money making on fiverr and the type of services he render which ensures he have no specialized skills to render such services.

Sir Fiverr (Afolabi Andrew Kenny) is acclaimed to have earn over $30,000 (N5,000,000) from fiverr.com within the period of 2011 – 2013.

How to open and register for a Fiverr account – the RIGHT  way.


Fiverr is free for all people from ll the world. You can register for free!

1. CLICK HERE to register!
2. Click "Join" (shown with the right arrow).


3. Type the information required into the following joining dialog!


You need to enter "Your Email", "Choose a username", "Password" and of course the simple mathematical operation that prove you are a human. Carefully choose your Username because it's very important in your further success.

After your registration I suggest you to check into your email inbox for an activation link. After that complete your profile.
Posted on 8:12 AM | Categories:

Recover, Crack and Hack Email Passwords for MS Outlook, Eudora, Thunderbird, etc


Recover, Crack and Hack Email Passwords for MS Outlook, Eudora, Thunderbird, etc


Recently I needed to recover a few passwords from email programs such as Outlook Express, MS Outlook, Eudora, etc. for some old user accounts. I ended up finding two free utilities that let you recover email passwords. Basically, the passwords are stored in all email clients in either an encrypted format or in plain text. You can recover those passwords from just about email client pretty easily.


Mail PassView


Mail PassView is a small password recovery tool that reveals the passwords and account details for many email clients as show below:


  • Outlook Express

  • Microsoft Outlook 2000 (POP3 and SMTP Accounts only)

  • Microsoft Outlook 2002/2003/2007/2010/2013 (POP3, IMAP, HTTP and SMTP Accounts)

  • Windows Mail

  • IncrediMail

  • Eudora

  • Netscape 6.x/7.x

  • Mozilla Thunderbird

  • Group Mail Free

  • Yahoo! Mail – If the password is saved in Yahoo! Messenger application.

  • Hotmail/MSN mail – If the password is saved in MSN Messenger application.

  • Gmail – If the password is saved by Gmail Notifier application, Google Desktop, or by Google Talk.


I was amazed at how well this program worked on my computer! I really didn’t expect it to work, but it not only showed me all the passwords for my Outlook accounts, but it also revealed the passwords for my Gmail and Yahoo mail accounts! In addition to being cool, it was also a little scary. Outlook is a great email client, but in terms of security, it’s just not up to snuff. That’s why I never use an email client and instead just check my email from the website directly.


However, you are still not completely safe from this program if you’re not careful.  The program can actually reveal your Gmail or Yahoo password if you have Gmail Notifier or Yahoo Messenger installed, respectively. Google Desktop and Google Talk have been discontinued, so those programs can no longer be hacked.


Once you have installed the program onto your computer, simply run it and you should see an output similar to this:


recover email password


As you can see from the above image, Mail PassView was able to determine all of my accounts in MS Outlook, including other information such as the server, type, and user names. It found ALL of my passwords for each account and they were actually correct! I was quite surprised! Again, I would have thought the passwords stored in Outlook were a little more secure than that.


So next time you need to recover, hack or crack an Outlook or any other email client password, first give MailPassView a try. It works all the way up to Windows 7 as of right now. Since most people use Outlook as their email client, I am also listing a second free utility that can recover only Outlook passwords.


Outlook Password Decryptor


This program works specifically with Outlook and works on all version from Outlook Express up to Outlook 2013. They explicitly state that the tool is not a password hacking utility because it can only decrypt your own passwords on your computer, however, if you install it on someone else’s computer without their consent, you can gain access to any passwords they have stored in Outlook.


Outlook Password Decryptor works all the way up to Windows 8 and comes into a 64-bit version also. It can decrypt just about all types of email configuration in Outlook including IMAP, POP3, Exchange Server, SMTP, LDAP and HTTP. You can also export the password list out to a CSV, XML, TXT or HTML file.


outlook password decryptor


Also, check out my other articles on password cracking, including how to crack an Excel password and how to crack a Windows XP Administrator password.


The post Recover, Crack and Hack Email Passwords for MS Outlook, Eudora, Thunderbird, etc appeared first on Online Tech Tips.


Posted on 12:30 AM | Categories:

Friday, October 24, 2014

Drive 5000 KILLER , UNIQUE Traffic to your Website or Blog within 24 Hours


If you wished your website would get more visitors just with one click, then I'm going to make your day! I will drive 5000 Genuine Real Traffic within 24 Hours to any website of your choice! Ordering more gigs will get you more targeted unique traffic, at 5K per gig.

~Thanks for your consideration and Take Care & Be Blessed~

This is NOT fake visitors, all real human visitors. If you need visitors to your website today, I can get people to your site immediately.

Key features:

  • Real visitors with unique IP will be driven to your website. No bots.
  • The traffic is Direct & 100% Adsense SAFE
  • CPA, affiliations, landing pages, blogs, etc are welcome!
  • Entirely track-able on Analytic
  • SEO complementary
  • Extensive customer support

Please also keep in mind that the visitors are  WORLD-WIDEI know you want your gig right away, so it is ALWAYS delivered ASAP.


Posted on 8:10 AM | Categories:

Monday, October 20, 2014

How to Find Out Who Hosts a Web Site (Web Hosting Company)


How to Find Out Who Hosts a Web Site (Web Hosting Company)


Here’s a quick little tip for anyone looking for a simple way to find out who is hosting a particular website. Trying to figure out who hosts a web site can be an annoying task if you’re trying to go through the usual channels by searching a WHOIS database, etc. A lot of times you’ll only get the company or person that registered the domain name, but not the actual hosting company.


Who is Hosting This? is a very simple web service whose sole purpose is to tell you the company that is hosting a website. I really like this because most of the other online web site checking tools simply do not give a clear and concise answer to this very simple question.


find web host


I came across this website because I was looking for a for better hosting company, but I first wanted to know what hosting companies some peer sites in my field were using, such as HowToGeek, Labnol.org, etc. I know those sites run smoothly and have millions of visitors every month, so if their servers can handle that traffic, I would be more inclined to go with one of those hosting companies.


Once you type in a domain name, for example, labnol.org, you’ll get your answer right away:


hosting company


DreamHost is actually the hosting company for the Digital Inspiration website. I’ve tried it on a good number of sites and the results have been correct each time. Also, very large sites like Google.com, etc. will not give you any useful information because they have their own IP address ranges and use their own servers. You’ll also see this for other companies like CNET, etc because they manage all of their own hosting.


google hosting


In addition to websites like Google and Facebook, you may also run into smaller websites that use private registration or extra privacy settings at their hosting company. When a domain is private, the information is hidden from public view and you’ll only see information about the company that is being used to hide the registration or nothing at all, like in the example below:


no hosting company


This site does a pretty good job because you can sometimes tell the hosting company by looking at the Name Servers, but here they are simply using the domain name and not the name of the hosting website. Even if you click on the WHOIS link, everything is privately registered.


If you try to look up the IP address, you will have more luck. Once I did a WHOIS lookup on the IP address, I was able to determine the hosting company. You can also try another website like WebHostingHero. Their site was able to give me the correct info.


web host company


That’s about it! Overall, you should really run into very few issues when trying to determine the hosting company for a website. If you do, someone is really trying hard to hide his/her server from the public. If you have any questions, post a comment. Enjoy!


The post How to Find Out Who Hosts a Web Site (Web Hosting Company) appeared first on Online Tech Tips.


Posted on 5:15 AM | Categories:

Sunday, October 19, 2014

Download Entire Web Sites in Firefox using ScrapBook


Download Entire Web Sites in Firefox using ScrapBook


Need to save a webpage or website so that you can view it offline? Are you going to be offline for an extended period of time, but want to be able to browse through your favorite website? If you’re using Firefox, then there is one Firefox add-on that can solve your problem.


ScrapBook is an awesome Firefox extension that helps you to save web pages and organize them in a very easy to manage way. The really cool thing about this add-on is that it’s very light, speedy, accurately caches a local copy of a web page almost perfectly and supports multiple languages. I tested it out on several web pages with a lot of graphics and fancy CSS styles and was surprisingly happy to see that the offline version looked exactly the same as the online version.


firefox scrapbook


You can use ScrapBook for the following purposes:


  • Save a single Web page

  • Save snippet or portion of a single Web page

  • Save an entire Web site

  • Organize the collection in the same way as Bookmarks with folders, sub-folders

  • Full text search and fast filtering search of the entire collection

  • Editing of the collected Web page

  • Text/HTML edit feature resembling Opera’s Notes


Installing ScrapBook


If you’re running the latest version of Firefox, which is v33 for me as of this writing, you’ll have to adjust some settings so that you can use ScrapBook properly. By default, the ScrapBook icon won’t show up anywhere, so the only way you can use it is if you right-click on a webpage. Add the button to your toolbar or to the menu by right clicking anywhere on the toolbar and choose Customize.


customize firefox


On the Customize screen, you’ll see the ScrapBook icon on the left-hand side. Go ahead and drag that to either the toolbar at the top or to the menu. Then go ahead and click on the Exit Customize button.


customize firefox add


Before we get into using ScrapBook to save a website, you might want to change the settings for the add-on. You can do that by clicking on the menu button at the top right (three horizontal lines) and then clicking on Add-ons.


firefox addons


Now click on Extensions and then click on the Options button next to the ScrapBook add-on.


scrapbook options


Here you can change the keyboard shortcuts, the location where the data is stored and other minor settings.


scrapbook settings


Using ScrapBook to Download Sites


Now let’s get into the details of actually using the program. First, load the website you want to download web pages for. The easiest way to start a download is to right-click anywhere on the page and choose either Save Page or Save Page As towards the bottom of the menu. These two options are added by ScrapBook.


save page right click


Save Page will let you choose a folder and then automatically save the current page only. If you want more options, which I normally do, then click on the Save Page As option. You’ll get another dialog where you can pick and choose from a whole lot of options.


download webpage


The important sections are the Options, Download linked files section, and then In-depth Save options. By default, ScrapBook will download images and styles, but you can add JavaScript if a website requires that to work properly.


The Download linked files section will just download linked images, but you can also download sounds, movie files, archive files or specify the exact type of files to download. This is a really useful option if you are on a website that has a bunch of links to a certain type of file (Word docs, PDFs, etc) and you want to download all the associated files quickly.


Lastly, the In-depth Save option is how you would go about download larger portions of a website. By default, it’s set to 0, which means it won’t follow any links to other pages on the site or any other link for that matter. If you choose one, it will download the current page and everything that is linked from that page. Depth of 2 will download from the current page, the 1st linked page and any links from the 1st linked page also.


start download website


Click the Save button and new window will pop up and the pages will begin to download. You’ll want to press the Pause button immediately and let me tell you why. If you just let ScrapBook run, it will start to download everything from the page, including all the stuff in the source code that may link to a bunch of other sites or ad networks. As you can see in the image above, outside of the main site (labnol.org), it’s downloading ads from googleadservices.com and something from ctrlq.org.


Do you really wants the ads to show up on the site while you’re browsing it offline? This will also waste a lot of time and bandwidth, so the best thing to do is to press Pause and then click on the Filter button.


download filters


The best two options are Restrict to Domain and Restrict to Directory. Normally these are the same, but on certain sites they will be different. If you know exactly what pages you want, you can even filter by string and type in your own URL. This option is fabulous because it gets rid of all the other junk and only downloads content from the actual website you’re on rather than from social media sites, ad networks, etc.


Go ahead and click Start and the pages will start to download. The time to download will depending on your Internet connection speed and exactly how much on the website you are downloading. The add-on works great for most sites and the only issue that I have run into is that on some sites, the URLs they use for linking to their own content are absolute URLs.


The problem with absolute URLs is that when you open the index page in Firefox while offline and try to click on any of the links, it will try to load from the actual website rather than from the local cache. In those cases, you have to manually open the download directory and open the pages. It’s a pain and I’ve only had it happen on a handful of sites, but it does occur. You can view the download folder by clicking on the ScrapBook button on your toolbar and then right clicking on the site and choosing ToolsShow Files.


tools show files


In Explorer, sort by Type and then scroll down to the files called HTML Document. The content pages are normally the default_00x files, not the index_00x files.


local copy website


If you’re not using Firefox and still want to download webpages to your computer, you can also check out a software called WinHTTrack that will automatically download an entire web site for later browsing offline. However, WinHTTrack uses up a good amount of space, so make sure you have enough free space on your hard drive.


Both programs works well for downloading entire websites or for downloading single webpages. In practice, downloading an entire website is almost impossible because of the massive number of links that are generated by CMS software like WordPress, etc. If you have any questions, post a comment. Enjoy!


The post Download Entire Web Sites in Firefox using ScrapBook appeared first on Online Tech Tips.


Posted on 9:15 AM | Categories:

Friday, October 17, 2014

How to Detect Invisible Users on Yahoo Messenger


How to Detect Invisible Users on Yahoo Messenger


Are you looking for a quick way to detect whether one of your Yahoo Messenger buddies is ACTUALLY offline or just Invisible? Apparently lots of people would like to know how to detect whether someone is invisible or not! I only realized this because I’ve been asked about it over and over again! I’m still not sure why it would matter because OBIVOUSLY your buddy doesn’t want to talk to you otherwise they would not be invisible!


But either way, I guess some people just need to know for the sake of knowing (especially guys and gals who want to know whether someone is avoiding them). The major problem is that 99% of the sites that detect invisible Yahoo messenger users don’t work. They can tell you whether the person is offline or online, but in my tests, they could not figure out I was invisible.


stealth settings


After testing a BUNCH of sites, I am only listing the ones that worked here for me using Yahoo Messenger 11.5. I did not test these services with all the other messenger downloads they have for other countries, so your mileage may vary. I’m not even sure why they have so many different versions, but hopefully they all work in the same way.


Also, I checked each of these sites on VirusTotal to make sure they were not spammy or one of those malware-infested sites that would mess up your computer.


Invisible Scanner


invisible scanner


This one worked! After trying about 10 sites, I reluctantly gave this one a shot and it actually told me I was invisible. So there are some sites that actually work! Now it’s worth noting that these sites tend to pop up and disappear randomly, so hopefully it’ll still be around when you read this post.


Well that’s about it. I could not find a single other site that actually gave me the correct result when checking my own Yahoo ID! So if you’re looking for ways to check for invisible users, you really only have one option and that option may not be right all the time.


Some of the other sites may work if the person you are trying to check on is using an older version of Yahoo Messenger, but with 11.5, it’s really hard to figure out if someone is in stealth mode or not.


The one good thing is that if someone is hiding themselves from just a few friends and not invisible to everyone, then the online status is displayed. So if you can’t see a friend online and invisible scanner tells you the person is online, that means they are not invisible to everyone, just you and maybe a couple of other people that they specifically chose to hide from.


The post How to Detect Invisible Users on Yahoo Messenger appeared first on Online Tech Tips.


Posted on 10:15 PM | Categories:

How to View Folder Size in Explorer


How to View Folder Size in Explorer


Running out of disk space on your hard drive? Need to figure out which folders are taking up the most space? Previously, I had written about a useful program called TreeSize that you can use to quickly find the largest directories on a drive. However, it would be really nice if you could simply see the size of a folder while browsing in Windows Explorer. Instead, only the size of files are shown in the Explorer interface.


Here’s what the normal Windows Explorer interface looks like  when in Details view:


folder size


So if you want to figure out which folders are taking up a lot of space, you have to manually right-click on each one and choose Properties. That’s just plain tedious and annoying! Why not simply have Windows Explorer calculate the folder sizes and display them for you?


Folder Size does just that for us. Folder Size is a freeware Windows utility that adds a new column to the Details view in Windows Explorer for Windows XP. The new column not only shows the size of files, but also shows the size of folders. It also keeps track of which folders you view and scans them in the background so that you can see the complete size of all files within the folder.


view folder size


In Windows Vista, Windows 7 and Windows 8, the program cannot edit the explorer interface, so it instead loads up a floating windows to the right of the explorer screen.


folder size


Here are a couple of its major features:


  • No need to switch to another program to view folder sizes. Also, it shows up in Open and Save dialog boxes (Windows XP only).


  • No scanning required before you start, folder sizes are displayed immediately. Large folders are scanned in the background while you browse.


  • The window will automatically update the folder sizes in real time


As of right now, the software works on Windows 2000 and Windows XP so that the column is displayed directly within Explorer. In Windows Vista and higher, the pop up window will display instead. The popup window is not the greatest solution and it can become a little annoying after a while. Thankfully, it does close when you close Explorer.


The developer realized this annoying issue and also made a small taskbar icon so that you can close the popup window when you don’t need it and simply click on the taskbar icon whenever you want to see folder sizes. After a few minutes, the program had scanned all the folders on my disk and I was able to instantly see the folder sizes.


show folder size


If you don’t want the popup window to appear at all when you open an instance of Explorer, just right-click on the taskbar icon and uncheck the Show Folder Size popups. This way, you can just let in run in the background and whenever you want to see folder sizes, just single click on the icon in the taskbar to open the window.


folder size window


The software also supports 64-bit machines, so that should make some people happy. There are some known issues with the software that the developer hopes to fix in the next version and they include:


1. Sometimes the size of the Windows directory will be reported larger than the actual size because of the use of hard links in the system.


2. The background service can sometimes run into permissions issues on certain machines.


3. The background scanning in Windows Vista and higher is not optimized fully as of yet.


4. Sometimes the pop up covers the close button on the Windows Explorer interface.


I didn’t run into any of these issues while running the program in Windows 7, but you should be aware of them as they might cause problems. Overall, it’s a good program, but I wish the developer was able to hack Windows 7/8 to get the size to show up as a column rather than in a separate window. Still, it’s close and with the hiding options and the fact that it closes with Explorer, it’s still a utility I would use. Enjoy!


The post How to View Folder Size in Explorer appeared first on Online Tech Tips.


Posted on 7:16 AM | Categories:

How to Move or Transfer Email Accounts from One ISP to Another


How to Move or Transfer Email Accounts from One ISP to Another


Are you looking for a way to move your email account from Gmail to Outlook or Yahoo to Gmail? Outside of the major email providers, if you’re still stuck with your college email address or an email from your local ISP like Cox or BellSouth, switching to Gmail, Yahoo or Outlook.com is a good idea because you’ll get a lot more features, better security and more support. Also, some colleges and universities eventually shutdown student email addresses after a certain time period, so switch before you lose everything.


You can try to perform a migration yourself and there are tons of tutorials on the Net, but if you’re not familiar with the technical details or don’t have the time, it might be better to use a third-party solution. So if you need to transfer your account info, emails, tasks, calendar items, address book and contacts, etc to a new email provider, there’s a paid service that can do it for you.


Note: There used to be a service called TrueSwitch that was backed by the likes of Google and Yahoo and let you switch between email providers for free, but it seems the site and service are no longer available. 


YippieMove


yippie move


You would think there would be more services out there to help people move their email between providers, but there really aren’t very many. YippieMove is now the only one that provides this service that I could find online. With TrueSwitch gone, you’ll have to pay a small price if you want someone else to migrate your email. If you want to do it for free, you’ll have to try it yourself. For those folks, scroll down to the bottom where I have listed out some excellent resources for migrating email yourself.


Basically, for one transfer, i.e. Cox to Gmail, you’ll have to pay $15. That includes transferring all the email from one account to the other.


What I like about YippieMove is that it supports a whole lot of email providers, including colleges/universities, international providers and those pesky local ISPs like Comcast, Cox, etc. Here is a full list of providers that they support.


Also, you can quickly check whether or not YippieMove will work for you or not by checking whether your email provider supports IMAP. If it only supports POP3, then you can’t use YippieMove. The good thing is that even if your email provider is not listed on the list of supported providers, it will probably still be able to migrate your email as long as IMAP is supported.


The site also provides quite a few guides and videos just to make the process even easier for you. It doesn’t list every possible transfer, but the principle is pretty much the same for all the transfers. To get started, you click on the Start now button on the homepage.


The process is basically three steps: where from, where to and what to transfer. Go ahead and fill in your login credentials for the email provider you want to move from first and click Next. Then enter the credentials for the email provider you are moving to and click Next.


moving email


Finally, on the last screen, you will get to choose which folders you want to migrate. It will try to match the folders for you, but if there are any problems, you can manually change the destination folder.


select folders


It’s worth noting that the website does not give you any error message if you mistype your login credentials on the first two steps. When you get to step 3, it’ll be empty instead of listing out the folders. In that case, go back and retype your login credentials. Also, if you’re using two-factor on any of the accounts, you will probably have to disable it in order to do the transfer. You could possibly use an app password, but I didn’t test that.


Finally, click Finish and the process will begin on their backend servers. According to the site, the entire process usually completes within 24 hours. The main feature talked about in the FAQ is the fact that YippieMove will maintain the integrity of the original email when performing the transfer. That means it will maintain the date/time it was sent, any attachments, read and unread status, etc.


You can then create an account and login to see the status of the migration. YippieMove also states that the credentials you enter on the site will be encrypted via SSL. The only issue I don’t like is their policy on storing your data. If you look at the privacy policy, it states they can store your credentials on their servers and that it will be deleted within 60 days.


I see no reason why they should hold on to your credentials for 60 days. My suggestion would be to use the service and then to change your passwords for both email providers just to be on the safe side.


Overall, YippieMove is a legitimate service that seems to work well for most people. I couldn’t find any bad reviews or remarks about the service online, so I’m guessing most people have been satisfied. For only $15, it worth a try even if it gets most of your email into the new provider. If you have used the service, let us know your experience in the comments. Enjoy!


The post How to Move or Transfer Email Accounts from One ISP to Another appeared first on Online Tech Tips.


Posted on 2:15 AM | Categories: