Monday, March 23, 2015

How to Avoid Problems Activating Windows After a Clean Install


How to Avoid Problems Activating Windows After a Clean Install


If you are planning on doing a clean install of Windows on your PC, you will more than likely have to reactivate Windows, either online or over the phone. Normally, the online reactivation will work just fine as long as the hardware on your computer hasn’t changed very much since the OS was originally installed and the version of Windows is exactly the same as the version that shipped with the computer.


If you have swapped out hard drives, graphics cards, memory, etc over time, then you might run into problems when you try to reactivate Windows online using the same product key. In these cases, you will have to call Microsoft and do an over the phone activation.


If the hardware hasn’t changed too much, you can make a backup of the information that Windows uses to ensure your copy is valid and then restore it after the reinstall, which I explain below using a freeware program.


Download Recovery Media


If the computer came installed with an OEM version of Windows and you perform a clean install with a retail version of Windows, it also won’t activate online. Previously, new PCs came with an OEM DVD that allowed you to reinstall Windows, but in the last few years most PCs now have a separate recovery partition that lets you restore directly from the hard drive. You shouldn’t have any problem activating Windows if you restore this way.


If you don’t have the DVD or recovery drive, you can either call Microsoft and try to activate by phone or you can directly download the ISO image files from Microsoft, but you will definitely need to have the product key from the COA sticker on the computer.


In order to download Windows 7 recovery media,  you have to enter a valid product key before it will let you download the ISO file. For Windows 8.1, you are not required to provide a product key for the download. You can get the Windows 8.1 ISO from the Create Media Reset page on Microsoft’s website.


It’s worth noting that for years you could download Windows 7 ISO images from DigitalRiver, an official distributor of Microsoft software. However, those have all been taken down and no longer work. Your only legal sources are the links above from Microsoft.


Another item to note is that if your computer has Windows 8, the key won’t be able to activate Windows 8.1. The same is true if you have a Windows 8.1 key and are trying to activate Windows 8. If you need a Windows 8 ISO image, then check out the Upgrade Windows with product key only page. Here you enter your product key and it will download the correct ISO image that can be activated for that specific key.


Windows XP


In Windows XP, you can avoid having to reactivate by simply copying a file from your Windows directory and saving it external media. When Windows XP is first activated, it creates a file called WPA.DBL and stores it in the C:\Windows\System32 directory.
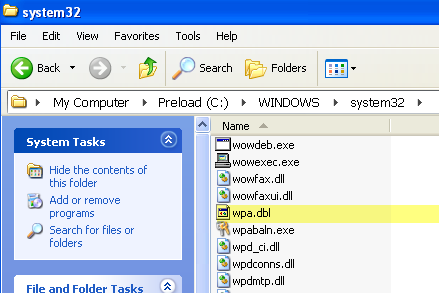

wpa dbl


Copy this file to your external storage device and keep it handy. When you go to reinstall Windows, you’ll reach the point where you have to activate. Decline the activation and complete the installation.


Now you’ll need to restart your computer in Safe Mode by pressing F8 on startup to get into the Advanced Boot Options menu.
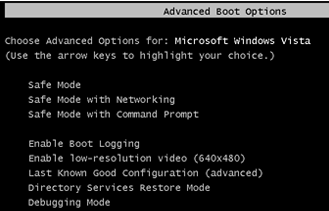

advanced boot options windows


Go to C:\Windows\System32 and you should see a file called WPA.DBL already there. Simply rename it to something like WPA.OLD and then copy your backup version of WPA.DBL to the current location.


Restart the computer and Windows XP should now be activated and working normally. Remember that this will only work if you use the WPA.DBL file from the same computer that Windows XP was originally activated on. If you install XP on a different machine and try to copy the WPA.DBL file there, it won’t activate.


Windows Vista, 7, 8


If you are running Windows Vista, 7 or higher, you won’t be able to simply copy one file in order to avoid the activation problem. There is a lot more information that is required, which makes it a lot more complicated.


Luckily, there is a freeware program called Advanced Tokens Manager that will make a copy of all the activation data for you and allow you to easily restore it later on.


Once you download it and unzip the files, go ahead and run the executable file. It doesn’t require any installation, so that’s nice. On the main screen, it will start detecting any valid Windows and Office products.
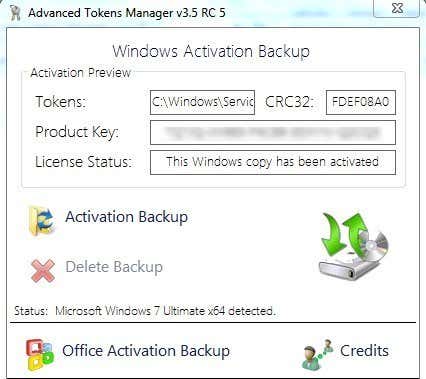

advanced tokens manager


If all works out well, the status should detect your version of Windows and it should display the product key along with the license status. To backup the data, just click the Activation Backup button. A fairly large dialog will pop up that basically explains all the features and the requirements in order for the activation to properly work. Make sure you read it carefully.
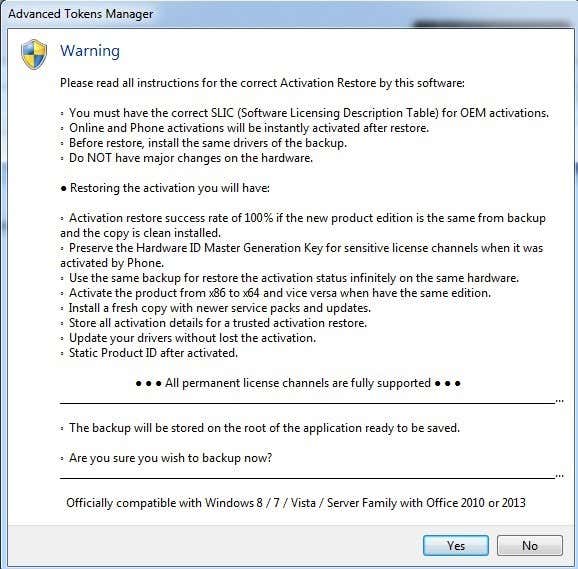

restore activation windows


The main points here are what I had already mentioned above: don’t make major hardware changes when performing the restore and make sure the OS edition is the same. Go ahead and click Yes and the backup will be created in a new folder called Windows Activation Backup, located in the same folder as the EXE file.


windows activation backup


You’ll want to make sure to copy this folder to some external media before you reinstall Windows. Once you have loaded Windows, simply download and run the program again. Make sure to copy the backup folder into the same folder as the EXE file. The program will detect the backup folder and the button will change to Activation Restore.
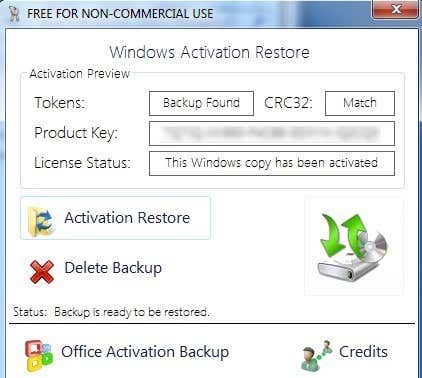

activation restore


Click on that and when it asks you if you are sure, click Yes. Wait about a minute or so and if the program succeeds, you will get a Success message.


activation success


At this point, you should be good to go with an activated copy of Windows. Note that if you Microsoft Office installed also, you can click the Office Activation Backup button and it will allow you to back that data up separately.


office activation backup


The only issue with Advanced Tokens Manager is that it does not fully support Windows 8.1. It can save all the activation data, but it can only restore activation for Windows 8.1 copies that were activated by phone. If activated online, it won’t be able to restore properly.


The developers say they are in the process of trying to figure this out, but there has been no update to the program September 2013, so that’s not a good sign. Either way, it works well for Windows Vista, Windows 7 and Windows 8. If you have any questions, post a comment. Enjoy!


The post How to Avoid Problems Activating Windows After a Clean Install appeared first on Online Tech Tips.


Posted on 9:33 AM | Categories:

Saturday, March 21, 2015

Remove Desktop Background Wallpapers in Windows


Remove Desktop Background Wallpapers in Windows


Looking for a way to delete desktop wallpapers from your Windows PC? If you have ever changed the wallpaper in Windows, you’ve probably noticed the ridiculous number of useless wallpapers that come with the system by default. I have NEVER used any of the built-in wallpapers and therefore wanted to figure out a way to delete them permanently!


This is probably a useless endeavor for most people, but if you are into customizing your machine to the max, then this might be worth your time.


If you right-click on the desktop, choose Personalize, and click on Desktop Background at the bottom you’ll see all the default wallpapers that are included in the system listed there. In Windows 7, you have categories like Architecture, Characters, etc.


windows 7 wallpaper


In Windows 8, you have more annoying categories like Flowers and Lines and colors. Again, I really would rather all of these wallpapers not show up.


windows 8 wallpapers


Windows 10 has another set of newly created wallpapers that will be shipping when it’s released this summer. Luckily, deleting the wallpapers is as easy as navigating to the correct folder and deleting everything there.


How to Remove Desktop Wallpapers


In Windows XP, there are a few locations where these annoying wallpapers are stored. In Windows 7, Windows 8 and Windows 10, the wallpapers are all stored in just one location. The main place to look in every version of Windows is:


C:\Windows\Web\Wallpaper


In that folder you will see the default wallpapers installed on the system. In Windows XP, you’ll see some JPG and BMP images, the most famous being Bliss.bmp, which is the default desktop background for that operating system.


windows wallpapers


In Windows 7 and higher, you might find a couple of folders and those are the categories that I was mentioning above.


wallpaper folder windows


Now you can simply delete all the images in this folder and they will be removed from the desktop background dialog the next time you open it. If you think you may actually want to use the wallpapers later, you can just cut them and paste them into a temp folder. Copy them back later on to have them show up in the list again.


One problem that you might run into when trying to delete wallpapers in Windows 7, 8 or 10 is an error message saying that you first need permission from TrustedInstaller.


trustedinstaller


This is a major annoyance in later versions of Windows and it’s meant to prevent non-technical people from messing up the system by deleting important system files. In order to delete the files or folders, you will have to change the owner to yourself first and then give yourself Full Control permissions.  Thankfully, I’ve already written a detailed article on how to delete files protected by TrustedInstaller.


If you want to add your own wallpapers into the C:\Windows\Web\Wallpaper directory, you can do so, but you will have to follow the same procedure and reset the permissions on the Wallpaper directory. Once you do that, you can copy over any image files you want in JPG format and they should show up in the desktop background dialog.


custom wallpapers


As you can see, I also created a folder inside the Wallpaper folder called My Wallpapers. Instead of the default wallpapers included with Windows, you can add a bunch of your own favorites. You can obviously add pictures from anywhere by simply clicking the Browse button and navigating to that folder, but the point here is to customize the look of the dialog so that it shows your custom wallpapers instead of the default ones.


As a side note, Windows XP also has a bunch of wallpapers stored in the C:\Windows directory. Make sure to be careful here because there are also many important files stored in the Windows directory and you don’t want to accidentally delete them. Note that you only want to delete the .BMP files, so leave everything else alone.


I would suggest viewing the directory in Thumbnails mode and then slowly browsing and deleting the wallpapers as you see them.


delete wallpapers


So that’s how you can remove background wallpapers from Windows if you like. It’s not something most people would care to do, but if you’re someone like me who likes to tinker, then it’s fun little experiment. If you have any questions, post a comment. Enjoy!


The post Remove Desktop Background Wallpapers in Windows appeared first on Online Tech Tips.



Posted on 1:00 PM | Categories:

Hide Text and Show Hidden Text in Word


Hide Text and Show Hidden Text in Word


Microsoft Word has a feature whereby you can hide text so that it does not visibly appear in the document. If you don’t want to delete text completely, hiding the text is a good option.


So why would you ever want to hide text in a Word document? Well, one reason would be if you wanted to print out two different versions of the same document, but didn’t want to create two separate files. In this case, you could hide some text, print the file and then print the document again, but choose to print hidden text in the printing options dialog.


In this article I will show you how to hide text in Word, how to view hidden text, and how to hide text and how to make it so that someone else can’t edit the hidden text. Note that you can hide text in Office for Mac in the exact same way as shown below.


Hide Text in Word 2007, 2010, 2013


First open any document you might have that has a fair amount of text in it. Here is an example document I am using for illustrative purposes.


word text


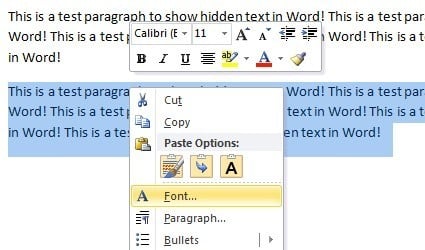
Highlight the text that you would like to hide and then right-click on it and choose Font.


right click font


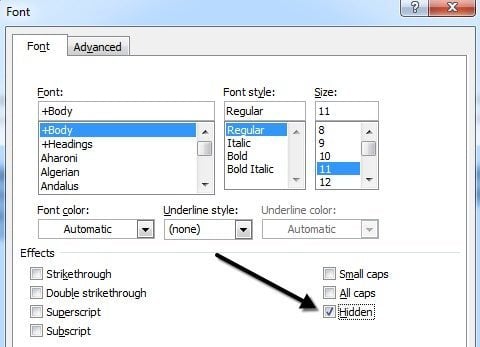
In the Font dialog box, you’ll see the Hidden checkbox in the Effects section. Go ahead and check that box.


font hidden word


Click OK and POOF, your text is now gone! All I am left with is one paragraph with no sign of the other paragraph. The paragraph still exists and there are some interesting questions that arise now that it’s hidden.


hidden paragraph word


The first question that popped into my mind was what happens if I start typing in the blank area that held the text earlier? Well, I went ahead and tested it out by typing another paragraph where the hidden text was previously.


overwrite hidden text


So what happened? Well, I’ll explain that in the next section when I talk about viewing hidden text in Word.


View Hidden Text in Word


Ok, so how do we go about getting the hidden text back to show up again the document? We basically follow the same procedure that when we hid the text. Press CTRL + A to highlight everything in the document, right-click on any highlighted portion and choose Font again. This time you will see the Hidden checkbox does not have a checkmark in it, but is instead fully green.


view hidden text


This means that some of the text selected is hidden and some is visible. Clicking on it once will change it into a checkmark, which means all the text in the document will be hidden and clicking on it again will remove the checkmark, meaning no text in the document should be hidden.


view hidden text


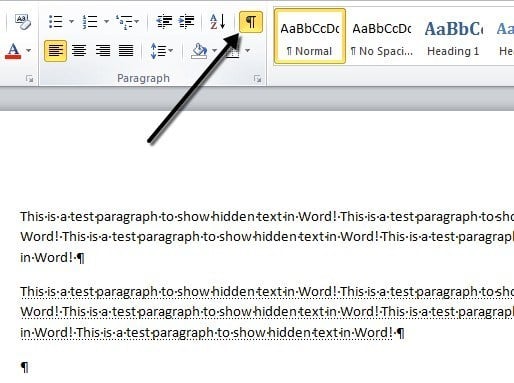
The hidden text is now visible, but as you can see, it’s in a slightly different location. It’s now located under the paragraph that I had typed when the text was hidden. So instead of being overwritten, it simply gets pushed down. If you want the text to remain in a certain place, you can click on the Show/Hide Paragraph Marks button and it will show you the hidden text with a special dotted underline.


show hide paragraph marks


You can then start a new paragraph in the location you want and then click the button to hide the text again. Now that you know how to hide and show hidden text, let’s talk about how to print it.


Printing Hidden Text in Word


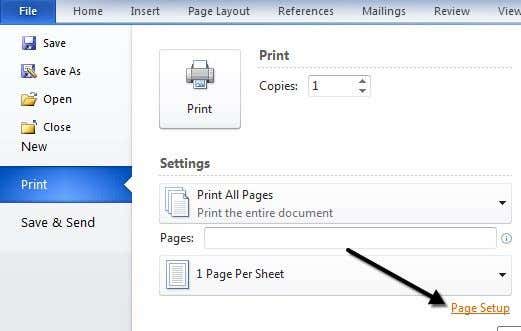
Printing hidden text in Word requires heading into the options section of the Print dialog. When you go to File and then Print, click on Page Setup at the bottom.


page setup word


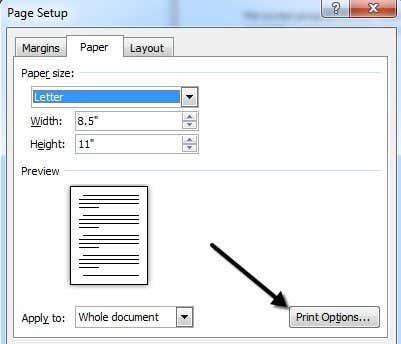
In the Page Setup dialog, click on the Paper tab and then click on Print Options.


page setup options


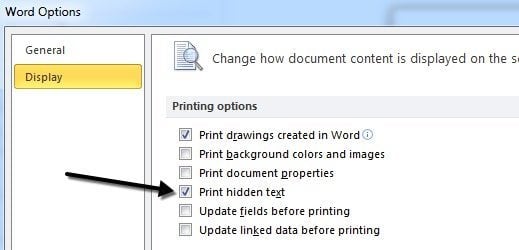
This will bring up the Word Options dialog box with the Display tab already selected. Here you will see a Print hidden text box under Printing Options.


print hidden text


You can also get to this dialog by clicking on File, then Options and then clicking on the Display tab. This setting is global, so you’ll have to go back and uncheck it later on if you don’t want to print hidden text for a different document.


So now that we know how to hide and show text, maybe you also want to prevent others from editing the hidden text? Well that is also possible as I show below.


Protect Word Document


Unfortunately, there is no way to completely hide hidden text in Word. If you send a document to someone that has hidden text, they will be able to view it if they know any of the procedures shown above. You can, however, prevent anyone from editing the text.


Protecting the document will prevent anyone from making any changes to any text. It will allow users to view the document, but not make any changes.


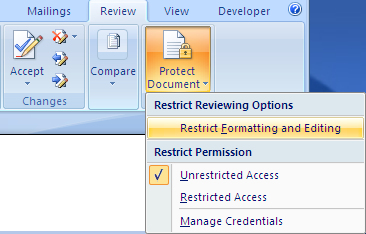
Click on the Review tab and click on Protect Document or Restrict Editing depending on your version of Office.


restrict formatting


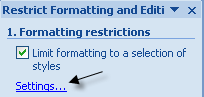
Check the Limit formatting to a selection of styles box and click on the Settings button.


limit formatting


In the Formatting Restrictions dialog, check the box again and click on None to make sure nothing can be changed in terms of formatting and style.


formatting restrictions


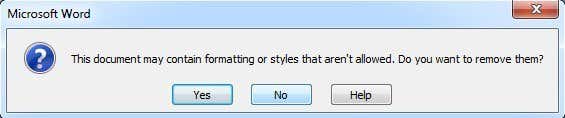
Click OK and you’ll get a pop up message asking if you want to remove some formatting styles that aren’t allowed. Make sure to click NO. If you click Yes, it will remove the hidden attribute from the hidden text and it will become visible again.


remove formatting word


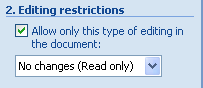
Next, check the box Allow only this type of editing in the document and leave it as No Changes (Read only).


no changes protect document


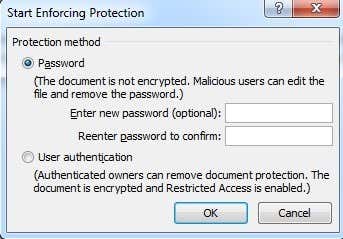
Under Exceptions, you can leave everything unchecked. Finally, click on the Yes, Start Enforcing Protection button and enter a password to protect the Word document. Try to make the password more than 8 characters, especially if you are using an earlier version of Office.


enter password protection


Even though others can view the hidden text, none of the text in the document can be edited. If you need the text completely hidden, you would actually have to remove it from the document. If you have any questions, feel free to post a comment. Enjoy!


The post Hide Text and Show Hidden Text in Word appeared first on Online Tech Tips.


Posted on 9:01 AM | Categories:

Friday, March 20, 2015

How to Remove UpdatusUser folder Windows 8.1/8/7/XP


How to Remove UpdatusUser folder Windows 8.1/8/7/XP


Well yesterday I thought of cleaning my system space and while I was deleting unnecessary files I found a strange folder “UpdatusUser” in the Users folder and I was bit surprised to see that because I have never seen that folder neither in the laptop on which i was working nor on my other desktop computer inspite of running same Windows 8.1 OS. I checked the size of UpdatusUser folder and it wasn’t much just around 300mb but still I wanted to remove UpdatusUser folder and i was a bit afraid of deleting that thinking it might cause some system issues so i checked about this UpdatusUser folder over internet and managed to get an overview about what is UpdatusUser folder and how to remove UpdatusUser folder without affecting your system which I am going to share here to help you out if you are also wondering about this UpdatusUser folder.


What is UpdatusUser folder ?


Usually this UpdatusUser folder is found in systems having NVIDIA Graphics drivers installed especially in laptops using Nvidia Optimus technology. UpdatusUser folder is automatically created during Nvidia graphics driver installer and it is user for the updation of graphics driver whenever new drivers are available. A whole new user control is created and thus this separate UpdatusUser folder is shown in the Users folder. So that’s why you all see UpdatusUser folder and it is verified because I also own a laptop running of Nvidia optimus technology.


How to Remove UpdatusUser folder in Windows - 1


How to Remove UpdatusUser folder in Windows 8.1/8/7/XP : Best Ways


Therefore after reading above you have now got a brief idea about UpdatusUser folder and you can now see that this has nothing to do with internal windows settings so you are free to remove this UpdatusUser folder without any hesitation at all. So if you are willing to get rid of this UpdatusUser folder then just follow the below given simple methods and you will be on your way to safe removal of UpdatusUser folder.


Method –  1 : Check for Nvidia Update / GeForce Experience Component


As i said above this is used for updation and is therefore basically provides an update service for Nvidia control panel so by removing the Nvidia Update or GeForce Experience component you can remove this folder from your system. What you have to do is just Go to your Control Panel -> Programs and Features -> Select Uninstall a Program -> There search for Nvidia update or GeForce Experience -> That’s it just select that component and click on uninstall to remove it successfully from your windows sytem.


How to Remove UpdatusUser folder in Windows - 2


Method – 2 : Removal of UpdatusUser Account from Accounts management


If you are an experience user you may go for the manual removal of UpdatusUser account from the system Users management dashboard which requires simple tweaking through Computer management.


  • Open RUN Command box and type compmgmt.msc in the box and Hit enter as shown below in the screen shot.


How to Remove UpdatusUser folder in Windows - 3


  • Here Go to Local Users and Groups ->  Users -> On the right hand side you will see UpdatusUser -> Just select that user and delete that user.


  • That’s it you will asked for conformation just conform your selection and you will no longer see that UpdatusUser folder in your system.


Method – 3 : Manually Deleting UpdatusUser folder by taking Ownership


Well if after trying the above solutions so you still face the same issue you can follow the manual removal procedure which will just require the folder ownership so that you can be eligible for deleting that folder because such folders can’t be removed like others. So for this you need to take ownership of that particular folder and thereafter you are free to delete that folder.


The post How to Remove UpdatusUser folder Windows 8.1/8/7/XP appeared first on RushInformation.


Posted on 12:46 PM | Categories:

Thursday, March 19, 2015

Ultimate Guide to Backing Up and Restoring the Windows Registry


Ultimate Guide to Backing Up and Restoring the Windows Registry


Windows stores just about everything that makes it work in a hierarchal file-based database called the Windows Registry. The registry contains all the configuration settings for the operating system, programs, services, components and pretty much everything else. Everything from the size of the icons to the color of the taskbar is stored there.


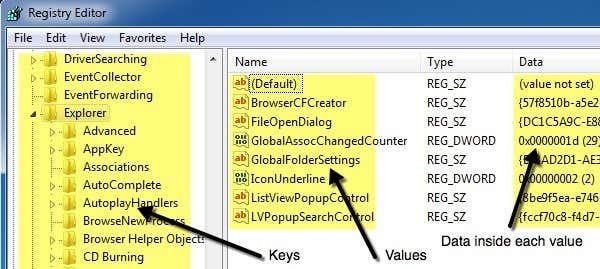
The registry is made up of millions of keys and values. You can think of keys as folders and values as the data stored inside the folders. In the registry editor, keys actually look like folders and values are what hold the actual settings. Each key in the registry can have more than one value, kind of like a folder can have more than one file stored inside.


Also, values can store data of different types including String, Binary, DWORD, QWORD, and more. You don’t really need to understand that level of detail, but hopefully you understand the structure of the registry.


registry keys values


In terms of backing up the registry, you really have two options: backup parts of the registry manually via export or backup the entire registry using System Restore. When you make a change to the registry, it’s always a good idea to create a restore point and then backup the edited section of the registry also.


There is a way to export the entire registry, but that’s not a good option for several reasons. Firstly, you’re going to get a large file that you have to store somewhere. Secondly, if you’re only changing one setting, trying to import back the entire registry later on may overwrite many other newer values that were written to other parts of the registry after the export. This can actually lead more problems and possible corruption. Lastly, you may not even be able to import back the entire registry because a lot of keys will be in use by Windows and therefore simply won’t be written.


The best option to backup and restore the entire registry is to use System Restore. So when making a change, create a restore point first and then backup the only edited section manually. If there is a problem, you can always reload the exported section by simply double-clicking on the .reg file in Windows.


If you can’t get into Windows anymore because the registry change messed something up more severely, then you can simply start up the Advanced Recovery Options and choose the previous restore point you had created. I’ll explain both methods in detail below.


Opening Registry Editor


First, let’s talk about opening the registry editor. In just about every recent version of Windows, you can open the registry editor by clicking on the Start button and typing in regedit.


open regedit


You probably already know how to do this considering you found this article while trying to learn how to backup the registry. Obviously, before you make any changes to the registry, you should always back it up. Now let’s get to the main point of this article on the different ways you can backup the Windows registry.


Backup Parts/Sections of the Registry


In many of my posts, I’ve mentioned tweaks or tips that require editing a key or value in the registry. If you’re going to be making a single change here and there, you don’t really need to backup the entire registry necessarily.


Let’s say you are editing a value stored at the following key:


HKEY_LOCAL_MACHINE – SOFTWARE – Microsoft – Windows – CurrentVersion – Explorer


You can right-click on Explorer and choose Export to make a backup of the entire key along with all sub-keys and any of their values.


export keys


You’ll notice that there are quite a few other sub-keys under the main Explorer key. By default, only the selected branch along with sub-keys and values will get exported. If you want to export the entire registry, you have to choose All under Export Range when saving the .reg file.


export range registry


Again, I don’t recommend backing up the entire registry in this manner as you’ll end up getting a Cannot import error when trying to import the file back.


cannot import registry


So stick with exporting only selected branches and you’ll have a better chance of being able to re-import the registry file later on. Now let’s talk about using System Restore to perform a full backup of the registry.


Backup Entire Registry via System Restore


Using System Restore, you won’t run into issues restoring to a previous state because Windows handles all the locked and in-use issues for you. You will always create a restore point while using Windows and it’s very simple to do.


Click on Start and type in Create restore point and click on the first result. You’ll be bought straight to the System Protection tab in the System Properties dialog.


create restore point


Click on the Create button at the bottom and another dialog will pop up asking for a description. Click the Create button and the restore point will be created.


restore point


It should only take a few minutes to create the restore point. Once completed, you can restore a previously created restore point in two ways: via the same System Restore dialog in Windows or via the Advanced Recovery Options screen. I’ll show you both methods below.


Restore Registry via Windows


If you are still able to start Windows and log into the system, then you can try to restore the registry by opening System Restore. Click on Start and type in system restore and click on the first result.


When the System Restore dialog pops up, go ahead and click Next. On the following screen, you will see a list of all the different restore points currently on the system.


restore registry


You will see the manually created restore points along with the automatically created ones too. You can check the Show more restore points box to see all the restore points stored on the system. If you click on the Scan for affected programs button, it will give you a list of any programs that were installed after the restore point was created since those will be removed. It will also tell you which programs were removed after the restore point was created that will be restored.


Click Next and Finish and that’s about it. The system will be reverted back to the previous restore point and you should be good to go. Note that System Restore does not alter any of your personal data when changing the state of the system. It only looks at the registry, programs and system files.


Restore Registry via Recovery Options


If you are not able to log into Windows, then you can still use system restore, but only via Advanced Boot Options in Windows 7 and Advanced Recovery Options in Windows 8 and Windows 10. The method is slightly different for all three operating systems, so I will explain them all below.


Windows 7 Recovery


For Windows 7, you have to restart your computer and then press the F8 key during the initial boot up. This will bring up the Advanced Boot Options screen and the first option there will be Repair Your Computer.


repair your computer


Select it and press Enter. This will load the System Recovery Options dialog and here you will need to choose System Restore.


system recovery options


Again, you just choose the restore you want to revert back to and that’s it. Normally, if you are having problems loading Windows, the Advanced Boot Options screen will appear automatically.


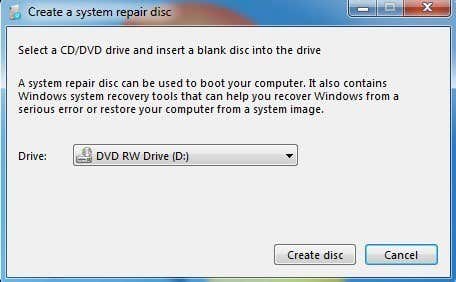
Note that if you are unable to load the boot options using F8, you may have to use a System Repair Disc. You can create a repair disc on any Windows 7 PC by clicking on Start and typing in system repair disc.


system repair disc


Pop in a CD or DVD and click the Create disc button. Once you have this disc, you can boot directly from it to get the system recovery options shown above. The only thing you need to ensure is that the boot order has the CD/DVD ROM drive listed first.


repair disc windows 7


Windows 8 Recovery


In Windows 8, the entire recovery procedure and GUI is completely different. Instead of the boring DOS interface of before, you now have a fancy looking modern GUI, which makes things a lot easier.


F8 no longer works when trying to get to this new interface. Luckily, I’ve already written a post about the different methods you can use to get to the advanced boot options screen in Windows 8. Once you have gotten to the main screen, click on Troubleshoot.


troubleshoot win 8


Under the Troubleshoot section, go ahead and click on Advanced options at the bottom.


advanced options troubleshoot


Finally, click on System Restore on the last screen and you’ll get the familiar system restore dialog to pick the restore point you want to revert back to.


system restore advanced options


In Windows 8, you can create a system repair disc like in Windows 7 or you can create a USB recovery drive. To create a repair disc, click on Start and type in recdisc.exe and to create the recovery drive type in recovery drive.


create recovery drive


Again, you only need to create these using a different computer if you are not able to load the recovery options on your current PC.


Windows 10 Recovery


The procedure in Windows 10 is exactly the same once you get to the advanced boot options screen, but slightly different while in Windows. Since the Start Menu is back in full form in Windows 10, you can click on that and then click on Settings.


start menu win 10


Next, click on Update and recovery in the Settings dialog. As you can see, the Settings dialog in Windows 10 is completely different than the one in Windows 8.


windows 10 settings


Finally, you’ll be able to click on the Restart now button under Advanced startup. This will get you to the same Choose an option screen where you will click Troubleshoot.


advanced startup win 10


Hopefully, the detailed instructions above will allow you to safely and easily backup and restore your registry in Windows 7, Windows 8 and Windows 10. If you have any questions, feel free to post a comment. Enjoy!


The post Ultimate Guide to Backing Up and Restoring the Windows Registry appeared first on Online Tech Tips.


Posted on 11:15 PM | Categories: