Wednesday, April 15, 2015

How to Set Away Message in Outlook


How to Set Away Message in Outlook


Going out of the office soon and need to setup an Out of Office, Away or Vacation message in Outlook? You would think it would be super easy, but unfortunately it’s not! There are actually two ways of creating an automatic reply and it depends on whether Outlook is stand-alone or using Microsoft Exchange.


If your are in a corporate environment and Outlook is connected to MS Exchange, then setting an out of office reply is actually very easy. Let’s go through that method first and then we’ll discuss how to do it if you are not using Exchange.


Out of Office Message w Exchange


In Office 2007 and earlier, go to Tools and click on Out of Office Assistant. Note that this should be there automatically in Outlook 2003 and Outlook 2007 when using Exchange. If you don’t see the option, you’re not using Exchange.


out of office assistant


In Office 2010 and Office 2013, you have to click on the File tab, then Info and you’ll see a button called Automatic Replies (Out of Office).


out of office


In Office 2007 and earlier, click on the I am currently Out of the Office radio button and type in the message into the AutoReply box.


out of office outlook


Go ahead and put the date you will be out till and also put in any contact info in case there is an emergency, etc. If you click OK, everyone will get this message until you come back to this dialog and change it to I am currently in the office.


You can also add rules to incoming messages while you are out of the office by clicking on Add Rule. This is useful if you want to perform certain actions on emails coming from different people. For example, if you get an email from a client, you may want to forward it to your phone or reply with a different email template than the one used for internal employees. If you don’t know how to use rules, read my previous post on how to create Outlook rules.


email auto reply


In Outlook 2010 and 2013, it’s a bit different. When you click on Automatic Replies, you’ll get a pop up dialog like the one shown below.


automatic replies outlook


Select the Send automatic replies button and then check the Only send during this time range box if you know the exact dates you’ll be gone. If you leave it unchecked, it will simply leave the automatic reply on until you manually come and select Do not send automatic replies.


What’s also cool about this version is that you can have a separate auto reply setup for people inside and people outside your organization. Again, as with the earlier versions of Office, you click on Rules if you want to add exceptions to the auto reply.


Out of Office Message w/o Exchange


So this is great if you have Outlook with Exchange, but what if you don’t have access to Out of Office Assistant or Automatic Replies? Well there is a way you can EMULATE the out of office assistant by creating an automatic reply rule along with a out of office template. Here are the steps below.


Step 1: First create a new message in Outlook as if you are going to write someone an email. Do not put anything in the TO or CC boxes. Type in your away email message and put in a subject also.


new office email


Click on the Microsoft Office button or the File tab in newer versions of Office and choose Save As. In the Save as type combo box, select Outlook Template. Type a name such as Out Of Office Reply in the File Name box and click Save.


out of office template


Step 2: Now all we need to do is create a rule and tell Outlook to use the new email template we just created. For Office 2007, click on the Tools menu and go to Rules and Alerts.


rules and alerts


In Office 2010 and 2013, click on the Home tab, then click on Rules and then click on Manage Rules & Alerts.


manage rules


Click on New Rule under Email Rules to create a new Outlook rule.


new rule outlook


Under the section Start from a blank rule, go ahead and click on Check messages when they arrive in older versions of Office or Apply rule on messages I receive in newer versions of Office, then click Next.


apply rule outlook


Next you’ll have to choose which conditions, if any, you want to check. For out of office auto replies, I normally don’t check anything since I want it to apply to any email that I receive.


outlook rule condition


Click Next and then under Actions, check the box that says “Reply using a specific template” and then in the second text box at the bottom, click on the link that says a specific template.


reply using specific template


Now select the template that you had created earlier from the list of templates. If you do not see your template, click on the Look In combo box and choose Use Templates in File System.


reply template outlook


Click Open and then click Finish. Now whenever you get a new email, an automatic response will be sent using your auto reply template. Outlook remembers whom it sends the messages too and will only send it once to each email address.


To turn it off, you have to go back into Rules and Alerts and uncheck the box next to the rule. Also, you have to make sure that Outlook is open on your computer before you leave in order for it to send the auto replies! If you have any questions, feel free to leave a comment. Enjoy!


The post How to Set Away Message in Outlook appeared first on Online Tech Tips.


Posted on 4:15 AM | Categories:

Sunday, April 12, 2015

How to Watch IPL Online Live Streaming in India : Hotstar App


How to Watch IPL Online Live Streaming in India : Hotstar App


Well IPL (Indian Premier League) is a popular Twenty20 Cricket Tournament founded in 2008 hosted by BCCI which has now just become an annual Indian festival that usually starts from April and lasts till the end of May. As per the resources and online information IPL is recognized as one of the most-watched Twenty20 league worldwide and is also popular for its commercial success. IPL was the first sporting event that was broadcasted live on Youtube Channel in 2010. As of now IPL is conducting its eigth season that has been already started from 8th April 2015 onwards and is now receiving an amazing response from the people on the stadium as well as from the audience that is watching pepsi IPL live on their TV screens across the World. Check more on how to watch IPL online live streaming.


Currently in this eigth season of IPL 2015 there are total 8 teams (Rajasthan Royals, Kolkata Knight Riders, Mumbai Indians, Chennai Super Kings, Kings Eleven Punjab, Royal Challengers Bangalore and Surnrisers Hyderabad) fighting and practicing hard to win the IPL trophy and the prize money.


Watching Pepsi IPL is really a great source of enterntainment and pleasure to get rid from the all day long frustraing and tiresome work. So if you are at home in front of your Television screen then you can consider yourself very lucky getting a chance to watch live ipl streaming in front of your TV screens but what if you are not at your home working late hours in offices or your cable is not working and still wanting to watch live IPL streaming. I have seen lots of my friends searching and wasting hours for getting links for watching IPL online streaming but the truth is no such links exists and therefore here I am going to share how you can watch live IPL streaming online no matter where you are are as far as you are having a decent internet connectivity and a smartphone with you. Well the method that I am going to share is really new that works beautifully and is an official one too. Follow the below given steps on how to watch UPL Online live streaming.


Set Max Live Watch Online Free : Watch IPL Online Live Streaming


As I said above all the links that are provided over internet at different websites are fake and therefore I highly recommended all of you to first stop searching for such links as this is gonna waste your valuable time because no such links exists and the one and only way to watch live IPL streaming is to follow the below given method via Hotstar App. What here we gonna do is watch IPL live on set max through the Hotstart App that allows for free set max watch online feature. So before we proceed on further lets get familiar with Hotstar App. Watch IPL Online Live streaming with the help of Hotstar Live App.


About Hotstar App : Brief Intro and Key Features


Hoststar is basically an mobile application developed and produced by Star India Pvt Ltd providing free access to watch latest TV Shows, Movies, LIVE sports and much more on your smartphone. With Hostart App installed on your mobile device along with a good internet connectivity gives you the feel of carrying your own Television with yourself 24/7. What is more interesting about Hotstar is that you don’t need to sign-up or do any kind of registration for watching shows on Hotstar App. Currently Hostart App is available on all the major mobile platforms like Google Android, Apple iOS and Windows Phone.


How to Watch IPL Online Live Streaming


How to Watch IPL Online Live Streaming via Hostar App : Steps to Follow


  • First of all you need to download and install Hotstar App on your mobile device as per your mobile operating system platform.


Download Hotstar App for Google Android Smartphone


Download Hotstar App for Apple iOS Smartphone


  • That’s it after downloading and installing Hotstar on your device you just have to open Hotstar on your device and navigate to the sports section and there you will find the IPL section from where you can easily watch live IPL streaming.


The post How to Watch IPL Online Live Streaming in India : Hotstar App appeared first on RushInformation.


Posted on 6:46 AM | Categories:

Sunday, April 5, 2015

How to Adjust Android Phone Volume Without Buttons


How to Adjust Android Phone Volume Without Buttons


There’s a popular saying that nothing is permanent and that goes quite well especially with the hardware devices which starts wearing out as their life cycle progresses. There’s nothing to surprise about this because no matter how hard or how safely you try to use these hardware devices they will surely gonna fail sooner or later but they will for sure. This same fact applies for all your mobile devices as well be it your android smartphone or Apple iPhone iOS though it is a well known fact that if you spend more you will get a better quality product but as i said above nothing is permanent so there’s no guarante that your device is going to last for long. In my personal life experience I have seen lot’s of mobile devices getting failed and my recent experience was with my friends android device whose volume buttons got damaged and was having quite a frustrating time adjusting the phone volume until I provided him with one amazing solution to adjust android phone volume without buttons which I am going to share with you and I hope you found this information helpful. Just check below on how to adjust android phone volume without buttons quickly.


How to Adjust Android Phone Volume without buttons : Volume ChopCUT App


By default there’s an option to adjust phone volume via android phone settings but accessing that becomes quite a hectic especially while listening to music or watching videos on phone. Though if you are having an android smartphone running on Cynaogen mod like Micromax Yureka there’s a special volume tile section under quick settings to adjust volumes frequently at ease but there’s no such direct option for normal android users. Therefore here I am going to tell you about an amazing app that is Volume ChopCUT which provides you easy control over all your phone volume settings.


How to Adjust Android Phone Volume without buttons


  • After you will be finished with downloading and installing Volume ChopCUT app on your device it will provide you with three different volume input methods after you run the app. The three different volume input methods are – Basic Notification, Extended Notification and Floating Widget.


    • Basic Notification options puts a direct link to the phone volume control settings on your phone notification bar for quick access. You can also choose different options from the type of volume to edit on the notification like ringer, alarm, media or all.


  • Extended Notification places full volume controller on your notification bar so that you can easily increase, decrease or mute your phone volume.


  • Floating Widget places a floating bubble on your phone screen no matter whatever you are accessing providing quick access to adjust your phone volume.


The post How to Adjust Android Phone Volume Without Buttons appeared first on RushInformation.


Posted on 10:30 AM | Categories:

Saturday, April 4, 2015

Thursday, April 2, 2015

How to Change Default Picture Viewer in Windows


How to Change Default Picture Viewer in Windows


By default, when I double-click on a picture in Windows, Windows Photo Viewer opens the image! That’s nice, but I would rather it open with a different photo viewing program, such as Photoshop, GIMP, etc.


If this problem annoys you also, there is a simple way to change the default photo viewing program in Windows to the application of your choice! Actually, there are two ways to go about it.


Also, you can configure it so that one image type opens with one application and another image type opens with a different program. So you could have JPG images open with Photoshop and GIF images open with Photo Viewer, for example.


Adjust Default Programs


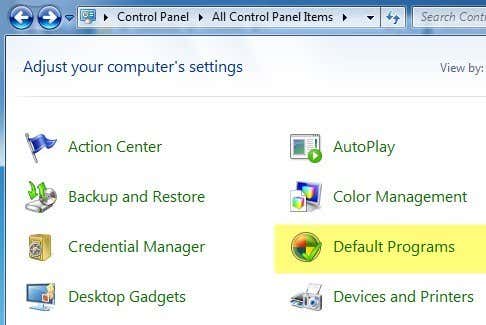
In Windows 7 and higher, you can change which file types a program opens or you can change which program is used when opening a specific file type. Click on the Control Panel and then click on Default Programs while under the icons view.


default programs


Here you will see the two options I mentioned above: Set your default programs and Associate a file type or protocol with a program.


set program defaults


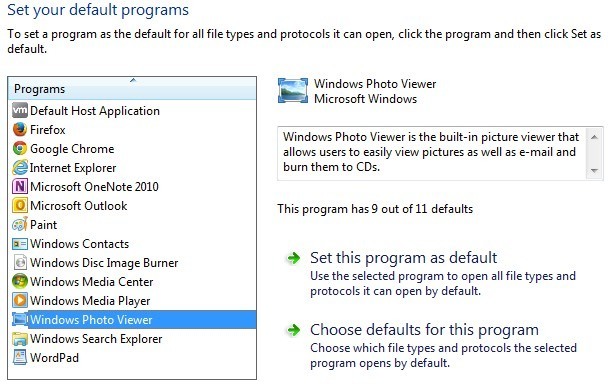
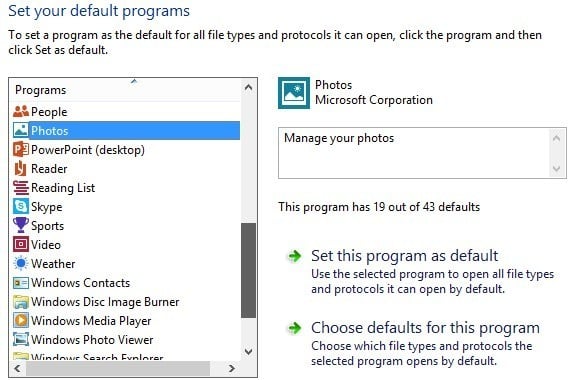
If you click on the first link, you’ll get a list of the different programs installed on your computer. Select the program and Windows will tell you how many defaults this programs is set to open.


program defaults windows


You can then click on Set this program as default to have it open all the default file types or you can click Choose defaults for this program to choose specific file types.


set program associations


In the example above, Internet Explorer is set to open GIF images and Microsoft Office 2010 is set to open JPG files. All other formats are set to open with Windows Photo Viewer. If you want to use a different program to open pictures, for example, select that program from the list and then choose Set this program as default.


Adjust via Open With


Going back and clicking on Adjust a file type or protocol with a program will allow you to browse through the hundreds of file types stored on the computer and then change the default program for opening that type of file.


associate file type


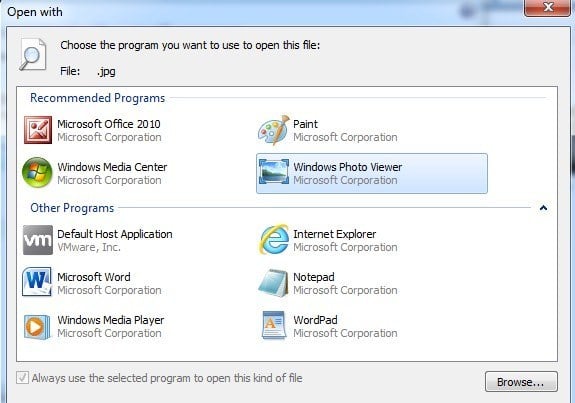
When you click Change Program, you’ll get a list of Recommended Programs and Other Programs, along with an option to Browse to a program that is not currently listed.


open program with


The advantage to this method as opposed to the first option is that here you can choose any program you like to open a file. In the first method, only programs that have registered with Windows will show up in that list and there is no way to manually add a missing program.


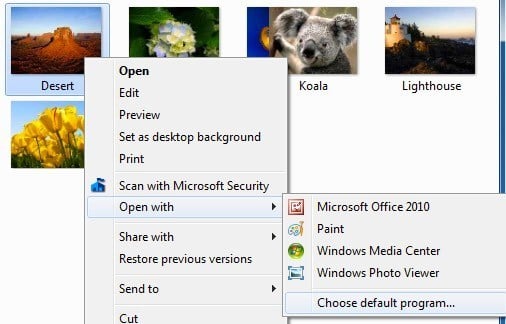
You can also get to this same dialog by right-clicking on the any file in Explorer, clicking on Open With and then clicking on Choose default program.


open with dialog


Windows 8, 10 Default Programs


In Windows 8 and Windows 10, things are slightly different because now you have desktop apps and you have Windows Store apps. By default, all Windows 8/10 PCs will have Windows Photo Viewer and the Photos app installed. The former is a desktop app and will load there and the latter is a Windows Store app and will load as an app.


You can follow the same procedures as for Windows 7, but the only difference is that you will see the Windows Store apps listed as options too.


windows 8 default programs


Hopefully, you can now double-click on an image and expect the correct program to open. You do want to be careful changing these settings because there is no way to simply reset all default programs back to their original values. I’m not sure why this option doesn’t exist, because it should, but it’s just not there.


The only real way to reset default programs is to either download a registry file that will manually change each value or create a new user profile. These settings are stored on a per user basis, so creating a new user account will start you from scratch. If you have any questions, feel free to post a comment. Enjoy!


The post How to Change Default Picture Viewer in Windows appeared first on Online Tech Tips.


Posted on 4:15 AM | Categories:

Change or Spoof a MAC Address in Windows or OS X


Change or Spoof a MAC Address in Windows or OS X


Every NIC (Network Interface Card) has a unique MAC address (Media Access Control). This applies to all types of network cards, including Ethernet cards and WiFi cards. The MAC Address is a six-byte number or 12-digit hexadecimal number that is used to uniquely identify a host on a network.


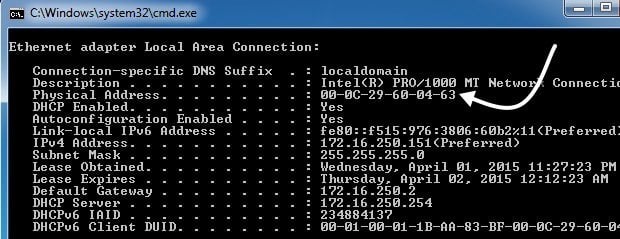
An example of a MAC address is 1F-2E-3D-4C-5B-6A and it falls into the Layer 2 networking protocol of the OSI model. In today’s networks, ARP, or Address Resolution Protocol converts a MAC address to a Layer 3 protocol address, such as an IP address. A MAC address can also be called a Physical Address. Read my post on how to find your MAC address if you don’t know it.


mac address


All MAC addresses are hard-coded into a network card and can never be changed. However, you can change or spoof the MAC address in the operating system itself using a few simple tricks.


So why would you want to change your MAC address? Well there are many reasons for this, mostly related to bypassing some kind of MAC address filter set on a modem, router or firewall. Changing the MAC Address can help you bypass certain network restrictions by emulating an unrestricted MAC Address or by spoofing a MAC address that is already authorized.


For example, a WiFi network may allow only authorized computers to connect to the network and filters out computers based on the MAC address. If you can sniff out a legitimate MAC address, you can then spoof your MAC address and gain access to the WiFi network.


Another example is if you have an ISP that allows only a certain number of computers to connect to the Internet from your home. If you have more computers that need to connect, you can spoof the MAC address of an authorized computer and connect from a different computer.


Change Windows MAC Address


You can change the MAC address for the network card in Windows pretty easily following the steps below.


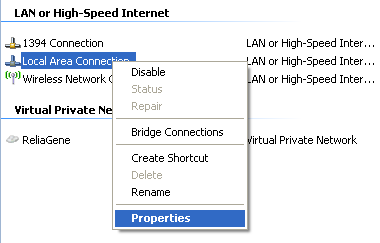
Step 1: Click on Start, then Control Panel, then Network Connections, and right-click on the network connection you want to change the MAC address for and select Properties. It will normally either be Local Area Connection or Wireless Network Connection.


local area connection


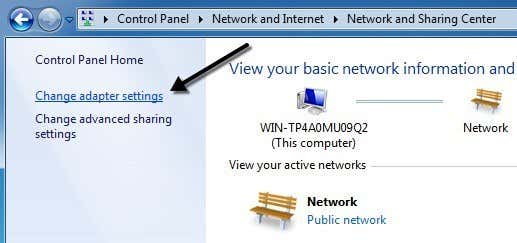
If you are using Windows Vista, Windows 7 or higher, you have to go to Control Panel, then Network and Internet, then Network and Sharing Center, and then click on Manage Network Connections or Change adapter settings.


change adpater settings


Then you can right-click on the adapter and choose Properties.


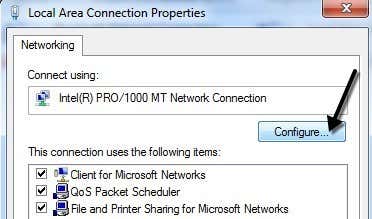
Step 2: On the General or Networking tab, click the Configure button.


configure network adapter


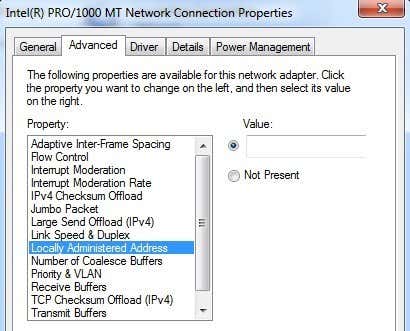
Step 3: Now click on the Advanced tab and click on the Locally Administered Address property or the Network Address property.


locally administered address


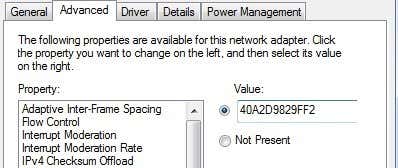
By default, the Not Present value is selected. Go ahead and click on the Value radio button and enter in a new MAC address. The MAC address is a combination of 6 pairs of numbers and characters, i.e. 40-A2-D9-82-9F-F2. You should enter the MAC address without the dashes.


mac address change


You can go to the command prompt and type in IPCONFIG /ALL to check that the MAC address has been changed. Go ahead and restart the computer in order for the changes to take effect.


This is the simplest way to change your MAC address in Windows. You can also do so via the registry, but it’s much more technical and probably not required by most people.


Change OS X MAC Address


Changing the MAC address on OS X is definitely not as easy as it is on Windows. Firstly, you have to use Terminal (similar to command prompt in Windows) to actually change the MAC address.


Secondly, you need to manually figure out the technical name of the adapter before you can change the settings. I’ll explain everything below step by step, but it gets a bit complicated at times.


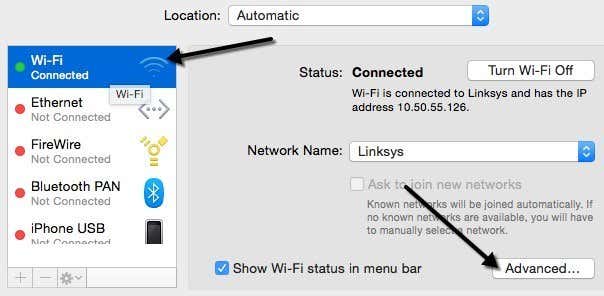
To start, let’s find out the current MAC address for your Mac. You can do this in one of two ways: via System Preferences or via Terminal. Open System Preferences, click on Network and then click on the Advanced button. Make sure to select the appropriate interface first (WiFi, Ethernet, etc) in the listbox on the left.


os x network advanced


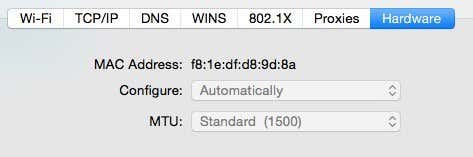
Click on the Hardware tab and you will see the first line is MAC Address. I thought you could simply choose Manually from the Configure dropdown, but that doesn’t allow you to edit the MAC address.


network hardware mac


In Terminal, you can get the MAC address by typing in the following command:


ifconfig en0 | grep ether


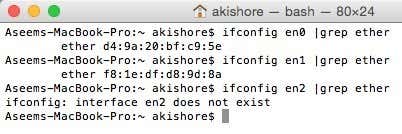
This will give you the MAC address for the en0 interface. Depending on how many interfaces you have on your computer, you might need to run this command several times adding 1 to the number each time. For example, I ran the following commands below until I reached an interface that didn’t exist.


terminal os x ifconfig


Now you can simply compare the MAC addresses listed here with the one you saw via System Preferences. In my case, my WiFi MAC address of f8:1e:df:d8:9d:8a matches with en1, so that is the interface I have to use for the next commands.


Before we change the MAC address, you can use a useful command in Terminal to generate a random MAC address if you need one.


openssl rand -hex 6 | sed ‘s/\(..\)/\1:/g; s/.$//’


Now that you have a new MAC address, you can change the current one using the following command below. Replace XX with the actual MAC address you want to use.


sudo ifconfig en0 ether xx:xx:xx:xx:xx:xx


In order to do this, you need to be logged in as an Administrator or you have to enable the root account in OS X. By default, root is disabled and it’s better to leave it disabled if you can. Just login as an admin and you should be able to run the command just fine. It will ask you for your password, though, before changing the MAC address.


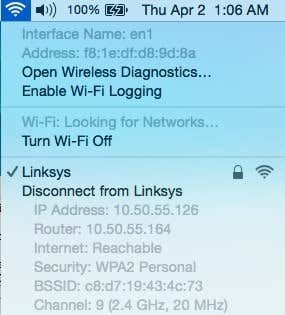
Also, the address won’t change if you are still connected to a WiFi network. You need to first disconnect from any networks and then run the command. Surprisingly, disconnecting from a wireless network in OS X is not intuitive at all. You have to press and hold the Option key and then click on the WiFi icon to see the disconnect option.


disconnect from wifi os x


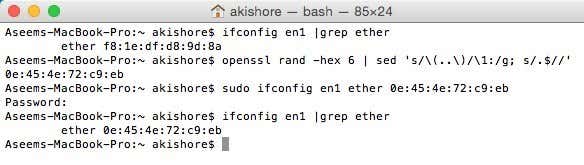
So here is a rundown of all the commands I ran in order to get the current MAC address, generate a random one, update the MAC address and then verify to make sure it had actually changed.


mac address change os x


As I mentioned earlier, this is definitely not as straightforward as the process is on Windows, but you should be able to do it if you simply copy and paste the commands above. If you have any questions, feel free to post a comment. Enjoy!


The post Change or Spoof a MAC Address in Windows or OS X appeared first on Online Tech Tips.


Posted on 12:31 AM | Categories:

Wednesday, April 1, 2015

How to Turn On Auto-Complete in the Command Prompt


How to Turn On Auto-Complete in the Command Prompt


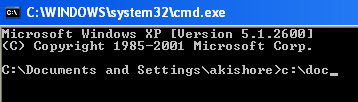
Do you use the command prompt on a daily basis? If so, I recently found a way to turn on auto-complete for the command prompt via a simple registry edit. When typing in long path names, simply type in the first few letters and then press TAB to autocomplete either folder or file names.


For example, if I am typing in C:\Documents and Settings\, I would just need to type in C:\Doc and then press the TAB key.


enable auto complete command prompt


dos prompt auto complete


As you can see, there is only one folder that starts with “doc“, so it automatically gets completed with quotes added. Now that’s pretty neat. If you want to continue further, just add another \ to the end and then press TAB. Note that you can add the forward slash after the quote and it will still work just fine.


You can continue through the different folders and files in a directory by simply pressing the TAB key. So if you type in C:\ and then keep pressing the tab key, you will be able to cycle through all the folders and files in that path in alphabetical order, i.e. C:\Documents and Settings, C:\Program Files\, etc.


Note that this really only applies to Windows XP. In Windows 7 and higher, autocomplete will work automatically when you press the TAB key.


Enable Autocomplete for Command Prompt


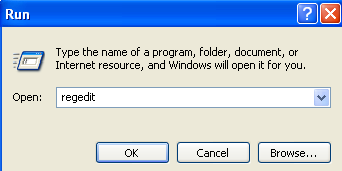
Step 1: Click on Start, then Run and type in regedit in Windows XP. In Windows 7 and higher, just clicking on Start and then type regedit.


regedit


Step 2: Navigate to one of the following registry keys:


HKEY_LOCAL_MACHINE\SOFTWARE\Microsoft\Command Processor


HKEY_CURRENT_USER\SOFTWARE\Microsoft\Command Processor


So which one do you pick? Well, here’s how it works. The Local Machine key will apply to all users on the computer, but will be overridden by the Current User key if the value is different. For example, if autocomplete is disabled at the HKLM key, but enabled on the HKCU key, then it will be enabled. You can tell if autocomplete is disabled when pressing the TAB key simply inserts a TAB space.


You can change the settings in both locations if you like, but it is really only needed in the HKCU key for autocomplete to be enabled.


Step 3: Double-click on the CompletionChar key and change the value to 9 in decimal format. CompletionChar enables folder name completion.


command processor


You can also enable file name completion by changing the value of PathCompletionChar to 9 also. Note that the value 9 or 0x9 in hexadecimal is to use the TAB control character for autocomplete. You can also use other keys if you like.


For example, you can use 0x4 for CTRL + D and 0x6 for CTRL + F. I personally find the TAB key to be the most intuitive key, but you have other options if you need.


You can also use the same control character for both file and folder completion if you like. In this case, autocomplete will show you all matching files and folders for the given path.


As mentioned earlier, the default value in Windows 7, Windows 8 and higher is 0x40 (64 in decimal) in the HKLM key. It should be set to 0x9 (9 in decimal) in the HKCU key by default, which means it will be enabled. If not, you can manually go and change it.


Overall, this is a great time saver for anyone who has to type a lot of DOS commands. If you have any questions, feel free to post a comment. Enjoy!


The post How to Turn On Auto-Complete in the Command Prompt appeared first on Online Tech Tips.


Posted on 12:16 AM | Categories: