Tuesday, February 10, 2015

The Ultimate Guide to Making Firefox Faster


The Ultimate Guide to Making Firefox Faster


If you’ve been using Firefox for a long time, you may have noticed it getting slower as time passed. Maybe it takes a few seconds to start up or takes a bit longer loading webpages. You might start noticing that it takes a second or so to switch between tabs or that the menu option doesn’t pop up instantly.


If your installation of Firefox runs slow or freezes more than you’d care for, there are a lot of different ways to speed things up a bit. In this article, I’m going to go through all the tips and tricks I’ve learned over the years to keep Firefox fast and efficient. Depending on your operating system and system configuration, some tweaks might give you more of a boost than others.


Note that some tweaks require changing the browser settings in about:config. If you don’t know what I’m talking about, read my previous post on backing up and modifying the about:config configuration in Firefox.


Enable HTTP Cache


browser cache backend


There is a new HTTP cache option that can be enabled in Firefox, which will help reduce UI glitches and various other browser crashes. Open about:config and search for the following entry:


browser.cache.use_new_backend

Double-click on it and change the value from 0 to 1. You can then simply close the about:config tab and continue browsing. There is no need to restart the browser or computer, etc. The new cache will be enabled and you should get a speed boost and a smoother browsing experience.


Refresh Firefox


Firefox has a really cool feature that basically performs an automatic tune up on your Firefox installation. However, you only want to do this after you understand exactly what it does. Firstly, it will keep your browsing history, bookmarks, passwords, cookies, website auto-fill info and personal dictionary.


It will delete extensions and themes, website permissions, added search engines, download history, security settings, plugin settings, toolbar customizations, user styles and social feature. To get to it, you have to type in about:support in the address bar.


firefox tuneup


Click on the Refresh Firefox button at the top right to get started. I have used this feature a several times and it works great. It does take a bit of time reinstalling a few add-ons, but I’ve found that it helps me get rid of the add-ons I never used in the first place.


Enable Safe Mode


Firefox has a nice feature called Safe mode that disables extensions and themes in order to determine whether an extension is causing problems. Since Firefox is all about extensions, you’ll definitely run into some with poorly written code that can cause a lot of grief.


If you find that browsing in safe mode is super fast compared to normal browsing, then you can almost guarantee that it’s an extension causing the slowdown. You can restart Firefox in safe mode by clicking on the menu icon and then clicking on the help icon.


firefox help button


Now choose Restart with Add-ons Disabled to get into safe mode.
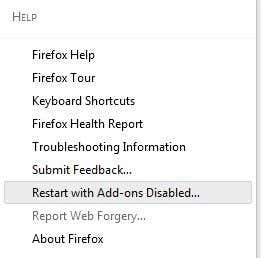

restart addons disabled


Safe mode will also turn off hardware acceleration and will reset toolbar and button customizations. Everything will go back to normal when you restart Firefox normally so don’t think you’ve lost any customizations you might have made.


Also, when you restart, it’ll ask you to Start in Safe Mode or Refresh Firefox, which is the the other tip I already mentioned above.


safe mode firefox


It’s best to disable all add-ons and then enable them one by one to see which one is causing Firefox to slow down, freeze or crash. You can see all the add-ons and plugins by clicking on the Firefox menu and clicking on Add-ons.


firefox plugins addons


The more add-ons and plugins you disable or delete, the faster Firefox will run. Some plugins will be set to Ask to Activate, which is ok. You want to check all the ones that are set to Always Activate and see which ones can be switched to Ask to Activate.


Minimize Memory Usage


Firefox has quite a few of these built-in performance tricks and another one is to minimize the memory usage. Go ahead and type in about:memory into the address bar and you can get detailed memory usage information about Firefox.


ff minimize memory usage


You’ll see a button under Free Memory called Minimize memory usage. Click on that and it will try to free up memory immediately and therefore make Firefox run faster. This is a good option to use if you had a bunch of tabs open in Firefox and you recently closed out a lot of them. Any memory being previously held by those tabs and still being used by Firefox will be freed.


Clear Cache


Another easy way to make Firefox faster is to periodically clear the cache. By default, Firefox will cache the contents of most websites you visit, so that they load faster when you visit them again. In the short term, this works well and does speed up browsing, however, once the cache becomes very large, it can start to slow things down.


If you click on the Firefox menu, click Options and then click on Advanced, you’ll see a Network tab that lets you clear the cache.


clear cache firefox


I don’t suggest clearing the cache very often, as that will slow down browsing. The best thing to do is to check every few months or to check the Override automatic cache management box and set the value depending on what type of hard drive you have. Since this cache is accessed via disk, it can be pretty slow if you have a slow hard drive.


However, if you have an extremely fast SSD drive, then using the cache can be more beneficial. So keep it small (<250 MB) if you hard drive is slow and leave it alone if you have a very fast hard disk.


Firefox Pipelining


If you have used Firefox for a long time, you have probably come across this hack on many blogs. Pipelining is a feature that basically lets Firefox open multiple connections to a server, theoretically loading pages faster. I’ve had mixed results with this setting, so it’s best to test it yourself first to see whether it’s worth keeping enabled.


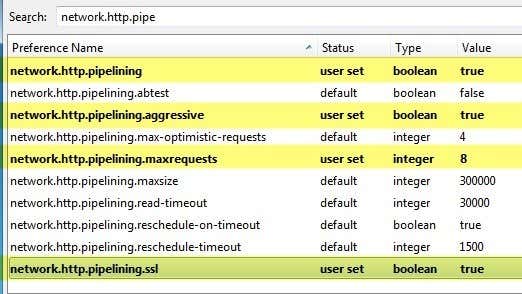
There are different views on what value should be set for the max number of connections, but the consensus from most diehard Firefox fans is 8. In order to enable pipelining, go to about:config and type in network.http.pipe in the filter box and you’ll see several settings.

network http pipelining


The values you need to change are shown in the image above. I have also listed them below if it’s not clear.


network.http.pipelining – true


network.http.pipelining.aggressive – true


network.http.pipelining.maxrequests – 8


network.http.pipelining.ssl – true


Other Settings


There are a couple of more obscure settings that could possibly speed up your Firefox browsing, but results are not guaranteed. It’s best to test these and see if there is any noticeable difference.


network.dns.disableIPv6 – true


browser.tabs.animate – false


browser.display.show_image_placeholders – false


Hopefully, your installation of Firefox is running a bit faster. I don’t recommend using add-ons like FasterFox because they only change the settings we have talked about above and adding more add-ons to speed up Firefox just doesn’t make any sense. If you have your own tip for speeding up Firefox, let us know in the comments. Enjoy!


The post The Ultimate Guide to Making Firefox Faster appeared first on Online Tech Tips.


Posted on 8:46 AM | Categories:

Monday, February 9, 2015

How to Fix Slow Keyboard response in Ubuntu : Key Delays


How to Fix Slow Keyboard response in Ubuntu : Key Delays


Ubuntu is basically a open source software platform that has become quite popular in all the new laptop models reducing the overall cost of the laptops as the customer’s don’t need to go through the old compulsion of buying genuine windows along with a laptop thus saving few bucks. Apart from these ubuntu is also used by thousands of developers for testing and development purpose. I have also ubuntu on my friend’s hp laptop and my overall experience was both good and bad. First of all it was quite difficult to work on ubuntu as i am quite used to the Microsoft windows but later on i enjoyed using ubuntu and is quite fast and doesn’t get affected from viruses etc easily. During my usage what i found was that earlier my keyboard keys response was very fast and good but later on i started facing poor or slow keyboard reponse or you can say propagation delay between key stroke’s and the result on screen thererfore i started searching about the issue over internet and i did found some good results and information which i thought of sharing here so as to help all those users who are also having a difficult time adjusting to ubuntu and facing slow keyboard reponse in ubuntu. So just read the following given instructions and follow them properly in order to fix delayed keyboard response in ubuntu.


How to fix Slow Keyboard response in Ubuntu : Key Delays Fix


What is more interesting to know here is that this issue has nothing to do with your device hardware rather it arises because of internal ubuntu settings and has become quite common these days. What actually happens in this case is that you have to keep press and hold the key for about a second in order to make them work. Also the behaviour is common for all the keys except for three keys namely Numlock, Capslock and Scroll lock which clearly indicates that there’s no hardware issue within your system. Follow the below given instructions on how to fix slow keyboard response in ubuntu or keyboard key press delay.


What is the reason for Key delays in Ubuntu ?


The most common reason for key delays in ubuntu is the introduction of Slow keys enable/disable feature which gets enabled by holding SHIFT KEY for more than 8 seconds. So usually this becomes the reason for slow keyboard responses in Ubuntu which can be easily fixed and therefore you can follow the below given instructions.


How to fix Key delays in Ubuntu : Slow keyboard response in Ubuntu – Steps to Follow


  • Go to your Ubuntu system settings by clicking the gear icon on your ubuntu desktop menu.


  • Here Under System settings -> Go to Universal Access as shown below in the screen shot.


How to fix Slow Keyboard response in Ubuntu - 1


  • Here Under Universal access -> Navigate to the Typing tab -> Here you can check your Slow keys settings and set them accordingly.


How to fix Slow Keyboard response in Ubuntu - 2


  • That’s it and now you will no longer have the same delayed keyboard response issue in Ubuntu. This method works for all ubuntu versions Ubuntu 13, Ubuntu 14etc


The post How to Fix Slow Keyboard response in Ubuntu : Key Delays appeared first on RushInformation.


Posted on 12:45 PM | Categories:

Sunday, February 8, 2015

Lava Iris X8 Review | Octa-Core Smartphone with 2GB RAM at Rs 8,999 Only


Lava Iris X8 Review | Octa-Core Smartphone with 2GB RAM at Rs 8,999 Only


Lava Iris X8 is the latest budget android smartphone from Lava that is priced for just Rs 8,999 only featuring powerful Octa-Core processor with 2 GB of RAM. Lava Iris X8 is the latest addition to the flagship lava Iris X Smartphone’s series. Considering it’s competitive price and looking at its powerful specifications it is quite clear that it is well set to compete with the likes of Xiaomi Redmi 4G and Micromax Yureka. It would be great to see how well Lava Iris X8 compete with these Smartphone’s after its first sale this week and that too at none other than Flipkart online store at 12PM IST Monday 9th February 2015. Overall Lava Iris X8 is really a great phone to buy especially after looking at its price and specifications. So here below are brief specifications of Lava Iris X8.


Lava Iris X8 is basically a Dual SIM Smartphone featuring a 5-inches display screen boasting a resolution of 720×1280 pixels witj swap technology that allows users to switch SIMs on the go, without the need to restart their handset. It is powered by a MediaTek chipset with 1.4Ghz octa-core processor supported by 2GB of RAM that is well enough to carry out the most intensive tasks on this device efficiently. Moving to its camera it sports an 8-megapixel rear camera with auto focus and dual LED flash and a 3-megapixel front camera. Currently Lava Iris X8 will be marketed with Android Kitkat v4.4.4 OS but there has been confirmed news from Lava that it will be soon getting the Android lollipop update.


It has 16GB of Internal storage space expandable upto 32GB via memory card. Talking about its battery backup it has got a decent 2500mAh battery that is good enough to last a day with moderate to heavy usage. Moreover to save on the battery life, the Iris X8 has been bundled with a flip cover that allows users to access applications like music, calling, camera, messaging and few other functions directly without the need of switching to the main screen. So if you really looking for a phone to buy under 10k this month then I would strongly suggest you to go for Lava Iris X8 therefore don’t miss the opportunity to buy tomorrow exclusively at Flipkart 12PM IST Onwards.


Lava Iris X8 Review


The post Lava Iris X8 Review | Octa-Core Smartphone with 2GB RAM at Rs 8,999 Only appeared first on RushInformation.


Posted on 12:45 PM | Categories:

Wednesday, February 4, 2015

How to Fix Error 651 Raspppoe.sys in Windows 7/8/8.1


How to Fix Error 651 Raspppoe.sys in Windows 7/8/8.1


Windows error 651 is a very popular error especially in Windows 7 associated with Internet modem connection while trying to connect to Internet using PPPoE connection. Generally the official error message says “Error 651:The Modem (or other connecting device) has reported an error“. in Windows 7 and in Windows 8.1, Windows 8 the error messages says “Error 651 Modem PPPoE Broadband Internet Connection”. Usually this is a very common error to face especially for those who are having a broadband internet connection via modem. Moreover it has been observed that the same internet connection works fine in other operating systems like Windows XP and Windows Vista. Therefore the issue is more dominant for people using Windows 7, Windows 8 and Windows 8.1 so if you are the one facing the same error 651 then you don’t need to worry anymore because here below is a perfect all in one solution for fixing error 651 in Windows but before we move on it is better to understand the root cause of such error so we can have a better overview about the current issue and therefore applying the right solution.


Reason for Error 651 in Windows 7/8/8.1 :


Usually such errors are often caused by the raspppoe.sys file as result of corruption which is found in the “C:\Windows\System32\Drivers” folder. So replacing the old raspppoe.sys file with a working one is the perfect solution for fixing this error.


How to fix Error 651 Raspppoe.sys in Windows


How to fix Error 651 Raspppoe.sys in Windows 7/8/8.1 – Steps to Follow


As mentioned above by replacing the old corrupted raspppoe.sys file with a new working one the issue can be easily resolved therefore here what you need to do is just download the below given raspppoe.sys file and replace it with the current raspppoe.sys in the C:\Windows\System32\Drivers directory.


Note – Before replacing the old raspppoe.sys it is better to make a backup of that file if in case something wrong goes though the chances are quite negligble but still precaution is better than cure.


Alternative Fix (In case if the above method doesn’t work)


Sometimes it has been observed that such errors also result from corrupted registry files or due to the presence of errors in windows registry file therefore it is advisable to use some third party windows registry tools like CCleaner, TuneUp Utilities, Registery easy etc.


Supported Searches :


  • raspppoe.sys Windows 7 download

  • raspppoe.sys Windows 8 download

  • Error 651 raspppoe.sys download

  • raspppoe.sys file download


The post How to Fix Error 651 Raspppoe.sys in Windows 7/8/8.1 appeared first on RushInformation.


Posted on 11:31 AM | Categories:

How to Restart Windows in Safe Mode


How to Restart Windows in Safe Mode


Need to get into Safe Mode on your Windows PC? If you’re not able to boot your computer normally, you can try to enter safe mode, a diagnostic mode for Windows that lets you troubleshoot problems that prevent normal booting.


In Safe Mode, Windows only loads the most essential services and drivers in order for it to run. All other normal Windows settings and start up programs are disabled in order to allow the user to fix the problem with their computer.


In this guide, I am going to go through the steps to get into Safe Mode in Windows XP, Vista, 7, 8.1 and Windows 10.


Note that if you installed a driver or just recently made a configuration change to your computer, you may want to try the “Last Known Good Configuration” before going into safe mode in Windows 7, Vista and XP.


Last Known Good Configuration loads the last working version of Windows. However, it is replaced each time you log into the computer, so if a problem has occurred, make sure to try this option BEFORE logging onto the computer again.


In Windows 8 and Windows 10, the Last Known option is no longer included. Instead, they have other options like Refresh, Reset (Reinstall), Restore, etc. I’ll go into more details below in the Windows 8/10 section.


Also note that there are three types of Safe Mode, so read the descriptions below to figure out which one is best for you.


Safe Mode – The basic option that loads Windows with a GUI interface and is usually what most people should choose when troubleshooting their computer.


Safe Mode with Networking – If you need access to the Internet or the network while in Safe mode, then this is the option to choose. This mode is useful when you need to fix a problem that requires an Internet connection so that you can download updates, drivers, or other files to help fix your problem.


Safe Mode with Command Prompt – This mode will load with just the MS DOS command line prompt. This is useful if you need to run a DOS command like fixboot or chkdsk.


Safe Mode in Windows XP/Vista/7


To get into the Safe Mode in Windows XP, Vista or 7, re-boot the computer and then press and hold the “F8 Key” which will then bring up the “Windows Advanced Options Menu“. Scroll down to “Safe Mode” using the arrow keys and press Enter.


windows safe mode


Note that sometimes if you press and hold the F8 key, some computers will start to beep annoyingly, so in that case, simply hold the F8 key continuously during the boot up period.


If you are still not able to get into Safe Mode, you can try to kill the power on the computer to turn it off and then turn it back on. If Windows shuts down unexpectedly, it will usually bring up the Advanced Boot Options menu automatically. If that doesn’t work, you can read my previous post on getting into Safe Mode if F8 is not working. This method, however, requires you to be able to log into Windows in order to tell it to boot into safe mode on the next restart.


Safe Mode in Windows 8/10


In Windows 8 and Windows 10, the process of getting into safe mode is completely different. The F8 key no longer works because the boot process is too fast.


The only way to get into safe mode is to boot into System Recovery Options, which is where you can perform various troubleshooting tasks including starting in safe mode.


I’ve already written about how to boot to the Windows 8 System Recovery Options screen, but the process is slightly different for Windows 10, so I’ll mention it here. In Windows 10, there are two ways to get to the recovery options screen. Firstly, you can click on the new Start button, which is back again in a different form, and then hold down the SHIFT key and click on the power button.


windows 10 safe mode


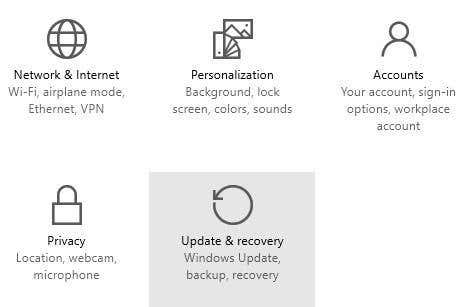
While still holding down the SHIFT key, click on Restart. The other way is the same as Windows 8, but it just looks a bit different. Click on the Start button and then click on Settings as shown above.


This will bring up a new Settings dialog that basically replaces the PC Settings dialog in Windows 8. Here you will click on Update & recovery.


update and recovery


Now you’ll see the options to refresh your PC, reinstall everything or restart in advanced startup mode.


advanced startup


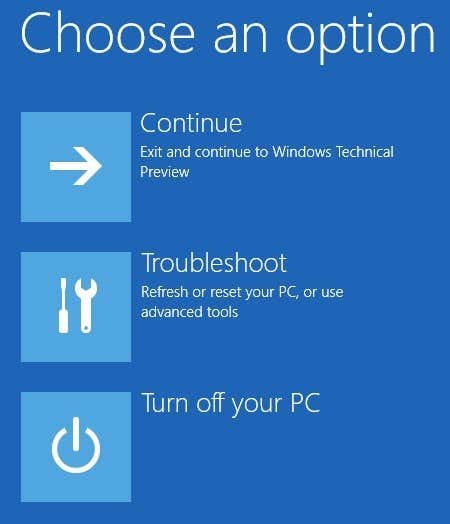
At this point, the process to get into Safe Mode in Windows 8 or Windows 10 is the same. You’ll now see three options: Continue, Troubleshoot and Turn off your PC.


recovery options windows


Now just follow the instructions on my article on booting to safe mode in Windows 8. You basically click on Troubleshoot and go from there. Windows 8 and Windows 10 are also a lot smarter than previous versions and will normally bring up the recovery options automatically if a problem is detected while booting.


If you have any questions about getting into safe mode on any version of Windows, feel free to post a comment. Enjoy!


The post How to Restart Windows in Safe Mode appeared first on Online Tech Tips.


Posted on 1:30 AM | Categories:

Tuesday, February 3, 2015

Whatsapp Web Version for Windows PC Google Chrome


Whatsapp Web Version for Windows PC Google Chrome


Whatsapp being the World’s most popular social networking app doesn’t need any sort of introduction having over 700 million users worldwide. Moreover most of us are already aware of the fact that Whatsapp has been acquired by Facebook recently for a huge $22 billion and since its acquistion we have witnessed lots of changes and important updates that the users were expecting for a very long time. After the acquisitive of Whatsapp by Facebook there has been quite a mixed response both good and bad as a part of improvement in Whatsapp feature’s but Facebook has been trying really hard to make whatsapp more friendly which is quite evident from the updates that are rolling out quite frequently.


And therefore one major update that has been rolled out recently allows users to use Whatsapp on their Windows PC via Whatsapp Web Version through Google Chrome without the need of Bluestacks or Youwave Android emulators. This is really one of the best update’s for the users who were eagerly waiting for the official release of Whatsapp for PC though the release of an official desktop based app seems quite far but this is really something that you can enjoy for the time being and thus start using Whatsapp on your system as Whatsapp Web version via Google Chrome. Get Whatsapp web version for Windows pc from below.


Must Read Important Requirements :


  • It is important to note that you must have updated Whatsapp on your device.


  • This Whatsapp Web Version is supported only on Google Chrome Web browser.


  • Moreover for the time being this Whatsapp web version is available only for Android, Windows Phone or Blackberry users. Users using Whatsapp on their Apple iOS devices are not eligible for this Whatsapp web version due to Apple restrictions.


How to Use Whatsapp on PC via Whatsapp Web Version : Steps to Follow


As mentioned above you must have update whatsapp on your device and Google Chrome Web browser installed on your Windows pc or laptop. After confirming all the above requirements proceed with the below given instructions. Get Whatsapp Web version for pc from below.


  • Open your Google Chrome Web browser on your Windows PC or Laptop and open the following given URL.


https://web.whatsapp.com


  • Wait for few seconds and soon you will see a screen similar to the below given screen shot.


Whatsapp Web Version for Windows PC


  • Now What you need to do is open Whatsapp application on your device and select the “Whatsapp Web” option from the menu.


  • It will now ask you to scan the QR code that appears on your Google chrome web browser while opening the above given link.


  • Just Scan the QR code and wait for few minutes till all your conversations or contacts are synced between the two devices.


  • That’s it and now you can start using Whatsapp on your pc in an official manner without using any kind of third party emulators.


I hope you find this article resourceful so please don’t forget to share it and if in case you have any doubts please feel free to ask by commenting below….Thanks


The post Whatsapp Web Version for Windows PC Google Chrome appeared first on RushInformation.


Posted on 11:15 AM | Categories:

Monday, February 2, 2015

Export Contacts from Outlook, Outlook Express and Windows Live Mail


Export Contacts from Outlook, Outlook Express and Windows Live Mail


Need to export your contacts out of Outlook? I used to work at an office where there are multiple versions of Office installed on employee computers including Office 2003, Office 2007, Office 2010 and Office 2013! When someone switched computers, I usually end up having to export their email and their contacts to a different computer, which more often than not had a different version of Office installed.


If you create multiple contact folders in Outlook, then you have to export each one of those individually. In this article, I’ll show you how to export contacts in the different versions of Outlook. I’ll also mention the process for Windows Live Mail, if you happen to be using that program.


Export Contacts from Outlook 2003, 2007


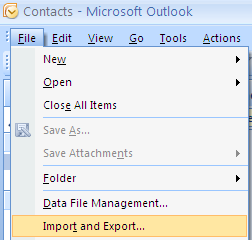
Let’s start with the older Office 2003! Note that the same procedure works for Outlook 2007. First open Outlook and then go to File and then Import and Export. If the menu option is greyed out, make sure to check out this Microsoft KB article. If the Import and Export option is missing altogether, then you have to simply add it to the File menu.


You can do this by clicking on View, then Toolbars and then Customize. On the Commands tab, click on File under categories.  Scroll down the list until you find the Import/Export command towards the bottom of the list. Now just drag it onto the actual File menu and drop it.


export contacts


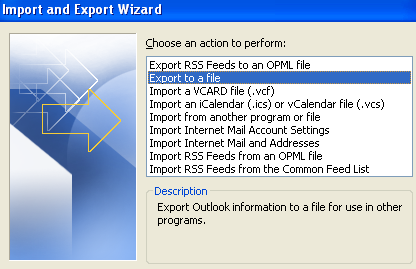
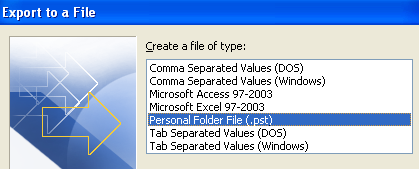
From the list, choose Export to a file and then click Next.


export to a file


From the list, choose Personal Folder file (.pst). I prefer to export it out as a PST file so that it can easily be imported into another version of Outlook.


personal folder file


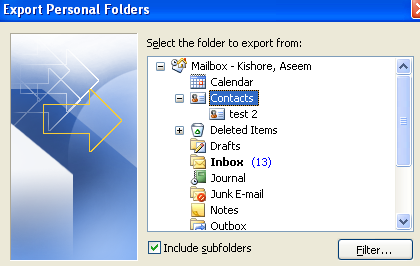
Now you’ll get a list of all of your folders, including the Inbox, Calendar, RSS feeds, etc. Click on Contacts since we want to export Outlook contacts only. If you have created other contact folders inside the main contact folder, be sure to check off the Include subfolders box.


export contact outlook 2007


Click Next and then choose the location for your backup file. Make sure to browse to some other location as Microsoft defaults to a hidden folder. You might also be asked if you want to add a password in order to protect the PST file. If not, just leave the fields blank and click OK. After that, click Finish and you’re done!


Export Contacts from Outlook 2010, 2013


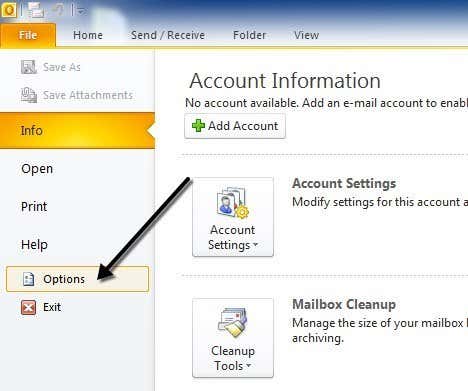
The interface in Outlook 2010 and 2013 is a bit different, so getting to the Export to a file screen requires a different set of clicks. First open Outlook and click on File and then Options.


outlook file options


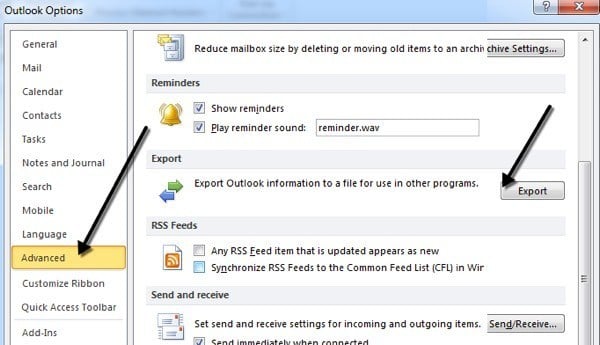
In the left-hand menu, click on Advanced and then scroll down until you see Export.


export contacts


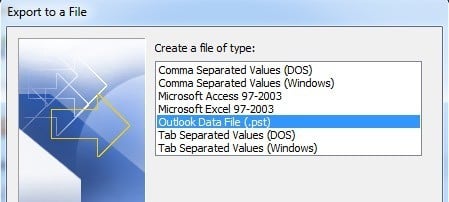
At this point, you’ll get the same Import and Export Wizard dialog that is shown in the above procedure for Outlook 2007. The only difference is the PST file is now called an Outlook Data File rather than the Personal Folder File.


outlook data file


Export Contacts from Outlook Express


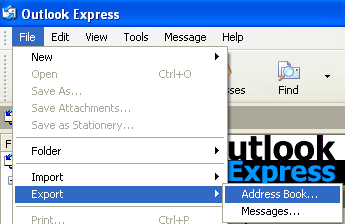
If you’re still running Windows 98, Me, 2000 or XP, then you may be using Outlook Express. Outlook Express has a slightly different procedure, but very straightforward also. First, open Outlook Express and then go to File, choose Export, and then choose Address Book.


outlook express export contacts


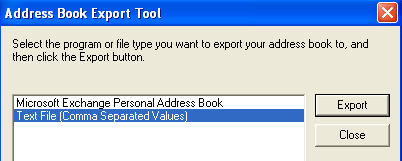
Click on Text File (Comma Separated Values) and then click Export.


outlook express export address book


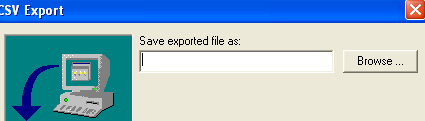
Click Browse to specify a location to save the file or type it in manually.


export contacts outlook


Click Next and then choose all of the fields that you want to export for each contact, i.e. First name, Email address, Street, Company, Phone, etc.


export contacts from outlook


Click Finish and you’re done!


Export Contacts from Windows Live Mail


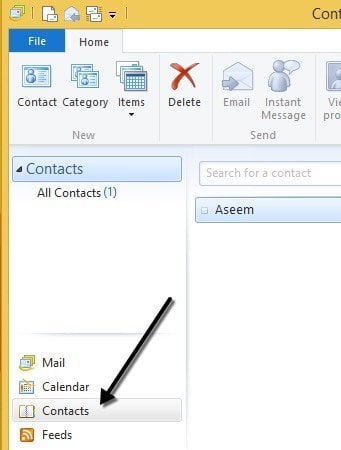
This is probably the easiest of all. Open Windows Live Mail and click on Contacts. It’s got a very similar look to Outlook, which makes it very easy to use.


windows live mail contacts


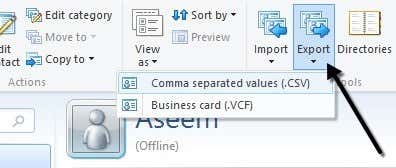
In Windows Live Mail, all you have to do to export contacts is to click on the Export button in the ribbon.


export contact wlm


Super easy! If you have any questions or issues getting your contacts out of Outlook, feel free to post a comment. Enjoy!


The post Export Contacts from Outlook, Outlook Express and Windows Live Mail appeared first on Online Tech Tips.


Posted on 4:01 AM | Categories:

How to Diagnose, Check, and Test for Bad Memory


How to Diagnose, Check, and Test for Bad Memory


Though rare, there are times when the memory chips (aka RAM) on your computer can go bad. They usually outlast all other components on a PC because they have no moving parts and use very little power. Since memory chips are one of the most essential components to any computer, any problems or issues will immediately manifest themselves in strange and sometimes confusing ways.


It’s also hard to instantly diagnose a problem as a RAM problem because most PCs have multiple RAM chips and not all of them will fail at once. When one fails and others work properly, a variety of odd behaviors will start to occur. Here are some symptoms of bad memory on a PC.


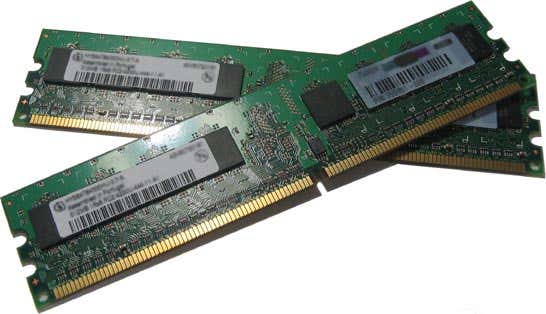
ram chips


RAM Issue Manifestations


1. Windows will freeze for minutes at a time regardless of what application you are using. It may take 2 minutes to open Word or 3 to 4 minutes to open IE. Usually performance issues are the first to appear and can easily be misconstrued as a virus or malware.


2. You get the infamous blue screen of death, but without having added any new hardware or installed any new software. If you’re getting the blue screens and haven’t installed any new drivers or Windows updates, it could be a memory issue causing the blue screen.


3. The PC restarts randomly while you are in the middle of doing something. Random restarts can also be attributed to a lot of different factors, but if you are having this problem in combination with any of the other mentioned, then it’s more than likely a RAM issue.


4. You start to notice files becoming corrupt on your system. If you’re working with a lot with certain files and notice that they are not saving properly or the data is being corrupted, you can narrow it down to the hard drive or memory. If you’ve run diagnostics on the hard drive and all is fine, then these read/write errors can be caused when parts of the file are stored in RAM.


5. You start to see strange colors or lines appear on the screen or things look garbled suddenly. Sometimes the memory issue can be so bad that the data being sent to the screen becomes corrupt and therefore displayed incorrectly.


6. When you boot the computer, you hear a beep, multiple beeps and a continuous beep. Depending on your manufacturer, a memory problem will be reported with a series of beeps. I’ve seen this a lot of Dell machines. It’s almost always a RAM problem when the computer beeps.


Diagnose RAM Problems


The next step is to actually determine whether it is physical RAM installed on your PC that is causing problems. You can test this in one of two ways: either run software that checks the RAM or physically open the computer and switch out the RAM.


The ideal method would be to open the computer and take out one stick of RAM at a time and see if the problems go away. If you have two sticks, for example, take out one and restart the computer. If the problems persist, turn off the computer and put back the one you took out and take the other stick out.


If you have more than two sticks of RAM, follow the same procedure. If you only have one stick of RAM, then you’ll have to purchase another stick or try to use a compatible stick from another computer, if possible. Each computer takes a specific type of RAM, so you really have to check to make sure a stick from another PC will be compatible with yours.


On the software side, there are several programs and tools you can use to troubleshoot memory issues.


Windows Memory Diagnostics Tool


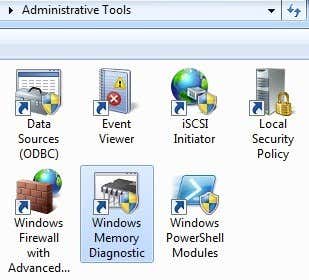
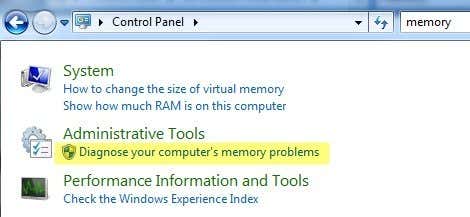
The easiest way to start is to use the Windows Memory Diagnostics Tool built into Windows. To get to it, open Control Panel and then click on Administrative Tools. You can also open Control Panel and just type the word memory into the search box. You’ll see a link to diagnose your computer’s memory problems.


windows memory diagnostic


admin tools memory


It’ll then ask you if you want to restart immediately or run the test the next time you reboot. The computer will boot into the diagnostic tool and start running the test, which is broken up into two separate passes.


running memory test


At the bottom you’ll see a Status field, which will show you any problems that have been detected. You can also press the F1 key and change a couple of options like the test type (Basic, Standard, or Extended), the cache setting, and the pass count. I have found this default test to be very handy and accurate over the years.


memtest86


memtest86 is by far the most popular amongst the memory-checking crowd and works very well. It’s been around since the 1990’s and has been recently updated to version 5.1. There is also a beta v6 in the works at the time of this writing.


In order to use it, you have to burn the ISO image that you download to a CD and then configure the PC to boot from the CD drive first. This is exactly what the Windows Memory Diagnostics Tool does, but it’s all built in and therefore doesn’t require these two extra steps.


What I like about memtest86 is that it also works with Mac or Linux computers too. So if the memory on your Mac system or Linux system is possibly bad, you can easily check using this tool.


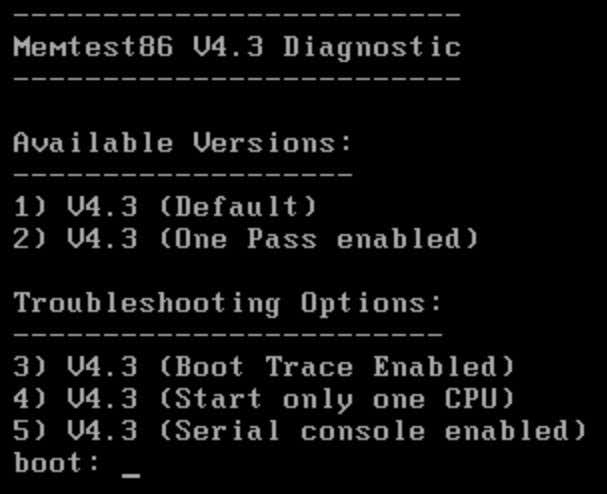
Once you boot to the CD, you’ll get a menu with a couple of different options. If none of it makes sense, don’t type anything and it will automatically default to the first option.


memtest86 options


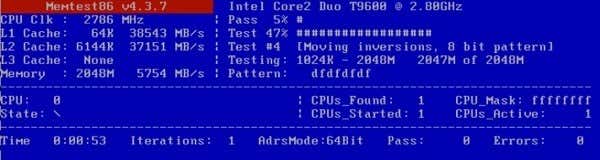
The memory test will begin and it’ll show you at the bottom right if there are any errors.


memtest86


Memtest86 has a bunch of memory tests that it runs on the system, so it takes quite a bit longer than the Windows memory tool. It’s a great tool and pretty much the industry standard for memory diagnostics.


There are other tools out there that do similar memory checks, but memtest86 is the most exhaustive and accurate out of all of them. If your memory is bad, the best place to buy RAM is from Crucial.com because it will only show you RAM that is compatible with your specific system. Enjoy!


The post How to Diagnose, Check, and Test for Bad Memory appeared first on Online Tech Tips.


Posted on 2:15 AM | Categories:

Sunday, February 1, 2015

How to Fix VLC does not support UNDF Format : Best Fix


How to Fix VLC does not support UNDF Format : Best Fix


VLC is regarded as one of the best audio video player for Windows platform supporting all the major file formats including MPEG-1, MPEG-2, MPEG-4, DivX, MP3, OGG and many more . VLC has always been the first choice as a media player for most of the users ranging from novice users to advanced users. What is good about VLC is that it is an open-source application which means that you can use all of its features at absolutely free of cost without spending a single penny from your pocket. I have been personally using VLC for past 3 years and this is the best media player that i have used thus far out of all other media players. It is very lightweight application as compared to other media player apps and thus doesn’t affect your system performance. As i said above it supports various file formats and can effectively run most of the  media formats available currenlty but still few users were found reporting an issue with VLC that is facing “No suitable decoder module : VLC does not support the audio or video format “undf”. Unfortunately there is no way for you to fix this.” while playing media files though this error varies from user to user depending upon the file format they are trying to run.


Note – Basically such error often results because of incomplete file or corrupted file or due to some internal issues within the file and if there exists some real issue within your media file then there’s no way that you can fix this error or play this file format with any media player but there are some cases also where despite of correct media file free from errors VLC does not support UNDF format error occurs and these can be fixed with some simple ways that are mentioned below. Therefore if you pretty sure about your file then only you should proceed with the following given fixes else there’s no meaning of trying to run corrupted media files.


How to fix VLC does not support UNDF format


How to fix VLC does not support UNDF format : Best Fix


In order to fix VLC does not support UNDF format you have to first understand what actually does undf file format means so that you can have a better overview about your issue and can proceed with appropriate fixes.


What is UNDF file format ?


.undf file format describes those files that doesn’t posses definite file format representing an issue within the file i.e errors or corrupted file.


Why VLC gives VLC does not support UNDF format error ?


If the file is okay then the only possible reason for facing such error is the non-availability of appropriate codes required to play that media file.


Fix VLC does not support UNDF format error : Steps to Follow


To fix VLC does not support UNDF format error you have to first install all the appropriate audio and video codes on your system in order to support all the file formats efficiently. Therefore here below is Combined Community codec pack that provides you with all the necessary audio or video codes that are required to play almost every media file format available currently.


About Combined Community Codec Pack :


Combined Community Codec Pack is an all in one codec pack containing the following codecs: CoreWavPack, FFDShow Tryout, FLV Splitter, Haali Media Splitter, MPEG-2 Decoder, VSFilter. All these codecs were carefully chosen by CCCP Project so that this combination pack will offer a flawless playback of video and audio files. To ensure that this pack will work properly and that there won’t be any conflicts between the codecs, you will need to run the CCCP Insurgent utility which will detect all the existing codecs within your system and thus informing you about all the codecs that may act as a conflict with other codecs. Overall Combined Community Codec Pack is a simple yet efficient codec pack suitable for all the users.


Supported searches :


  • How to fix VLC does not support the audio or video format “undf”

  • How to fix VLC does not support undf .mkv .flv .mov extensions


The post How to Fix VLC does not support UNDF Format : Best Fix appeared first on RushInformation.


Posted on 9:15 AM | Categories: