Wednesday, December 31, 2014

Add Google Maps Driving Directions to Your Website


Add Google Maps Driving Directions to Your Website


Even though there are so many mapping apps and services out there to get you from point A to point B, the definitive king of maps is Google Maps. I use it on my computer, tablet and 90% of the time on my smartphone. It’s got the best data, the most navigation and routing options and cool features like Street View and walking, biking and mass transit info.


But what if you need to use a map or directions outside of Google’s website? Suppose you have your own wedding website or a personal blog and guests could visit your site, type in the address they will be coming from and automatically get directions to the event location!


Well, there are a couple of ways you can go about accomplishing this. The easiest way is to simply embed the map onto your webpage using the embed code generated by Google Maps. The second way is a bit more technical, but more customizable and dynamic. I’ll mention both methods below.


Embed Google Map


If you only want to display directions from one location to another, the easiest thing to do is to embed whatever map you are viewing using the embed code. First, go ahead and setup whatever directions you want in Google Maps and then click on the gear icon at the bottom right of the page.
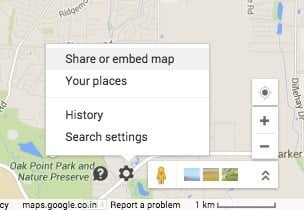

share or embed map


Click on Share or embed map and then click on the Embed map tab. Here you can pick a size for your map and then copy the iframe code and drop that onto any webpage you like.
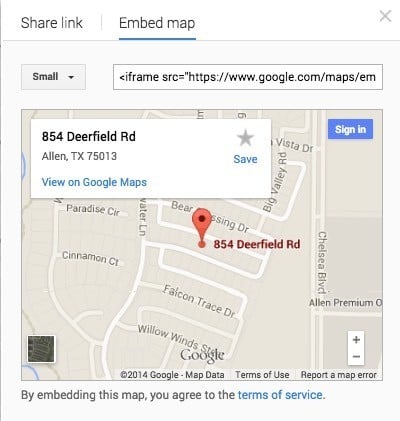

embed map


The only downside to this method is that the user just sees a static map. In the second method below, you can create a form whereby the user can type in any starting address and it will generate a map from that address to a destination address of your choosing.


Create Google Maps Form


To illustrate what I mean by the second method, go ahead and type a US address in the box below to get directions from your location to my house:


Enter your starting address: 


Cool huh? You can easily create this little form on any website, blog, or anywhere you can put in some HTML code! This is also great for small business web sites as you can throw it up on your contact page and people can get directions quickly, rather than having to copy your address, open a new window, and then type in their starting address.


So how do we go about creating this modified get directions box? Well first, we’ll need to get the correct syntax for the URL that Google uses for directions. Luckily, we can figure that out by getting directions between two places and then just copying the URL from the address bar. You can also click on the tiny gear icon at the very bottom right of the page and choose Share or embed map.


share or embed map


The Share link tab will contain the URL, which is the same URL in your browser address bar. I ‘ve gone ahead and pasted the entire URL below just to show you what it looks like.
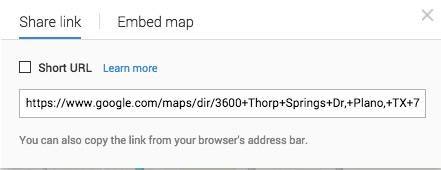

share link maps


https://www.google.com/maps/dir/3600+Thorp+Springs+Dr,+Plano,+TX+75025,+USA/ 854+Deerfield+Rd,+Allen,+TX+75013,+USA/@33.1125686,-96.7557749,13z/ data=!3m1!4b1!4m13!4m12!1m5!1m1!1s0x864c3d45018517a5:0xbabd3c91a1321997!2m2!1d-96.762484!2d33.08947!1m5!1m1! 1s0x864c16d3018a7f4f:0xab2052b5786cd29f!2m2!1d-96.666151!2d33.133892


Yikes! That’s pretty long! There’s a lot of stuff in there, most of which doesn’t make any sense! Google Maps URL parameters used to be very straightforward and easy, but the new URL structure is quite complicated. Thankfully, you can still use the old parameters and Google will convert them into the new version automatically. To see what I mean, check out the link below.


http://maps.google.com/maps?saddr=start&daddr=end


Go ahead and give it a shot. Put in an address in quotes for the starting and ending address and paste the URL into your browser! I replaced start with my home city New Orleans and end with Houston, TX, so this is what my Google Maps directions URL looks like:


http://maps.google.com/maps?saddr=”new orleans, la”&daddr=”houston, tx”


It works! As you can see, though, Google Maps converts the links into something far more complicated once the map fully loads. Ok, so now that we have a sane URL that we can pass into Google Maps, we need to create a simple form with two fields, one for the starting address and one for the destination address.


If you want people to just type in their address and get directions to your place, then we’ll want the second field to be hidden and already set to the destination address.


<form action=”http://maps.google.com/maps” method=”get” target=”_blank”>

Enter your starting address:

<input type=”text” name=”saddr” />

<input type=”hidden” name=”daddr” value=”854 Deerfield Rd, Allen, TX” />

<input type=”submit” value=”get directions” />

</form>


Check out the code above. The first line starts out form and says that when the submit button is clicked, the data should be sent to maps.google.com/maps. The target=blank means that we want the result to open in a new window. Then we have a text box for the starting address, which is blank.


The second text box is hidden and the value is the destination address that we desire. Finally, there is a submit button with the title “Get Directions”. Now when someone types in their address, they’ll get this:
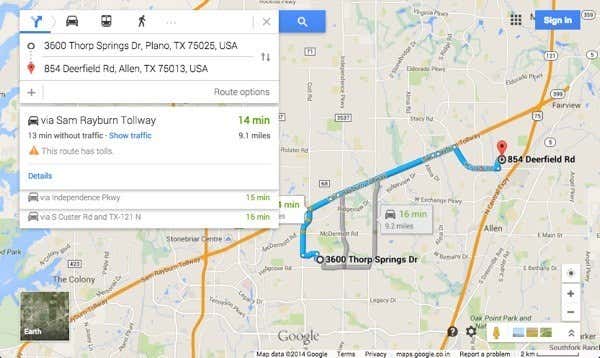

maps directions


You can customize the directions and map even more with a few extra parameters. For example, let’s say you don’t want the default view to be maps, but instead want it to be Satellite and show Traffic.


http://maps.google.com/maps?saddr=%22new+orleans,+la%22&daddr=%22houston,+tx%22&ie=UTF8&t=h&z=7&layer=t


Notice the layer=t and t=h fields in the URL. layer=t is for the traffic layer and t=h means hybrid map! t can also be set to m for normal map, k for satellite and p for terrain. z is the zoom level and you can change it from 1 to 20. In the above URL, it’s set to 7. Just tack those on to your final URL and you’ve now got a highly customized Google Maps Get Directions form on your site!


Have any issues with this, post a comment and I’ll try to help! Enjoy!


The post Add Google Maps Driving Directions to Your Website appeared first on Online Tech Tips.


Tuesday, December 30, 2014

Fix Error Retrieving Information from Server RPC: S-3: AEC


Fix Error Retrieving Information from Server RPC: S-3: AEC


Google Android is currently the most popular mobile OS platform with millions of users across the world and almost all the new phones are marketed with Android OS. Overall Google android is a great OS with a very high satisfaction rate but being in the technology nothing is perfect and therefore you may face errors while using your android device. Errors are inevitable so no matter how hard you try to avoid them you can face errors at any point. There are likely chances that while trying to update your android apps from Google Playstore you may end up facing “Error retrieving information from server [RPC: S-3: AEC-0]” or “Error retrieving information from server [RPC: S-7: AEC-0]” or   “Error retrieving information from server [RPC: S-5: AEC-0]” therefore under such circumstances just follow the below given instructions to fix error retrieving information from server.


Possible Reasons for such errors :


    • Due to mis-configured Google Account Settings


    • Due to Old temporary Cache system files (In most cases)


    • Maybe due to some Internet connection issues (less likely)


How to Fix Error Retrieving Information from Server – Steps to Follow


According to the above mentioned possible reasons for facing such error it is quite clear that this error arises basically due to Google account sync issues or old temporary cache files. In most of the cases it has been highly observed that errors related to updating, installation of apps etc from Google play store all arises due to the presence of Cache files and even i have mentioned the importance of clearing old cache files from your android device in my earlier articles but don’t worry if you have missed them here again I am going to tell how you can clear your cache and avoid facing such errors in future.


Fix Error retrieving information from server


Note :


First of all make sure that all your Google Account details are properly matched and configured correctly and if you are not sure then Go to your Phone Settings -> Accounts & sync -> Here reset your Google account.


Steps to Follow :


  • After ensuring all your Internet connectivity and Google Account sync details it’s the time to clear cache files for Google Services framework and Google Playstore.


  • Open your Phone settings -> Go to Applications -> Select All and Select “Google Services Framework” and “Google Play store” one by one.


Fix Error retrieving information from server - 1


  • Here Scroll down search for “Google Services Framework” and tap on “Google Services Framwork” app and Click on Force Stop -> Clear Data and Clear Cache as shown below.


Fix Error retrieving information from server - 2


  • Repeat the same for Google Playstore app search for “Google Playstore” and tap on “Google Playstore” app and Click on Force Stop -> Clear Data and Clear Cache as shown below.


Fix Error retrieving information from server - 3


  • Restart your android device and now trying updating your apps from Google playstore and this time you won’t be facing the same error again.


Have fun enjoying your Android device…If you still face any issues please feel free to drop your query by commenting below and I will try to reach you shortly….Thanks


Related Searches :


  • Bluestacks error retrieving information from server

  • Whatsapp error retrieving information from server

  • Facebook error retrieving information from server


The post Fix Error Retrieving Information from Server RPC: S-3: AEC appeared first on RushInformation.


Sunday, December 28, 2014

Diez.hn an Online Sports Website Serving the Spanish Community Globally


Diez.hn an Online Sports Website Serving the Spanish Community Globally


href="https://harkingbade.s3.amazonaws.com/wp-content/uploads/2014/12/29001030/diez-hn.png">class="aligncenter size-full wp-image-1946" src="https://harkingbade.s3.amazonaws.com/wp-content/uploads/2014/12/29001030/diez-hn.png" alt="diez.hn" width="703" height="380" />

The Spanish sports reporting site diez.hn was established around March 2008 with the sole aim of providing sports news to millions of spanish speaking sport lovers. The site is owned and managed by Buro Internacional de Tecnologias – Honduras.

Diez.com is reported to have over hundreds of thousand visitors monthly with majority of its readers from Spain, followed closely by the United States.

Though a sports website is focuses more on soccer, especially the Spanish league and the Soccer in Honduras. Other sports covered include NBA, Formula One, MLB, Tennis. Aside from the Spainish, the English Premiere League is a very interesting League with famous players and stars, slogging it out with other soccer leagues from Italy, Germany, France and the rest for the UEFA Champions League.

The South American Leagues is one of the most interesting and followed leagues, with many fans across the continent.  Football leagues South America fans are interested in include Concachampions, MLS, MX League, La Liga, Serie A, Premier League, Bundesliga, Ligue de France, Primera A of Argentina, Costa Rica, El Salvador, Guatemala, Panama.

Print Edition of Diez.hn

The print edition of Diez Journal can be gotten for L.749.00 a year, with home delivery across Honduras. International audience may have to pay extra for shipping outside Honduras.

The Diez Magazine Print Edition can be gotten for L.190.00 for a whole year with home delivery. Charges may apply for International audience.

Apple Store Itunes Download for Diez.hn

You can now download the application for iPad, iPhone and iPod

Daily Ten, the first sports newspaper in Honduras.Instant news, top videos, photo galleries and entertainment. Browse, research, upgrade and feel the sport.

title="Itunes Download Diez.com" href="https://itunes.apple.com/hn/app/diario-diez-para-ipad-iphone/id581389616?mt=8" target="_blank">Download on Itunes

Google Play Store Download for Diez.hn

The Android App was recently released September 30, it provides unlimited access to news and sports information as it is on the diez.hn website.

title="Google store diez.hn download" href="https://play.google.com/store/apps/details?id=hn.diez.android&hl=es_419" target="_blank">Google Play Store App Download

href="https://harkingbade.s3.amazonaws.com/wp-content/uploads/2014/12/29000834/Diez.hn_.png">class="aligncenter size-full wp-image-1945" src="https://harkingbade.s3.amazonaws.com/wp-content/uploads/2014/12/29000834/Diez.hn_.png" alt="diez.hn" width="600" height="200" />


Saturday, December 27, 2014

Bing.com Customization Tips and Tricks.


Bing.com Customization Tips and Tricks.


Bing.com has a beautiful interface that connects with the audience unlike the Google.com interface that is quite plan. At a glance you can now view your personalized features on the Bing.com homepage. This is a reason to have Bing.com has your default web browser, aside from the reward system and quick access to both Offline Online and Outlook.com.

href="https://harkingbade.s3.amazonaws.com/wp-content/uploads/2014/12/27225810/bing-homepage.png">class="aligncenter size-large wp-image-1938" src="https://harkingbade.s3.amazonaws.com/wp-content/uploads/2014/12/27225810/bing-homepage-1024x477.png" alt="bing.com homepage" width="720" height="335" />

To personalize, sign up or login with your Microsoft Account. Once you connect, click on the setting icon on the top right corner of the page.

Select Interest on the left side bar, this has a visible star icon.

Take time to explore this page, after click on get started to start customization.

Features  of the new Bing.com personalization

  • Get updates on Bing.com and all Windows 8.1 devices
  • Update your interests at any time
  • On your desktop and tablet, updates show up on the bottom of the Bing homepage
  • You can also track interests on most Windows 8.1 devices

Disable the Bing interest feature

Under interest, select settings, turn off to switch off stop receiving updates for Bing interest.

class="titlewithpadding standardcolor">style="text-decoration: underline;">Clear Interests
class="standardtext standardcolor cortanasettings" data-tag="Interests.Settings.ResetText{TestHooksEnabled}">To clear all of your interests and stop receiving updates, go to the href="https://www.bing.com/account/personalization">personalization page. Here, you can clear interests on Bing, on your Windows Phone, and in your Bing apps.

class="standardtext standardcolor cortanasettings" data-tag="Interests.Settings.ResetText{TestHooksEnabled}">At the moment you can track nine major interests on Bing: news, weather, finance, and flights. Bing will be adding to those interests to continue making your Bing experience more personal and relevant.

Bing Interests helps you stay up to date with personal interests like news, stocks, and local weather, so you always have the latest information on the topics you care about.

id="categorypagebody">
    class="categoryinfo">class="primarylink">Daily routine. Make sure you’re on time and prepared by getting traffic and weather alerts.href="https://harkingbade.s3.amazonaws.com/wp-content/uploads/2014/12/27234118/Bing.com-Customization-Tips-and-Tricks.png">class="alignright size-medium wp-image-1940" src="https://harkingbade.s3.amazonaws.com/wp-content/uploads/2014/12/27234118/Bing.com-Customization-Tips-and-Tricks-300x300.png" alt="Bing.com interest setting" width="300" height="300" />class="categoryinfo">class="primarylink">Discover. Get restaurant, museum, and nightlife recommendations based on your location.class="categoryinfo">class="primarylink">Finance. Get up-to-date stock prices on the companies you’re following.class="categoryinfo">class="primarylink">Food. Discover the best food near you.class="categoryinfo">class="primarylink">Music. See suggestions for shows by your favorite artists.class="categoryinfo">class="primarylink">News. Add a news topic you want to follow.class="categoryinfo">class="primarylink">Sports. Stay on top of the latest scores and news about the teams you follow.class="categoryinfo">class="primarylink">Travel. Track your flight status and keep track of traffic for your upcoming travel.class="categoryinfo">class="primarylink">Weather. Get updates on weather conditions.

Add interest for Bing.com personalization

Select add interest under the interest tab after selecting get started.

You can edit your interest at anytime, if you choose to delete this can also be done. Bing interest can only be seen when you login.

Once you have login to Bing you will see your interest on the bottom stripe at the foot of the Bing.com homepage.


New Windows 8.1 Microsoft Login Option – Local or a Microsoft Account?


New Windows 8.1 Microsoft Login Option – Local or a Microsoft Account?


Microsoft Windows 8.1 is a refreshed and upgraded version of the Windows 8 that replaced the old look of the Windows 7 and below versions. This new operating system was designed based on user’s experience and from comments and outrages on various blogs and posts on the internet.

href="https://harkingbade.s3.amazonaws.com/wp-content/uploads/2014/12/27161538/microsoft-account-login.png">class="aligncenter wp-image-1933" src="https://harkingbade.s3.amazonaws.com/wp-content/uploads/2014/12/27161538/microsoft-account-login.png" alt="microsoft account login" width="598" height="336" />

The new Windows 8.1 requires you to choose between the Local Account and the Microsoft Account Login. This option is available upon launch or during configuration of the operating system. If you are also upgrading from Windows 8 to Windows 8.1 you will also be required to choose as well.

The question is which one do you choose between the Local Login and the Microsoft Account Login. We would look into the features and the benefits of the two and also see the possibility of switching if need be latter.

The Microsoft Account Login: What is it anyways?

A total collection of the Microsoft Logins of their various product is embedded into this feature, be it Skype, email services like: live.com, Hotmail.com and msn.com. And all Microsoft product which is not limited to the ones mentioned earlier, it includes Xbox, Microsoft Store, Microsoft Passport amongst others.

A complete handshake of all it services are present in the account login, the new login feature also allows the use of your existing email address to login into your account, hence the need to have a valid email account. Since the login Id will be your email address, another thing worth noting, you will have to use your default Microsoft email account password to login into the system if you use an email dependent on Microsoft.

You need to keep your password safe at all times, one compromise will lead to compromise of all.

The Local Account Login

The local account login restricts you to the old Windows 7 and below login feature, it restricts you from enjoying the most of the new windows 8.1 feature. This may be ideal to some users who prefer to be walled up or users with preference for the old Microsoft way. It allows you to navigate through your system unhindered, however it does not connect to other account features on the Metro theme or the Microsoft store.

You need a Microsoft Account Login if any of these applies to you.

Do you love apps – If you do you need Microsoft Store

To get apps on your system you need a Microsoft Login Account, get access to the store by logging using the Microsoft Account. The store allows you to download apps that allows you to access your emails on the metro tabs, allows access to Xbox games, Music Apps, Maps, Calender, One Drive, and more.

Unification of Microsoft Products.

If you have a Microsoft Phone, Xbox, email and Skype. You can have access to the same information across all the platforms. Updates done on your Microsoft Phone can be seen on all other devices, additions and deletes affects all your device. You can Skype, update your calendar, add contact list, share files or update them on your one drive accounts. Images and Videos sync also.

Another beauty is that your apps can be accessed across all the platforms on Microsoft, If you buy an app or download a free one, you can access the same app on your Xbox and Microsoft Phone, Tablets running Windows RT and 8 and Laptops with Windows 8 and above.

href="https://harkingbade.s3.amazonaws.com/wp-content/uploads/2014/12/27161659/microsoft-login.png">class="aligncenter wp-image-1934" src="https://harkingbade.s3.amazonaws.com/wp-content/uploads/2014/12/27161659/microsoft-login.png" alt="Microsoft login" width="707" height="442" />

Auto Transfer of your configuration settings

This feature is thrilling indeed, you do not need to configure a system to your taste when you are logging in on another Microsoft Windows 8.1 system. You settings is automatically transferred with your Microsoft Login ID. This particular feature helps you configure new system purchase, re-formats, or system transfer. The must authorize the syncing before this happens, by trusting the PC when you get the message prompt.

You have to weigh the choice of the two before you pick your preference, the Microsoft Account may be used, but the features may not be fully utilized. While the local account may be ideal for concentration, or privacy the reason differs based on user preference.

If you are still caught in the web of deciding between the two, I will suggest you try the local account first. You can update it latter in the PC settings.

Microsoft Sign in Options

You have four sign in options in Microsoft Windows 8.1, to access them swipe to the right corner of your screen and select settings.

Click advanced settings, then accounts.

Choose account settings to choose from the four listed.

  • Picture Password – Choose a favorite picture, make a gesture drawing on it to secure. This might be difficult though.
  • Password -Enter your system password or change it here.
  • PIN – Enter a four digit Pin to secure your system
  • Password Policy – This allows you to wake you PC without or with a Password

Microsoft Windows 8.1 is packed the Microsoft Account Login allows you to unlock so many features.


How to fix System Restore Error 0x81000203 : Easy Fix


How to fix System Restore Error 0x81000203 : Easy Fix


System restore is an essential part of windows operating system that helps you to recover your system incase of system failure or system malfunctioning and recently while trying to restore my Windows 8.1 laptop to earlier date I faced a very strange error that was continuously preventing me to restore my system which was quite annoying to face.


The error says “There was an unexpected error in the properties page: System Restore encountered an error. Please try to run System Restore again. (0x81000203) Please close the property page and try again” each time while trying to configure system restore settings.


Systrem Restore encountered an error (0x81000203)


 Moreover while trying to Open the system restore the system was showing no previous restore points to restore the system to earlier date which was really shocking to see because I usually keep creating restore points often to be on the safer side but this was horrible. The more frustrating part was that there was no proper fix available over the internet in a detailed step instructions and also most of the fixes were like registry editing, removal of third party software’s like Antiviruses, Tuneup utilities etc and to be frankly speaking none of these work. After an hour of rigorous search I finally fixed the system restore error 0x81000203 and therefore here I am going to share detailed step by step instructions on how to fix system restore error 0x81000203.


How to fix System Restore Error 0x81000203 : Steps to Follow


As mentioned above you will find lots of fixes over the internet like registry editing, removal of third party software’s like Antiviruses, Tuneup utilities etc but none of these work so just avoid these fixes and follow the below given simple fix that will surely fix your issue as it did in my case.


  • Press Windows + R button to Open RUN Command box and here type services.msc as shown below and Hit Enter.


Services msc-compressed


  • Here look for VOLUME SHADOW COPY and make sure that it is ENABLED and its startup type is set to AUTOMATIC as shown below.


How to fix System Restore Error 0x81000203 - Volume Shadow Copy


Note – To Change the startup type to AUTOMATIC Right click on VOLUME SHADOW COPY and select PROPERTIES and here you can change the startup type as shown below.


How to fix System Restore Error 0x81000203 - Volume Shadow Copy 2


  • Repeat the same for MICROSOFT SOFTWARE SHADOW COPY PROVIDER where you need to and make sure that it is ENABLED and its starup type is set to AUTOMATIC


  • That’s all you need to follow and this will surely fix your error.


Related Searches :


  • System restore error 0x81000203 fix


The post How to fix System Restore Error 0x81000203 : Easy Fix appeared first on RushInformation.


How to Create a Microsoft Login Button using PHP – With Integration tip


How to Create a Microsoft Login Button using PHP – With Integration tip


You can login with major websites like Microsoft, Google, Facebook and Twitter into some websites using a protocol called “OAuth” it is an authentication app that controls access to a website using well known and trusted sites to make login faster and secure. It a subtle form of collaboration and partnership between the participating websites.

What is OAuth?

class="_Tgc">OAuth is an open standard to authorization.title="OAuth" href="http://en.wikipedia.org/wiki/OAuth" target="_blank"> OAuth provides client applications a ‘secure delegated access’ to server resources on behalf of a resource owner. It specifies a process for resource owners to authorize third-party access to their server resources without sharing their credentials.

OAuth Types

After OAuth 1.0 the OAuth 2.0 is the next evolution of the OAuth protocol and is not backwards compatible with OAuth 1.0. OAuth 2.0 focuses on client developer simplicity while providing specific authorization flows for web applications, desktop applications, mobile phones, and living room devices. The specification and associated RFCs are developed by the IETF OAuth WG; the main framework was published in October 2012. (It was expected to be finalized by the end of 2010, according to Eran Hammer. However, due to discordant views about the evolution of OAuth, Hammer left the working group.

href="https://harkingbade.s3.amazonaws.com/wp-content/uploads/2014/12/27091242/microsoft-account-login-button.png">class="aligncenter size-full wp-image-1929" src="https://harkingbade.s3.amazonaws.com/wp-content/uploads/2014/12/27091242/microsoft-account-login-button.png" alt="microsoft login button" width="640" height="396" />

What is Microsoft Log-In?

Microsoft Log-in means asking user to grant access to his/her Microsoft live information like email id, username etc. Once your website has been granted access and has all these information about the user it can allow the users to access protected pages on your website.

Setting up Directory and Files

Before we get started you need to create a PHP file named redirect.php. Place this file anywhere in your webspace.

Creating a Microsoft App

If your website is allowing login using Microsoft then your website is considered as an Microsoft app. So you have your website ready now its time to register you website as a Microsoft app. Follow this steps to create a Microsoft app:

  1. Visit href="https://account.live.com/developers/applications" target="_blank" rel="nofollow external">Microsoft apps page.
  2. Now create a Microsoft app
  3. Select API Settings and for redirect URL pass URL pointing to the redirect.php file.
  4. You can find the Client ID and Client Secret under App Settings

Creating Login with Microsoft Button

When user clicks on Login button you need to run this code to redirect user to Microsoft Live website so that user can grant permission to your app to access their information
id="highlighter_890494" class="syntaxhighlighter ">class="lines">class="number">1class="content">class="variable">$client_id class="plain">= class="string">""class="plain">;
class="number">2class="content">class="variable">$redirect_uri class="plain">= class="string">""class="plain">;
class="number">3class="content">class="variable">$scopes class="plain">= class="string">"wl.basic,wl.offline_access,wl.signin,wl.emails"class="plain">;
class="number">4class="content">
class="number">5class="content">class="plain">header(class="string">"Location: " class="plain">. class="string">"href="https://login.live.com/oauth20_authorize.srf?client_id=">https://login.live.com/oauth20_authorize.srf?client_id=" class="plain">. class="variable">$client_id class="plain">. class="string">"&scope=" class="plain">. class="variable">$scopes class="plain">. class="string">"&response_type=token&redirect_uri=" class="plain">. class="variable">$redirect_uriclass="plain">);

Scopes represent the list of permissions for the app. You need to pass a comma separated list of permissions. href="http://msdn.microsoft.com/en-us/library/hh243646.aspx" target="_blank" rel="nofollow external">List of all scopes.

Populate the $client_id and $redirect_uri variables.

Once user has given access to the app, Microsoft will redirect user back to the redirect URI. Now you need to retrieve an access token which acts like a permission to get user information.

In the redirect.php file you can retrieve access token by running this code
class="lines">class="line alt1">class="number">01class="content">class="plain"><?php
class="line alt2">class="number">02class="content">
class="line alt1">class="number">03class="content">class="spaces">  class="variable">$client_id class="plain">= class="string">""class="plain">;
class="line alt2">class="number">04class="content">class="spaces">  class="variable">$client_secret class="plain">= class="string">""class="plain">;
class="line alt1">class="number">05class="content">class="spaces">  class="variable">$redirect_uri class="plain">= class="string">""class="plain">;
class="line alt2">class="number">06class="content">
class="line alt1">class="number">07class="content">class="spaces">  class="comments">//$_GET["code"] is the authorization code
class="line alt2">class="number">08class="content">class="spaces">  class="keyword">ifclass="plain">(isset(class="variable">$_GETclass="plain">[class="string">"code"class="plain">]))
class="line alt1">class="number">09class="content">class="spaces">  class="plain">{
class="line alt2">class="number">10class="content">class="spaces">    class="comments">//user granted permission
class="line alt1">class="number">11class="content">
class="line alt2">class="number">12class="content">class="spaces">    class="comments">//get access token using the authorization code
class="line alt1">class="number">13class="content">
class="line alt2">class="number">14class="content">class="spaces">    class="variable">$url class="plain">= class="string">"href="https://login.live.com/oauth20_token.srf">https://login.live.com/oauth20_token.srf"class="plain">;
class="line alt1">class="number">15class="content">class="spaces">        class="variable">$fields class="plain">= class="keyword">arrayclass="plain">(class="string">"client_id" class="plain">=> class="variable">$client_idclass="plain">, class="string">"redirect_uri" class="plain">=> class="variable">$redirect_uriclass="plain">, class="string">"client_secret" class="plain">=> class="variable">$client_secretclass="plain">, class="string">"code" class="plain">=> class="variable">$_GETclass="plain">[class="string">"code"class="plain">], class="string">"grant_type" class="plain">=> class="string">"authorization_code"class="plain">);
class="line alt2">class="number">16class="content">
class="line alt1">class="number">17class="content">class="spaces">        class="keyword">foreachclass="plain">(class="variable">$fields class="keyword">as class="variable">$keyclass="plain">=>class="variable">$valueclass="plain">) { class="variable">$fields_string class="plain">.= class="variable">$keyclass="plain">.class="string">"="class="plain">.class="variable">$valueclass="plain">.class="string">"&"class="plain">; }
class="line alt2">class="number">18class="content">class="spaces">        class="plain">rtrim(class="variable">$fields_stringclass="plain">, class="string">"&"class="plain">);
class="line alt1">class="number">19class="content">
class="line alt2">class="number">20class="content">class="spaces">        class="variable">$ch class="plain">= curl_init();
class="line alt1">class="number">21class="content">
class="line alt2">class="number">22class="content">class="spaces">        class="plain">curl_setopt(class="variable">$chclass="plain">,CURLOPT_URL, class="variable">$urlclass="plain">);
class="line alt1">class="number">23class="content">class="spaces">        class="plain">curl_setopt(class="variable">$chclass="plain">,CURLOPT_HTTPHEADER, class="keyword">arrayclass="plain">(class="string">"Content-Type: application/x-www-form-urlencoded"class="plain">));
class="line alt2">class="number">24class="content">class="spaces">        class="plain">curl_setopt(class="variable">$chclass="plain">,CURLOPT_POST, class="functions">countclass="plain">(class="variable">$fieldsclass="plain">));
class="line alt1">class="number">25class="content">class="spaces">        class="plain">curl_setopt(class="variable">$chclass="plain">,CURLOPT_POSTFIELDS, class="variable">$fields_stringclass="plain">);
class="line alt2">class="number">26class="content">class="spaces">        class="plain">curl_setopt(class="variable">$chclass="plain">,CURLOPT_RETURNTRANSFER,1);
class="line alt1">class="number">27class="content">
class="line alt2">class="number">28class="content">class="spaces">        class="variable">$result class="plain">= curl_exec(class="variable">$chclass="plain">);
class="line alt1">class="number">29class="content">class="spaces">        class="variable">$result class="plain">= json_decode(class="variable">$resultclass="plain">);
class="line alt2">class="number">30class="content">
class="line alt1">class="number">31class="content">class="spaces">        class="plain">curl_close(class="variable">$chclass="plain">);
class="line alt2">class="number">32class="content">
class="line alt1">class="number">33class="content">class="spaces">    class="comments">//this is the refresh token used to access Microsoft Live REST APIs
class="line alt2">class="number">34class="content">class="spaces">        class="variable">$access_token class="plain">= class="variable">$resultclass="plain">->access_token;
class="line alt1">class="number">35class="content">class="spaces">        class="variable">$refresh_token class="plain">= class="variable">$resultclass="plain">->refresh_token;
class="line alt2">class="number">36class="content">class="spaces">  class="plain">}
class="line alt1">class="number">37class="content">class="spaces">  class="keyword">else
class="line alt2">class="number">38class="content">class="spaces">  class="plain">{
class="line alt1">class="number">39class="content">class="spaces">    class="functions">echo class="string">"An error occured"class="plain">;
class="line alt2">class="number">40class="content">class="spaces">  class="plain">}
class="line alt1">class="number">41class="content">
class="line alt2">class="number">42class="content">class="plain">?>
Populate variable $client_id,$client_secret and $redirect_uri.

Finally we got $access_token and $refresh_token. $access_token usually expires in 1 hour therefore $refresh_token is used to get a new access token after every 1 hour.

If access token is expired then you are likely to get an error in HTTP response content while making requests to REST APIs.

You can retrieve new access token using this function
id="highlighter_818389" class="syntaxhighlighter ">class="lines">class="number">01class="content">class="keyword">function class="plain">new_access_token(class="variable">$refresh_tokenclass="plain">)
class="number">02class="content">class="plain">{
class="number">03class="content">class="spaces">    class="variable">$url class="plain">= class="string">"href="https://login.live.com/oauth20_token.srf">https://login.live.com/oauth20_token.srf"class="plain">;
class="number">04class="content">class="spaces">    class="variable">$fields class="plain">= class="keyword">arrayclass="plain">(class="string">"client_id" class="plain">=> class="variable">$client_idclass="plain">, class="string">"redirect_uri" class="plain">=> class="variable">$redirect_uriclass="plain">, class="string">"client_secret" class="plain">=> class="variable">$client_secretclass="plain">, class="string">"grant_type" class="plain">=> class="string">"refresh_token"class="plain">, class="string">"refresh_token" class="plain">=> class="variable">$refresh_tokenclass="plain">);
class="number">05class="content">
class="number">06class="content">class="spaces">    class="keyword">foreachclass="plain">(class="variable">$fields class="keyword">as class="variable">$keyclass="plain">=>class="variable">$valueclass="plain">) { class="variable">$fields_string class="plain">.= class="variable">$keyclass="plain">.class="string">"="class="plain">.class="variable">$valueclass="plain">.class="string">"&"class="plain">; }
class="number">07class="content">class="spaces">    class="plain">rtrim(class="variable">$fields_stringclass="plain">, class="string">"&"class="plain">);
class="number">08class="content">
class="number">09class="content">class="spaces">    class="variable">$ch class="plain">= curl_init();
class="number">10class="content">
class="number">11class="content">class="spaces">    class="plain">curl_setopt(class="variable">$chclass="plain">,CURLOPT_URL, class="variable">$urlclass="plain">);
class="number">12class="content">class="spaces">    class="plain">curl_setopt(class="variable">$chclass="plain">,CURLOPT_HTTPHEADER, class="keyword">arrayclass="plain">(class="string">"Content-Type: application/x-www-form-urlencoded"class="plain">));
class="number">13class="content">class="spaces">    class="plain">curl_setopt(class="variable">$chclass="plain">,CURLOPT_POST, class="functions">countclass="plain">(class="variable">$fieldsclass="plain">));
class="number">14class="content">class="spaces">    class="plain">curl_setopt(class="variable">$chclass="plain">,CURLOPT_POSTFIELDS, class="variable">$fields_stringclass="plain">);
class="number">15class="content">class="spaces">    class="plain">curl_setopt(class="variable">$chclass="plain">,CURLOPT_RETURNTRANSFER,1);
class="number">16class="content">
class="number">17class="content">class="spaces">    class="variable">$result class="plain">= curl_exec(class="variable">$chclass="plain">);
class="number">18class="content">class="spaces">    class="variable">$result class="plain">= json_decode(class="variable">$resultclass="plain">);
class="number">19class="content">
class="number">20class="content">class="spaces">    class="plain">curl_close(class="variable">$chclass="plain">);
class="number">21class="content">
class="number">22class="content">class="spaces">    class="variable">$access_token class="plain">= class="variable">$resultclass="plain">->access_token;
class="number">23class="content">
class="number">24class="content">class="spaces">    class="keyword">return class="variable">$access_tokenclass="plain">;
class="number">25class="content">class="plain">}

Making calls to REST API

You can find list of all REST APIs at href="http://msdn.microsoft.com/en-us/library/hh243648.aspx" target="_blank" rel="nofollow external">Microsoft REST API reference. All the requests to these APIs must be made using the access token.

To retrieve user profile information you need to make a GET request of such kind
id="highlighter_962250" class="syntaxhighlighter ">class="lines">class="number">1class="content">class="functions">echo class="functions">file_get_contentsclass="plain">(class="string">"href="https://apis.live.net/v5.0/me?access_token=">https://apis.live.net/v5.0/me?access_token=" class="plain">. class="variable">$access_tokenclass="plain">);

Integrating Microsoft Login in WordPress

WordPress is made on PHP therefore all code will be same for authorizing user and getting profile information. To create a redirect URL in WordPress use href="http://qnimate.com/integrating-ajax-in-wordpress/" target="_blank" rel="nofollow external">WordPress AJAX API.

This guide was first published in script-tutorials dot com.


Friday, December 26, 2014

Windows 8 Safe Mode – How to Boot Windows 7 / 8 / and 8.1 into Safe Mode


Windows 8 Safe Mode – How to Boot Windows 7 / 8 / and 8.1 into Safe Mode


Even pros sometimes find it challenging to boot windows 8 into safe mode, this does include other versions like the windows 7 and windows 8.1. During the development of windows 8 one of the goals of the developers is to have a system that boots very fast, by circumventing some procedures. Windows was able to achieve this feat, however the usual command F8 for booting to safe mode by the former versions does not really respond though you can make it happen.

What is Safe Mode

Safe Mode is a diagnostic mode that allows you to use Windows with basic drivers. If you are having errors or software problems in Windows 8, restarting in Safe Mode can allow you to continue working and troubleshoot the problem. When in Safe Mode, no extra software is loaded, so troubleshooting software and driver problems is much easier.

-HP

style="text-decoration: underline;">Windows 8 safe mode now resides inside the core of the operating system; the recovery option. There are few methods to achieve this. The easiest are the following.

  1. Using the recovery option to achieve this, manually access the recovery options by pressing the Shift+F8class="Apple-converted-space"> key together./>
  2. You can also restart you system holding the shift key down, when booting commences press the F8 key, this works well on slow systems.

Let get down to business, the windows 8 safe mode boot option you choose will depend on the nature and severity of the challenge you are facing. We would highlight some of the methods here.

Windows 8 and 8.1 Safe Mode Boot – Method One

To begin, swipe you mouse to the right upper corner of your screen.

  • Select settings, the Last choice below reads change PC settings, select.
  • Click “General” -> Select “Advanced startup” -> Click “Restart now”

Once restart concludes you will see a new user interface.

  • Click on troubleshoot, usually the second option.
  • After this click “Advanced Options”
  • Click start up settings, then click restart.
  • A dialog box will pop up with the following information.
  • For safe mode choose between the option 4 – 6

The appropriate choice will open windows 8 and 8.1 in safe mode.

Understanding Safe Mode Option 4, 5 and 6

The options can also be achieved by pressing F4, F5 and F6

  • Meaning of Enable Safe Modeclass="Apple-converted-space"> - This is your “standard” Safe Mode option and should probably be your first try.
  • Meaning of Enable Safe Mode with Networkingclass="Apple-converted-space"> - This option is identical toclass="Apple-converted-space"> Enable Safe Modeclass="Apple-converted-space"> but the few extra processes necessary to access your network and the Internet are also loaded.
  • Meaning for Enable Safe Mode with Command Promptclass="Apple-converted-space"> - This option is also identical to Enable Safe Modeclass="Apple-converted-space"> but instead of the standard Explorer interface,class="Apple-converted-space"> Command Promptclass="Apple-converted-space"> is loaded instead.

href="https://harkingbade.s3.amazonaws.com/wp-content/uploads/2014/12/26231945/windows-8-safe-mode-boot.png">class=" size-full wp-image-1922 aligncenter" src="https://harkingbade.s3.amazonaws.com/wp-content/uploads/2014/12/26231945/windows-8-safe-mode-boot.png" alt="windows 8 safe mode boot" width="650" height="347" />

Windows 8 and 8.1 Safe Mode Boot – Method Two

If you can run windows normally, you can use the msconfig utility.

In the search bar, type cmd and press enter, after type in msconfig. This will bring up the msconfig tab, or press Win+R to get the Run dialog. Type msconfig, then press enter.

In the Boot tab, checkclass="Apple-converted-space"> Safe boot, followed by the type of Safe Mode that you want to achieve. Hit Apply. Restart again to enter safe mode.

Other Methods to boot to safe mode include:

Boot from a System Recovery CD/DVD

Boot from a System Recovery Memory Stick

class="unordered">class="listItem">class="para">If you have installation media forclass="Apple-converted-space"> class="phrase">Windows 8.1, start (or boot) your computer from the installation media. Insert the DVD or USB flash drive and restart your computer. If you see a message asking you to “Press any key to boot from DVD,” do so. If you don’t see the message, you might need to change the boot order in your computer’s BIOS settings so that it first starts from the DVD or USB. When you see theclass="Apple-converted-space"> class="ui">Install Windowsclass="Apple-converted-space"> page, tap or clickclass="Apple-converted-space"> class="ui">Repair your computerclass="Apple-converted-space"> to start the Windows Recovery Environment.

class="listItem">class="para">If you don’t have installation media, use the power button to restart your computer three times. This will start the Windows Recovery Environment.


Snipping Tool for Capturing Screen Shots in Windows Vista/7/8/8.1 – Download and Use


Snipping Tool for Capturing Screen Shots in Windows Vista/7/8/8.1 – Download and Use


Snipping Tool

href="https://harkingbade.s3.amazonaws.com/wp-content/uploads/2014/12/26134155/snipping-tool.png">class="alignright size-full wp-image-1915" src="https://harkingbade.s3.amazonaws.com/wp-content/uploads/2014/12/26134155/snipping-tool.png" alt="snipping tool" width="345" height="612" />

Snipping Tool captures a screen shot of anything on your desktop, like a picture or a section of webpage. Snip a whole window, a rectangular section of the screen, or draw a freehand outline with your mouse or tablet pen (or your finger, if you’re using a PC with a touchscreen). Then you can annotate, save, or e-mail the image using buttons right in the Snipping Tool window. Snipping Tool is available only in the Home Premium, Professional, Ultimate, and Enterprise editions of Windows 7.

– Microsoft

The snipping tool is an essential tool designed to help you capture a copy of the content o

f your screen, there are some websites that prevent copy and save as the screen capture will help you keep a record or copy of the content.

Finding the Snipping Tool on your computer.

  • The snipping tool can be found easily be doing a search on your system, for windows vista and windows 7.
  • Click on start, type in the search box the term “snipping tool”, then press enter.
  • On windows 8 and above, swipe to the right edge of your screen and search for snipping tool press enter to view.

To add snipping tool to your task bar

If you right click the icon it will open a menu on the bottom portion of the screen.

  1. To pin the application to your tile menu click “Pin to Start.”
  2. To pin the application to your task bar on your desktop click “Pin to Taskbar.”
class="section sectionNormal">

To open Snipping Tool

class="">class="procedure">class="">
    class="step">class="para">class="phrase">Open Snipping Tool by swiping in from the right edge of the screen, tappingclass="Apple-converted-space"> class="ui">Searchclass="Apple-converted-space"> (or if you’re using a mouse, pointing to the lower-right corner of the screen, moving the mouse pointer up, and then clickingclass="Apple-converted-space"> class="ui">Search), enteringclass="Apple-converted-space"> class="userInput">Snipping Toolclass="Apple-converted-space"> in the search box, and then tapping or clickingclass="Apple-converted-space"> class="ui">Snipping Tool.

Snipping tool Windows 8 or Windows 8.1

The snipping tool in windows 8 and windows 8.1 is quite similar to that of the windows 7, however locating it might require you doing a simple search on your windows device.

Snipping tool shortcut Windows 8.1

Previously known shortcut for snipping tool on windows 8 does not work on windows 8.1.

For windows 8 the short cut is ctr+alt+s

For windows 8.1 its is shift+win key +s

First time users should wait a bit and launch the app. Use the alt+tab key to check for open tabs.

You can capture the following types of snips:

class="unordered">class="listItem">class="para">class="leadInPhrase_other">Free-form Snip.  Draw any shape around an object with your finger, mouse, or tablet pen.

class="listItem">class="para">class="leadInPhrase_other">Rectangular Snip. Drag the cursor around an object to form a rectangle.

class="listItem">class="para">class="leadInPhrase_other">Window Snip.  Choose a window—like a browser window or a dialog box.

class="listItem">class="para">class="leadInPhrase_other">Full-screen Snip.  Capture the entire screen.

class="section sectionNormal">

Capture a snip

class="">class="para">In Snipping Tool, tap or click the arrow next to theclass="Apple-converted-space"> class="ui">Newclass="Apple-converted-space"> button, choose the kind of snip you want, and then pick the area of your screen that you want to capture. The snip is automatically copied to the Snipping Tool window.

class="section sectionNormal">

Capture a snip of a menu

class="">class="procedure">class="">class="ordered_dec">class="step">class="para">After you open Snipping Tool, open the menu that you want a picture of.

class="step">class="para">Press Ctrl+PrtScn.

class="step">class="para">Tap or click the arrow next to theclass="Apple-converted-space"> class="ui">Newclass="Apple-converted-space"> button, choose the kind of snip you want, and then pick the area of the screen that you want to capture.

class="section sectionNormal">

Save a snip

class="">class="procedure">class="">class="ordered_dec">class="step">class="para">After you capture a snip, tap or click theclass="Apple-converted-space"> class="ui">Save Snipclass="Apple-converted-space"> button.

class="step">class="para">In theclass="Apple-converted-space"> class="ui">Save Asclass="Apple-converted-space"> dialog box, enter a file name, location, and file type, and then tap or clickclass="Apple-converted-space"> class="ui">Save.

Keyboard Shortcuts

Within any program or window you can use the following keyboard shortcut to save a screen capture of your entire screen

  1. Click and hold the following combinations of keys (Win +PrntScrn) until you see your screen flash, like taking a picture.
    1. Note: the “Fn” key may be needed to invoke the “Prnt Scrn” key on some keyboards.
    2. Note: the Windows key might not say “Win” but rather may be the logo of the Microsoft flag
class="section sectionNormal">

Remove the URL

class="">class="para">When you capture a snip from a browser window and save it as an HTML file, the URL appears below the snip. To prevent the URL from showing up:

class="procedure">class="">class="ordered_dec">class="step">class="para">Tap or clickclass="Apple-converted-space"> class="ui">Tools, and then tap or clickclass="Apple-converted-space"> class="ui">Options.

class="step">class="para">In theclass="Apple-converted-space"> class="ui">Snipping Tools Optionsclass="Apple-converted-space"> dialog box, clear theclass="Apple-converted-space"> class="ui">Include URL below snips (HTML only)class="Apple-converted-space"> check box, and then tap or clickclass="Apple-converted-space"> class="ui">OK.

class="section sectionNormal lastElement">

Share a snip

class="">class="para lastElement">After you capture a snip, tap or click the arrow next to theclass="Apple-converted-space"> class="ui">Send Snipclass="Apple-converted-space"> button, and then choose whether you’d like to send the snip in the body of your email or as an attachment.

class="para lastElement">Download snipping tool

class="para lastElement">The snipping comes to most versions of windows vista, 7, 8 and 8.1 by default. Follow the instruction on how to find the snipping tool above.


Tuesday, December 23, 2014

How to Change Name in Truecaller database : Edit Name


How to Change Name in Truecaller database : Edit Name


Truecaller is a Global Mobile Phone number lookup app developed by Scandinavia AB that is currently world’s largest collaborative phone directory that includes database of more than 950+ million mobile phone users worldwide which lets you search or track any mobile phone number and its contact details,name,location etc directly from within Truecaller.You can get all the caller details flashed immediately on your mobile screen before you receive call from new unknown number which is one of the best and very useful feature to have on your Smartphone.


True Caller keeps adding and updating new numbers from different countries in its phone directory automatically which ensures that you don’t need to manually update it or do something else. With Truecaller App your Phonebook or contacts stay alive and updated 24/7 by adding your friend’s latest Facebook or linked in pictures to your Smartphone. Truecaller as an app is available for all the major platforms which includes popular Google Android, Apple iOS, Blackberry, Windows phone etc. Generally Truecaller tries to get the user details from phone contacts, social networking sites etc and that’s the reason most of the numbers displayed on Truecaller database bears different user details therefore if incase your contact details or personal details are displayed wrong then you can manually change or provide correct details via Truecaller Name suggestion facility. Therefore if you wish to change your name in truecaller database then just follow the below given steps. Read below on how to change name in truecaller database.


How to Change Name in Truecaller database : Steps to Follow


In order to change your name or edit your name from truecaller phone directory you need to go through a series of steps as mentioned below so just follow them carefully and soon your new name will be updated in truecaller directory.


  • Here in the Name Suggestion form Just put your Phone number details with your country code i.e if you are from India type +91xxxxxxx


How to change name in truecaller


  • Fill in the rest of the details like your First Name, Last Name that you want truecaller to show when someone searches for your number.


  • That’s it enter the verification code and Click on Send button. Wait for about 1 week for the review process and after this your new name will be reflected in true caller database.


The post How to Change Name in Truecaller database : Edit Name appeared first on RushInformation.


Friday, December 19, 2014

Samsung PC Studio Not Working in Windows 8/8.1 : FIXED


Samsung PC Studio Not Working in Windows 8/8.1 : FIXED


Samsung PC Studio is basically a type of PC Suite for the devices having samsung proprietary OS installed on them which lets you synchronize your Samsung mobile phone with your PC and manage multimedia files, messages and more at ease. With the help of Samsung PC Studio you can take a backup of your important and even allows you to send and create text messages.  It supports synchronization with most email clients out there, including Microsoft Outlook, Outlook Express, Lotus Notes and Lotus Organizer, so it allows you to easily transfer your contacts between mobile phone and computer. You can also install java or symbian apps on your samsung device with the help of Samsung pc studio. The only thing that lacks in Samsung PC Studio is the poor user interface but that’s ok not a big deal.Overall Samsung PC Studio is a great app and a must have application for all the Samsung GSM Mobile phone owners as without this you can’t take full advantage of your samsung gsm handset. But some users are facing incompatibility issues while running Samsung PC Studio on their Windows 8 or Windos 8.1 systems like not responding or frequent crashes etc therefore here below for those users I have provided a working fix for Samsung PC Studio not working in Windows 8, Windows 8.1


How to Fix Samsung PC Studio Not Working in Windows 8/8.1 : Steps to Follow


The procedure for fixing samsung pc studio not working in Windows 8 or 8.1 is quite simple and easy which just requires a series of steps to be followed and here below are those steps. What you need to do here is to take ownership of Windows files and folders and then making specific changes in windows so as to fix samsung pc studio crashing.


Note – The file is in .zip format so to open this you need to have 7zip or Winrar installed on your system to extract the contents of the .zip file


  • Open the zip file and Click on “Install Take Ownership” as shown below.


Samsung PC Studio Not Working - 1


  • Now you will see a successful message as shown below in the image.


Samsung PC Studio Not Working - 2


  • Now Go to the directory  C:\Windows\SysWOW64\Macromed


  • Here you will a find a folder with FLASH name and just select that folder and do a right click on that folder and select Take Ownership as shown below.


Samsung PC Studio Not Working -


  • After downloading the file RENAME the file to Flash.ocx


  • Now open the Flash folder and replace the file Flash.ocx with the above file.


Note – Please keep a backup of the Flash folder before replacing the file to be on the safer side incase of some malfunctioning.


  • That’s it close all your windows and now try to run Samsung PC Studio once again and this time hopefully you no longer have to face the same error.


The post Samsung PC Studio Not Working in Windows 8/8.1 : FIXED appeared first on RushInformation.